Elements of the interface
On startup, the main window of the program is displayed. It includes the title bar on the top, the main menu and the main toolbar under it, the storages navigation pane on the left side of the interface and the storage properties pane positioned to the right. The buttons area is found at the bottom of the window and is activated only when a certain storage is selected.
Below you can find a general overview of the interface elements applicable to the Standard, RAID, and Network RAID editions of UFS Explorer. The options and tools that are specific for a certain edition will be indicated using special markings (*Only Standard Recovery, *Only RAID Recovery, *Only Network RAID).
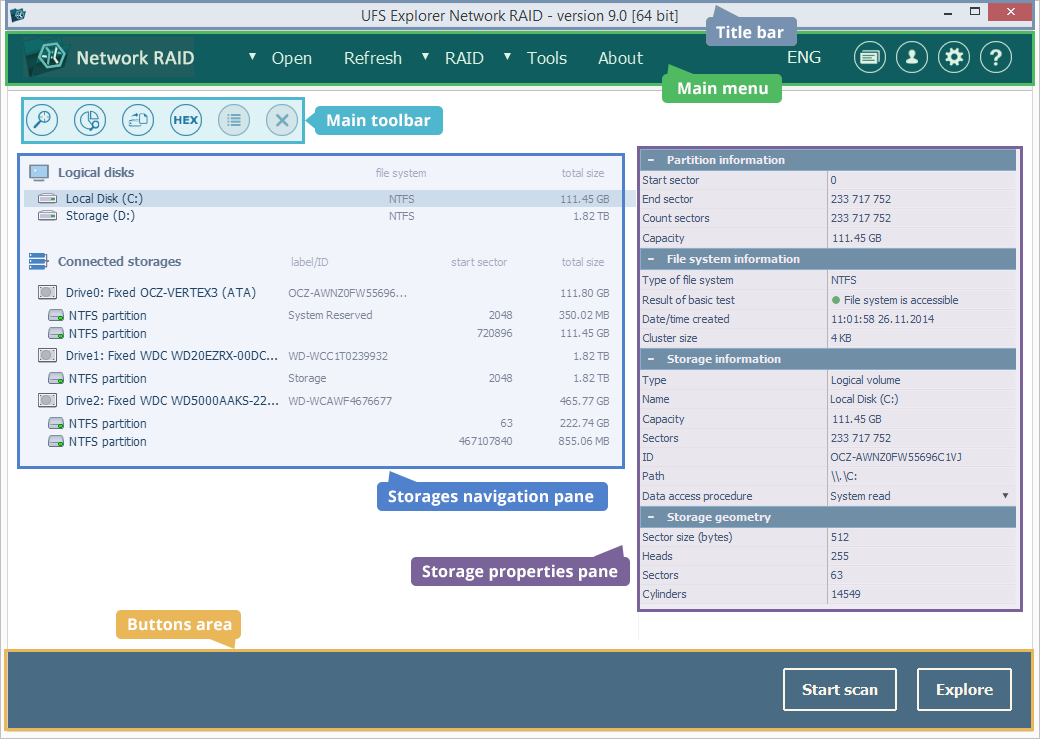
Title bar

The top part of the software window includes the name of the employed edition of UFS Explorer (Standard, RAID, Network RAID), the current version of the program and the control buttons (minimize, restore/maximize, close).
Main menu
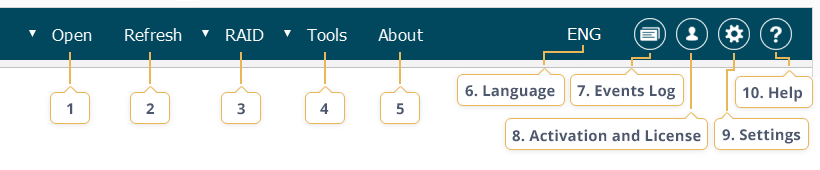
The main menu provides access to the majority of core functions. It contains dialogs for opening different digital media in the program presented in the "Open" item (1), the "Refresh" option (2) for updating the content of the storages navigation pane, the mechanisms for work with complex storages available in the "RAID" item (3), various additional instruments launched via the "Tools" item (4) and the "About" option (5) providing basic information regarding the software. Using this menu, you can also select the preferred language of the interface (6), track the major events in the software (7), enter the dialog for the software activation and license (8), change the general program’s settings (9) and open the "Help" pane (10) to obtain guidance.
-
Open
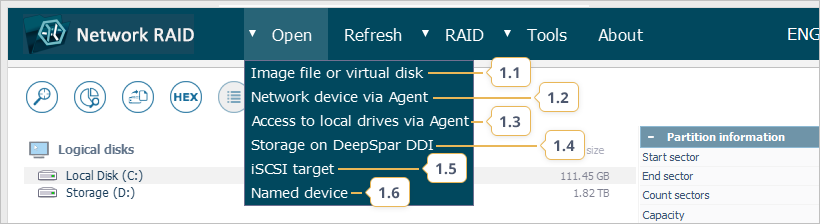
The "Open" item allows choosing a data source for processing in the software (a storage device, disk image/virtual disk file, etc.). Please note that for access to local storages, the software has to be run with elevated privileges.
The "Open" item may contain the following subitems:
-
Image file or virtual disk
This subitem allows opening a supported disk image or virtual disk file for further operations. The supported formats include *.IMG and other RAW disk images, *.DSK, *.DMG, *.VDI, *.VMDK, *VHD/*.VHDX, *.QCOW/*.QCOW2, *.RDR, *.SDLSP. In addition, it can be used to load a previously created and saved RAID configuration or a Runtime Software Virtual Image file (a *.vim-file), provided that these options are supported by the employed software edition.
-
Network device via Agent *Only Network RAID
The subitem enables UFS Explorer Network RAID running on the host computer to open and process the storages connected to a remote PC, provided that access to that PC has been activated via the Network Agent). More information about the Network Agent component is available in the respective section.
-
Access to local drives via Agent *Only Network RAID
This subitem can be used to open the "Network Agent" window in UFS Explorer Network RAID launched on the remote computer and make this computer available to the program over LAN for further manipulations with the drives attached to it. For more information, please go to the Network Agent section.
-
Storage on DeepSpar DDI *Only Network RAID
This function serves for virtual mounting of drives connected to a DeepSpar Disk Imager device in the interface of UFS Explorer Network RAID for subsequent operations. The procedure also allows defining the timeout and the minimal size of the block for reading. When mounted, the DDI drive will appear in the storages navigation pane.
-
iSCSI Target *Only Network RAID
This option makes it possible to connect to a functioning iSCSI server on your network by entering its IP address and port. After that, the required target device can be selected and mounted in UFS Explorer Network RAID in the "read only" mode.
-
Named device
This subitem makes it possible to open a physical storage device attached to the local computer. The option also allows specifying the advanced parameters for access to the storage, including the reading mode (default system procedure, direct ATA/SCSI), I/O timeout (when applicable) and the type of device usage (data access, disk imaging). For more details, please refer to the Open storage device dialog section.
-
-
Refresh
This item updates the information about the connected storages. The tree of storages in the navigation pane gets reset and will include all detected storages, even the ones that have been previously closed, except for closed disk images and manually assembled complex storages.
-
RAID*Only RAID Recovery, Network RAID

The "RAID" item provides access to the RAID-related functionality available in the software:
-
Build RAID*Only RAID Recovery, Network RAID
This subitem is used to launch the RAID Builder toolkit for the manual definition of a new RAID unit or other type of supported complex/composite volumes from a set of separate constituents (physical drives, virtual disks, disk images, other RAID units, etc.). This component makes it possible to assemble an array in a virtual mode for subsequent access to its content or data recovery. In case of success, the RAID storage will be added to in the storages navigation pane and presented for further operations. More detailed information related to RAID Builder is provided in the corresponding section.
-
Drobo BeyondRAID Assistant*Only RAID Recovery, Network RAID
Drobo BeyondRAID Assistant is a special mechanism capable of searching for lost BeyondRAID configurations on the drives taken out from Drobo. The virtually reconstructed Drobo volumes can be mounted in the storages navigation pane for subsequent manipulations. Further details related to this component are provided in the Drobo Beyond RAID Assistant section.
-
-
Tools

The "Tools" menu offers access to the additional instruments featured by the program. This item may include the following options:
-
S.M.A.R.T. monitoring
This function makes it possible to see the detailed S.M.A.R.T. data of the attached hard drives and solid-state devices. Using this information, one can determine the state of the digital medium and estimate chances for its physical failure. Further details regarding the component can be found in the S.M.A.R.T. Monitor section.
-
iSCSI Target Server*Only Network RAID
The function makes it possible to see the list of drives/volumes set up as iSCSI Targets, connect to them from a remote computer via the network or disconnect active iSCSI Targets that are no longer needed. For more information, please refer to the iSCSI Target Server Control section.
-
DeepSpar DDI Terminal *Only Network RAID
This option allows connecting to the DeepSpar Disk Imager Device via LAN and make the necessary adjustments to the DDI software directly in UFS Explorer Network RAID. Further information on the component can be obtained in the DeepSpar DDI Terminal section.
-
-
About
This menu item opens a window with the general information related to the program. There one can also find the links to software licensing options and other products from the developer of UFS Explorer.
-
Language
This button allows choosing a language for the interface of the application from the set of presented options. Please note that the program has to be restarted for the change to take effect.
-
Software Events Log
This function makes it possible to trace/save the major events that take place as you work with the software: storage and file system detection events, notifications as to crashes, I/O errors and others. The Events Log dialog is described more specifically in the corresponding section.
-
Software Activation and License
This section is used for activation of the purchased license for the software by entering the Registration Name and Registration Code in the corresponding fields. After the license is applied, here you can check the information about its type and the expiration date of the software updates period. This dialogue also contains the links to the product license order page, licensing options and the End-User License Agreement.
-
Settings
This option opens a separate pane with the general settings for the software, along with the settings for the Explorer (file browser) dialog, files copying process and Hexadecimal Viewer. The specified settings will be stored in the user profile folder of the software directory as a separate "ufsx" file. Additional information regarding the Software settings can be found in the respective section.
-
Help
The "Help" section contains helpful instructions and recommendations for each step of the data recovery procedure.
Main toolbar

The main toolbar provides fast access to the major instruments for operations with the drives, partitions and other storages selected in the storages navigation pane. Most of them can also be found in the context menu of the corresponding storage from the list. The toolbar may consist of the following buttons:
-
Scan this storage (find lost data)
The tool initiates a scanning procedure on the storage selected in the storages navigation pane. This way, the software analyzes its structure and content, enabling the recovery of data lost from it, including the files deleted by the user, formatted volumes, damaged file systems, etc.
-
Manage storage partitions or regions
This button opens the window of Partition Manager for the physical drive selected in the storages navigation pane. The instrument presents the list of partitions found on it, together with the information about their file systems, and provides a set of tools for work with partitions: search for the lost ones by their metadata, manual definition of a partition within the given region on a storage and others. For more information, please go to the Partition Manager section.
-
Backup data (save disk image)
This tool can be used to launch Disk Imager for any storage selected in the storages navigation pane for further creation of its image with advanced parameters (a full bit-to-bit clone of a drive, an image file of a partition or region, etc.). If a storage device seems to have defects or operates unstably, it's strongly recommended creating its image and carry out subsequent data recovery operations on the disk image file. Further details can be found in the Disk Imager section.
-
View storage contents in hexadecimal viewer*Only RAID Recovery, Network RAID
This button opens the Hexadecimal Viewer window for any storage selected in the storages navigation pane. This instrument allows viewing its raw content in a hexadecimal representation and delivers a wide set of tools facilitating its analysis. For a comprehensive description of the Hexadecimal Viewer component, please refer to the respective section.
-
Show properties
The tool opens a properties pane for any storage selected in the storages navigation pane. The content of the pane may differ depending on the type of the chosen storage.
-
Close storage (Remove from list)
This button can be used to close the storage opened in UFS Explorer and remove it from the storages navigation pane. Please note that the closed items will appear again after you refresh the list of connected storages, except for disk images and manually assembled complex storages.
Storages navigation pane
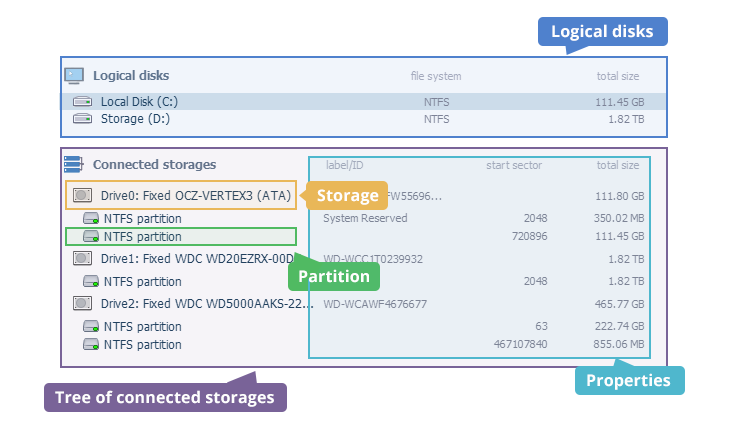
The storages navigation pane consists of two major sections. The "Logical disks" section contains only disk volumes that are recognized by the current operating system, together with the names assigned to them. The tree of connected storages lists all the detected physical devices, opened disk images/virtual disks, reconstructed RAID storages and composite volumes. The partitions found on each storage are displayed under the corresponding storage item, with the indication of its file system, accessibility or possible presence of additional storage technologies (when applicable). The label/ID, start sector and total size properties are also provided next to the listed items.
A more comprehensive overview of this element and its usage can be found in the Storages navigation pane section.
Storage properties pane

This pane demonstrates the main properties of the storage selected in the storages navigation pane. The information in this pane may vary depending on the storage type:
-
Partition information
This section provides the basic properties of the selected partition, including its positioning and overall capacity.
-
File system information
This section provides basic information about the file system on the selected partition (provided that there is a valid file system supported by UFS Explorer) and its accessibility.
-
Storage information
This section provides the basic information about a storage device object, such as a drive, disk image, virtual disk, complex storage, etc. When a partition or other logical storage is selected, it displays the information about the storage device object it resides on.
-
Storage geometry
This section provides the information about physical geometry of the selected storage device object. When a partition or other logical storage is chosen, it displays the information about the storage device object it resides on.
For further information related to this component, please, refer to the Storage properties section.
Buttons area

This area is located at the bottom of the software interface. The buttons on it are activated when a storage is selected in the storages navigation pane.
-
Start scan
This button serves for the start of the scanning process for the selected storage. During it, the structure and content of the storage is examined for the presence of lost data, including deleted files, formatted volumes, damaged file systems, etc.
-
Explore
This button opens the Explorer (File browser) window for the selected partition. This mechanism allows examining the content of the available file system, browse its folders/files, and perform other operations like search, size evaluation, copying, etc. Please note that when a partition is a part of a complex storage/composite volume, first of all, you should reconstruct the storage itself and then work with the partition mounted on it. In case of an encrypted volume, it should be decrypted first. A detailed description of this component can be found in the Explorer section.