Open storage device dialog
Overview
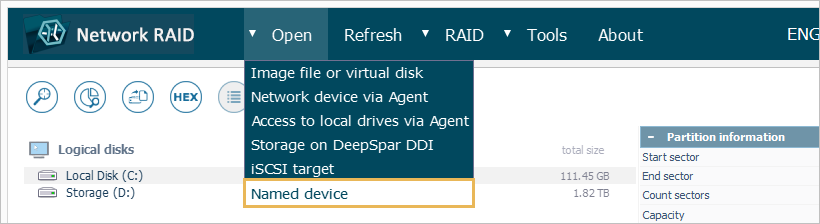
The "Open storage device" dialog makes it possible to load a physical storage device connected to the local computer into the program with additional parameters related to its reading. The element is launched via the "Named device" option from the "Open" item in the main menu:
The dialog itself consists of the following items:
-
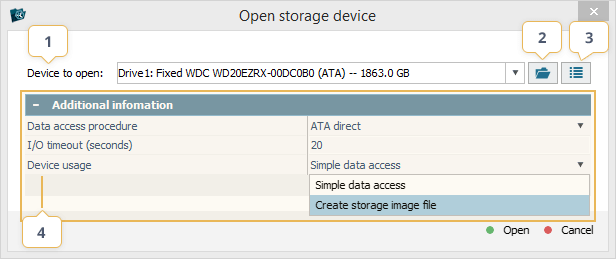
Device to open
The drop-down list enumerates all the drives attached to the computer, together with the information about their sizes. The selected storage will be added to the storages navigation pane for further processing.
-
Specify device name
The button can be used to open a storage device through manual specification of the path to its location defined by the operating system.
-
Refresh devices
This button updates the information about the newly attached storage devices.
-
Additional information
The sheet contains a set of advanced parameters for access to the storage:
-
Data access procedure
The property makes it possible to set up a controlled mode for work with unstable devices.
Default (OS API) procedure – the use of standard OS algorithms for access to the drives. The option is compatible with all operating systems, but may not be optimal for failing devices due to the absence of control and possibility of hanging in case of an I/O error.
ATA Direct – the employment of the ATA driver in order to reduce the number of reading attempts and establish control over I/O errors for PATA/SATA drives. This mode is available only in the Windows edition of the software.
SCSI Direct – the use of the SCSI driver for reading all Linux-based and Windows-based storage devices, except PATA/SATA drives with a direct connection. The procedure allows performing a controlled disk readout with the diagnostics of reading errors, though such a diagnostics may not be supported by the USB adapter. The option is available in the Windows and Linux editions of the software.
-
I/O timeout
The parameter allows defining the time in seconds to wait for a response of the device in case an I/O error occurs. The option is not available when the storage is accessed via the default (OS API) procedure.
-
Device usage
The property allows choosing the way in which the storage will be opened for further manipulations in the software.
Simple data access – the storage will be opened in the interface with the specified parameters.
Creating storage image file – the Disk Imager dialog will be opened right away for the selected storage device, without any extra access to it. The option is recommended when an image of a defective drive is required.
How to use
The "Open storage device" dialog allows reducing the number of references to the drive and enables less intrusive extraction of data from storage devices with multiple defective sectors or other hardware issues. This can be achieved through deactivation of the default system disk polling operation and direct proceeding to the creation of its image, with the possibility of control over the connection timeout and other parameters:
-
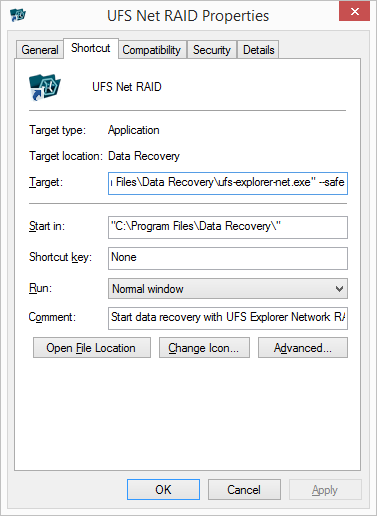
Before launching the program, insert the "--safe" key into the "Target field" in the software "Properties" and click "OK". Alternatively, run UFS Explorer and connect the drive only after the application has been started, without using the "Refresh" option from its main menu.
-
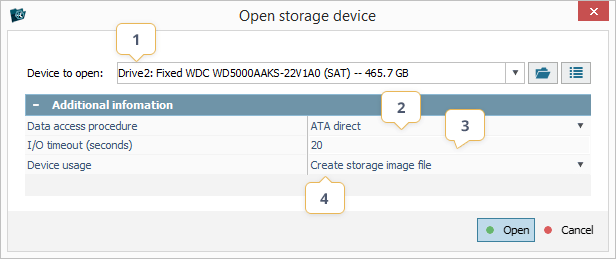
Launch the dialog element using the "Named device" option from the "Open" item in the main menu and select the required storage device from the drop-down list (1). Choose the ATA or SCSI Direct mode(2), if one of them is supported for your device and operating system. In this case, the I/O timeout (3) can be specified. Yet, please note that a higher value for the timeout may increase the percentage of the extracted data, but, at the same time, it decreases the lifespan of the device because of the heavy load.
-
Choose the "Create storage image file" option (4) and click "Open". The Disk Imager dialog will be launched at once for this storage, without additional references to the device. There you can define the most optimal configuration and start the imaging procedure. For more details, please refer to the Disk Imager section.