Managing bad sectors
The drives from which the data is being recovered may contain bad sectors that appear on their surface. As such blocks do not respond to read requests, causing the controller to access them over and over again, when their number is approaching a critical value, the drive may start operating unstably and freeze or disrupt all the data recovery operations. To avoid further degradation of problematic drives, UFS Explorer offers additional functionality that enables their handling with as little wear as possible. You may employ the following procedures to optimize the recovery process and extract the important data before the drive fails altogether.
Creating an image of readable areas on the drive
The main purpose of this procedure is to acquire a disk image from the available good areas on the drive and omit the ones that are failed or not required. After that, you can recover the lost data from an accurate, stable image file/clone, without affecting the original device.
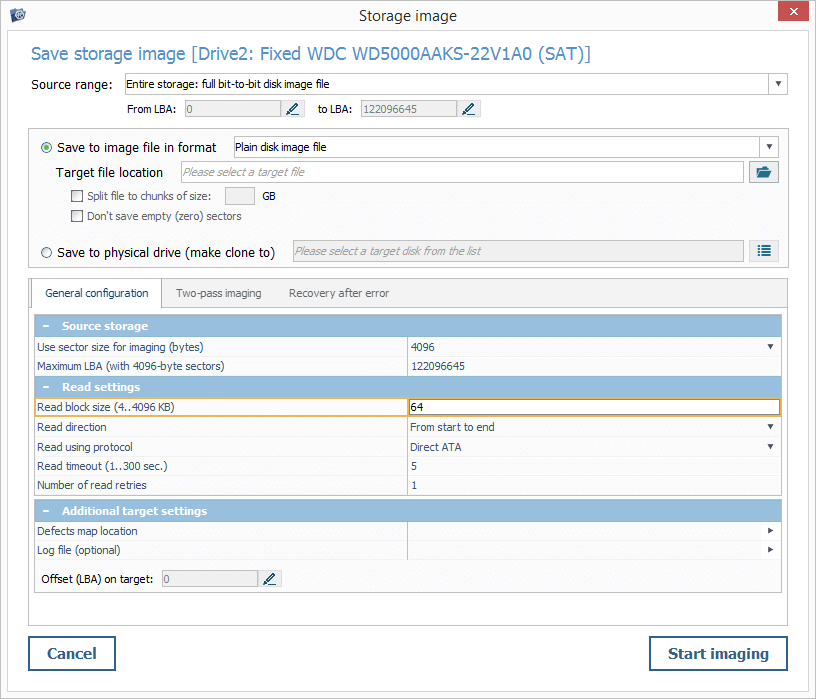
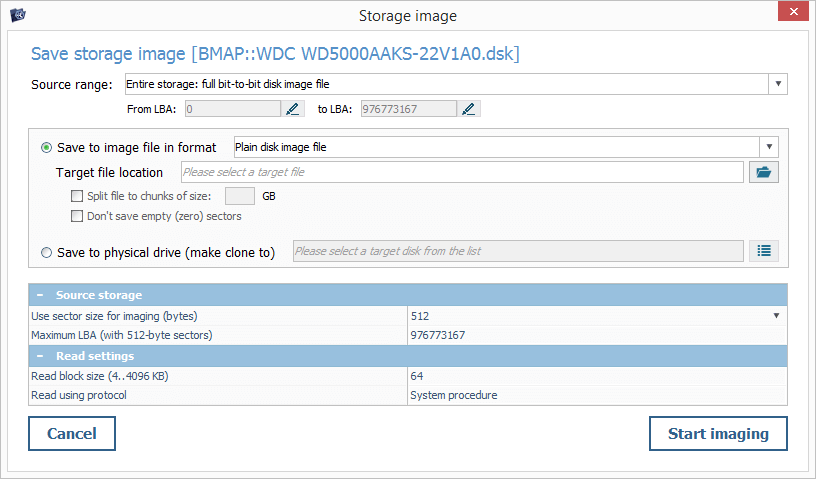
The Disk Imager integrated into UFS Explorer allows creating an image/clone of the entire drive, partition or only a certain portion of sectors using a multi-pass imaging engine. It also provides a set of options to control the imaging process when bad sectors are encountered. The detailed information about the usage of this component can be found in the Disk Imager section. Below, you will learn about setting up the parameters that are of particular importance for dealing with defective media.
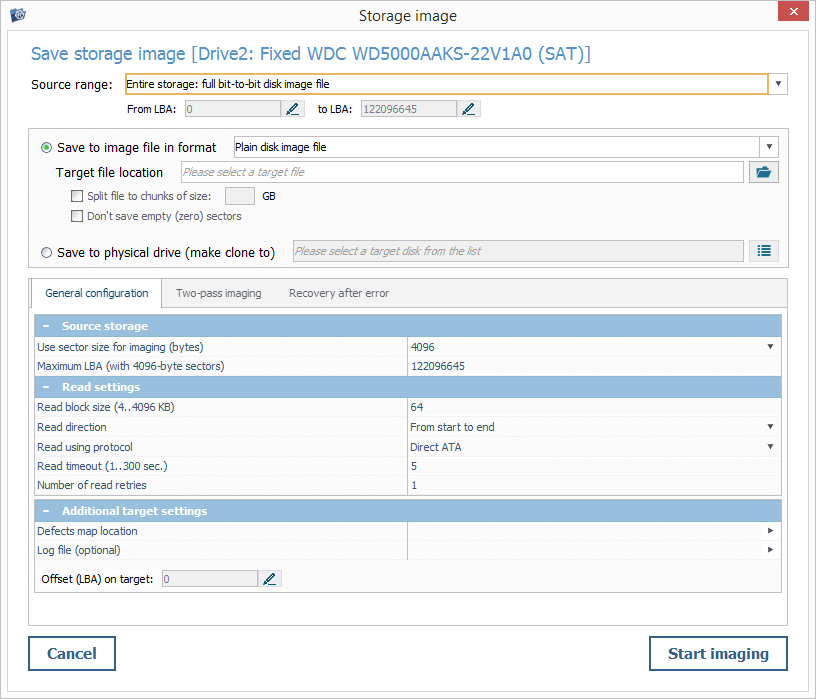
First of all, configure the way the data will be accessed via the "Read settings" pane:
-
Use the "Read block size" parameter to adjust the size of the data block requested during imaging.
Though blocks of larger sizes produce the fastest performance and may be optimal for reading drives in a good condition, a bad sector is more likely to occur within a large block, resulting in the abortion of the entire reading operation. As a consequence, extra intact sectors located close to the defective one will be skipped. Using a smaller block size allows retrieving maximum data from an unstable drive, but also slows down the procedure and may cause additional damage to the device. Thus, a medium size from 64 to 128 KB should be used to enable smooth sequential imaging of the drive while maximizing the amount of the extracted data.
-
Specify the "Read timeout" to define how long the Disk Imager will be trying to read each block.
This parameter should be modified based on the condition of the processed drive. On average, a 5-second timeout is enough to determine whether the block can be read out. A long timeout is likely to cause the rotational scoring of defects on unstable drives. A short timeout will speed up the process, but may result in leaving out many poorly readable sectors, especially for slow-responding drives.

-
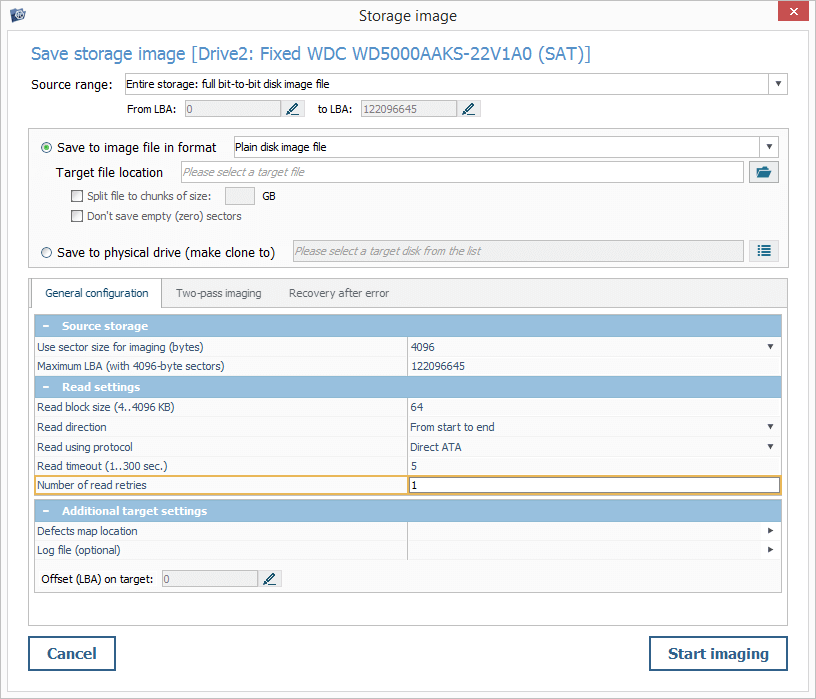
Define the "Number of read retries" parameter to specify the number of times the software will attempt to read a block that causes an error.
Choosing 1-2 attempts can lead to the omission of poorly readable blocks. However, too many retries can cause the rotational scoring of defects.
-
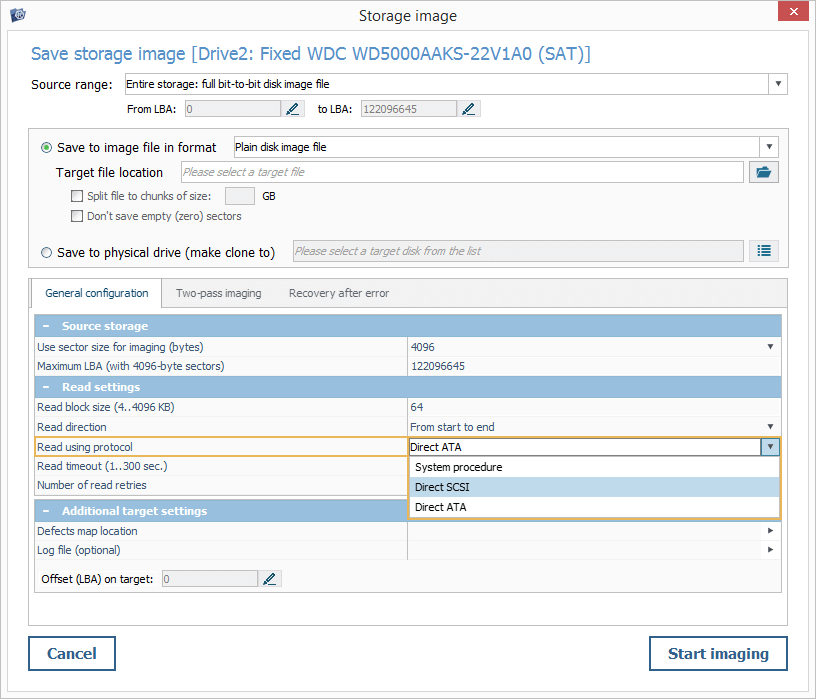
Choose the direct procedure for access to the storage when configuring the "Read using protocol" parameter.
The standard "System procedure" may raise issues when the drive is not functioning normally and lead to its further degradation. Having encountered a defective block, the OS may repeatedly try to access that area of the disk to get the expected data, which often causes the operation to hang and stop responding. The "Direct ATA/SCSI" procedure implies control over the reading errors. Yet, it may not be applicable for all storage devices and may not work under certain operating systems.
-
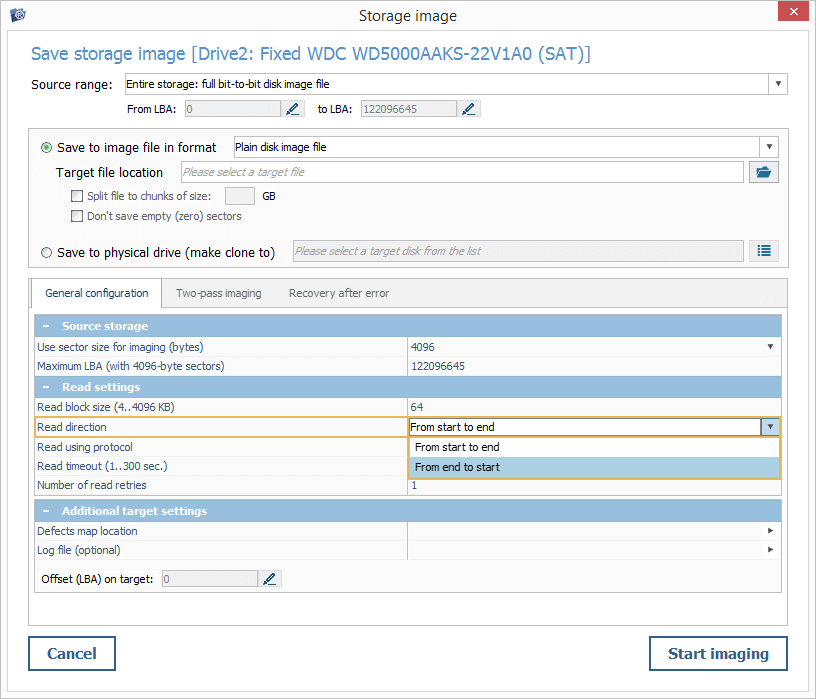
Change the "Read direction" parameter, if the defective area is found closer to the beginning of the drive.
Choose the "From end to start" option in order to approach the discovered damaged area "from the other side". The data will be read in the forward direction, but in blocks of several megabytes, starting from the end of the drive. This way, more data can be extracted before the Disk Imager will reach the defective zone. However, the use of this method will slow down the imaging process.
-
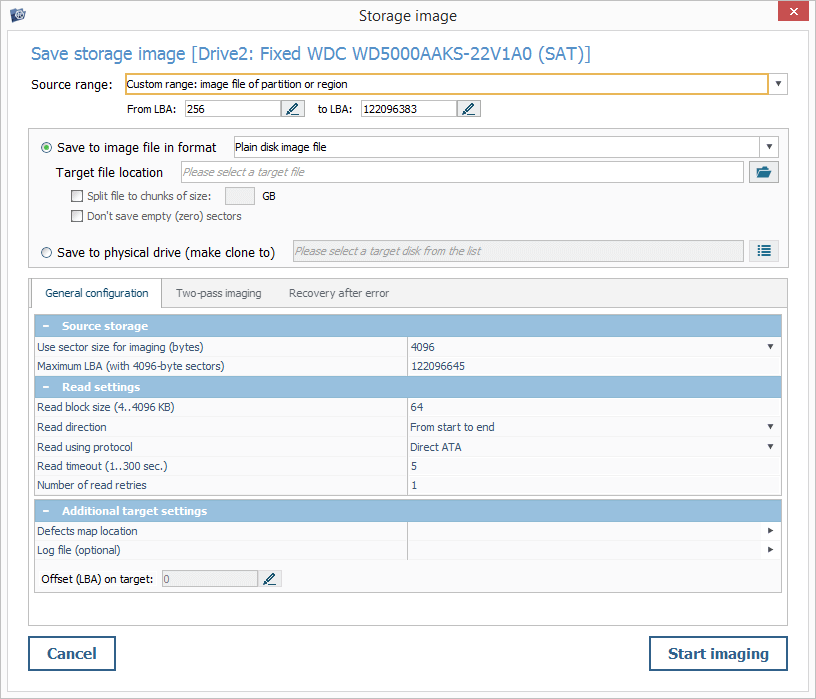
Set up the "Area on the source storage for imaging" parameter.
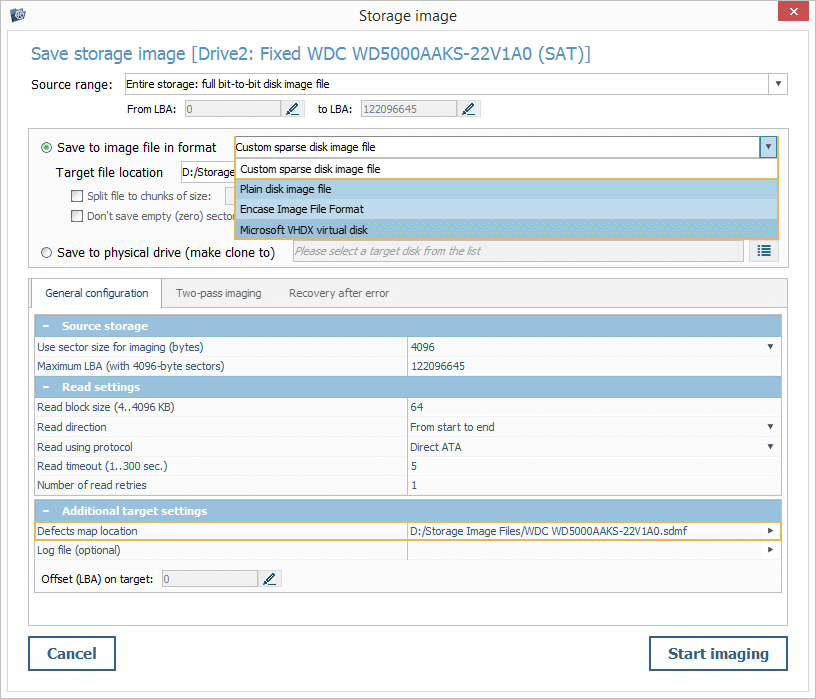
Decide which part of the source storage should be imaged. The "Entire storage: full bit-to-bit disk image file" option makes it possible to save all the readable information from the drive, from its first block to the last one. Using it, you can create an image of the entire drive, but the process may be time-consuming and increase the load on the storage.
The "Custom range: image file of partition or region" option allows creating a partial image of the drive. You can manually specify the range of blocks for imaging. Alternatively, run the Disk Imager for the chosen partition, and the values for its start/end sectors will be selected automatically.
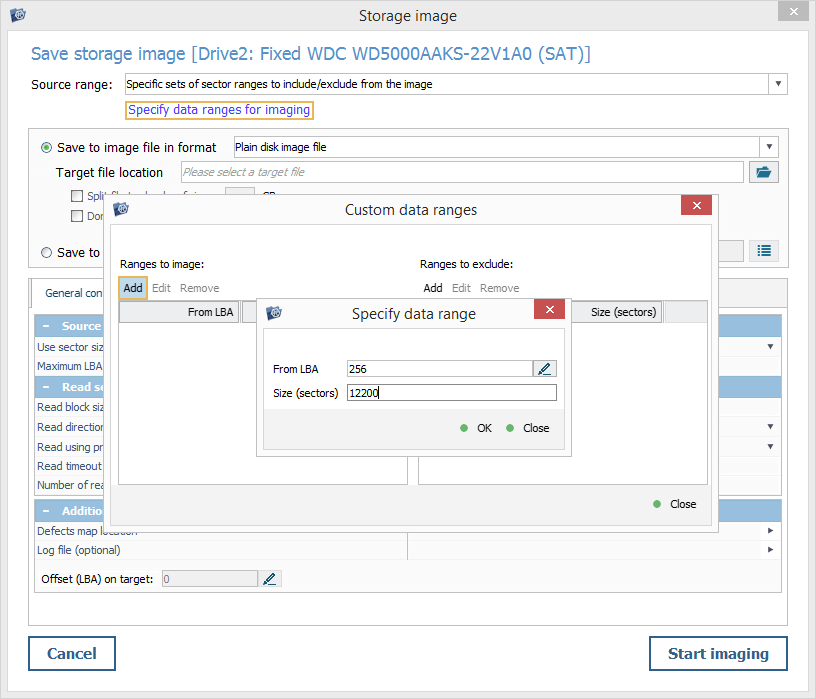
The "Specific set of sector ranges to include/exclude from the image" option can be used to define which ranges on the storage will be included/excluded from imaging. It should be applied when it is known exactly that certain areas are damaged and should not be present, or when a particular range has to be read out one more time.
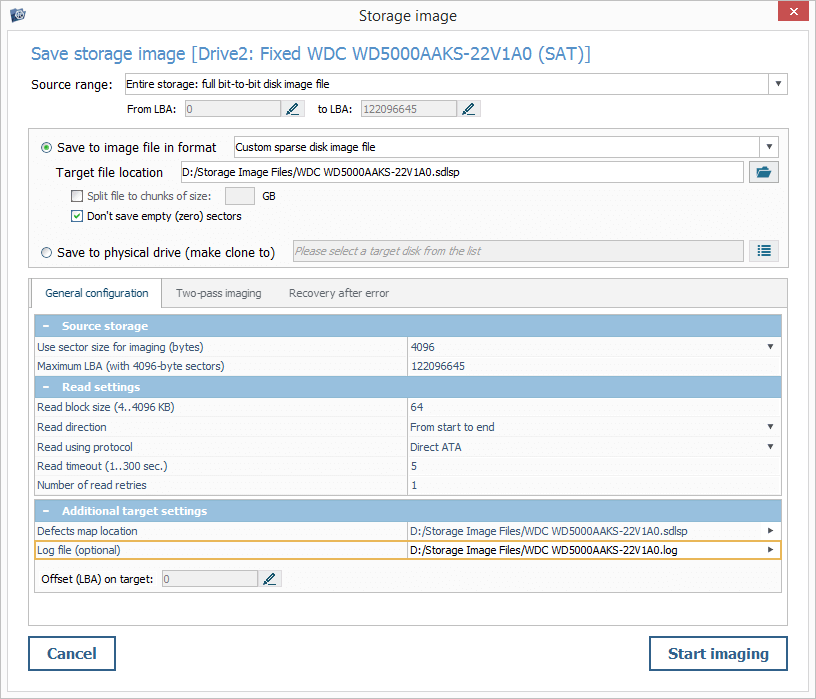
Secondly, switch to the "Additional target settings" pane to specify the locations for the accompanying files:
-
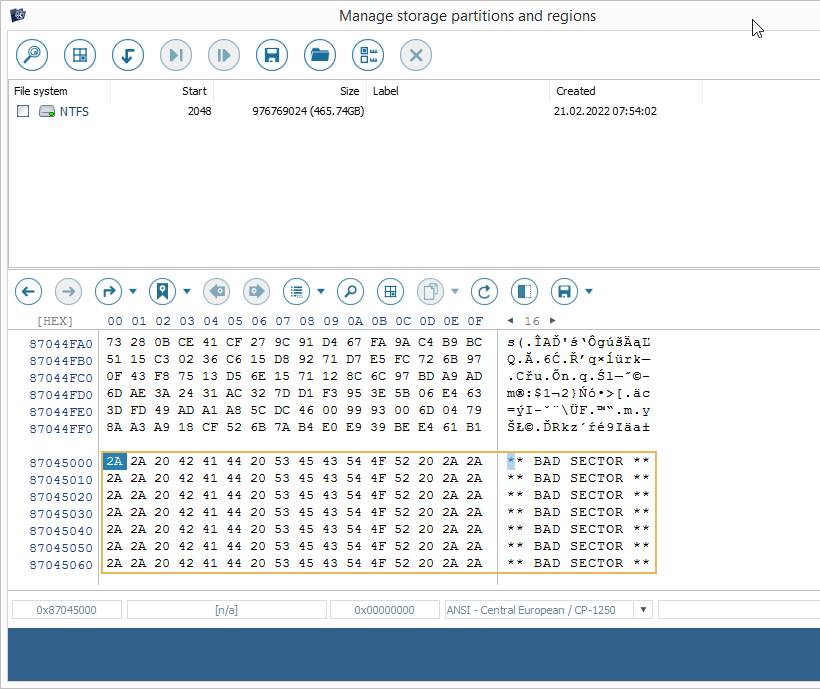
The "Defects map" file will be created during the process of imaging. It keeps a record of which sectors have been imaged and which of them were skipped due to reading errors. The *.sdmf format is used for all types of images (except for the one created in the "Custom sparse disk image file" mode, where the state of reading is a part of the *.sdlsp file). In such a file, each byte defines the status of four blocks.
-
The "Log file" will contain the information about the reading errors encountered during image creation and can be useful for diagnostics.
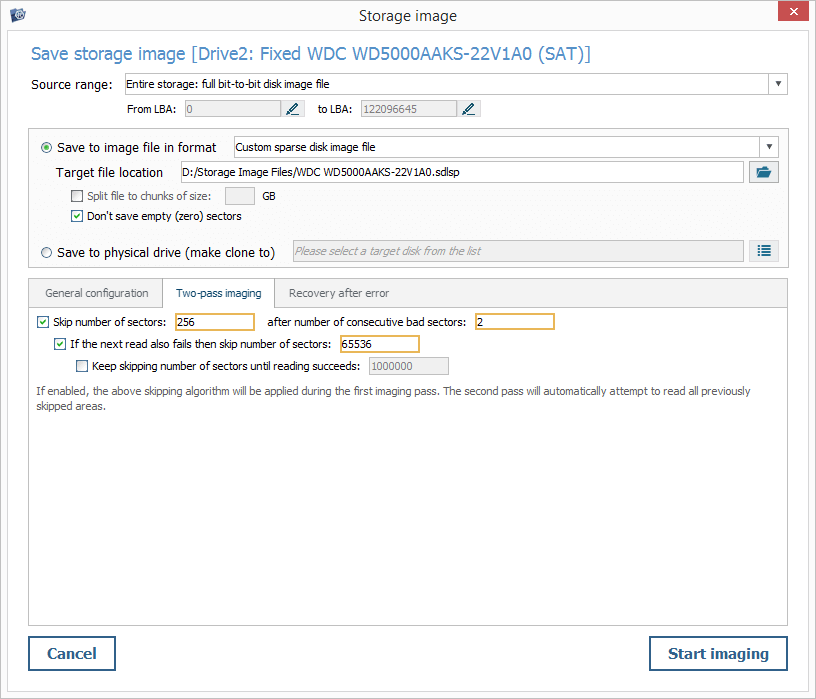
After that, enable and configure the two-pass imaging algorithm. The defined rules will be applied for skipping problematic blocks during the first pass of imaging. During the second pass, the software will return to the omitted areas.
-
The "Skip number of sectors … after number of consecutive bad sectors …" parameter consists of two values: the first one specifies the number of subsequent sectors that will be jumped over, and the second one – the number of encountered bad sectors that will trigger a jump. Reading then will be resumed from a new location.
-
The "If the next read also fails, then skip number of sectors" parameter defines the number of sectors that will be skipped if the data cannot be read out immediately after the first jump.
-
The "Keep skipping number of sectors until reading succeeds" parameter allows specifying the size of the third jump. It will be performed if reading still fails after the second one.
The software will perform such jumps until normal reading will be achieved. When the second or third parameter is not activated, the size of the next jump will be equal to the size of the previous one.
Also, you may enable the "safe zone" test via the "Recovery after error" tab to be able to ensure that the drive is still capable of responding to commands after an I/O error:
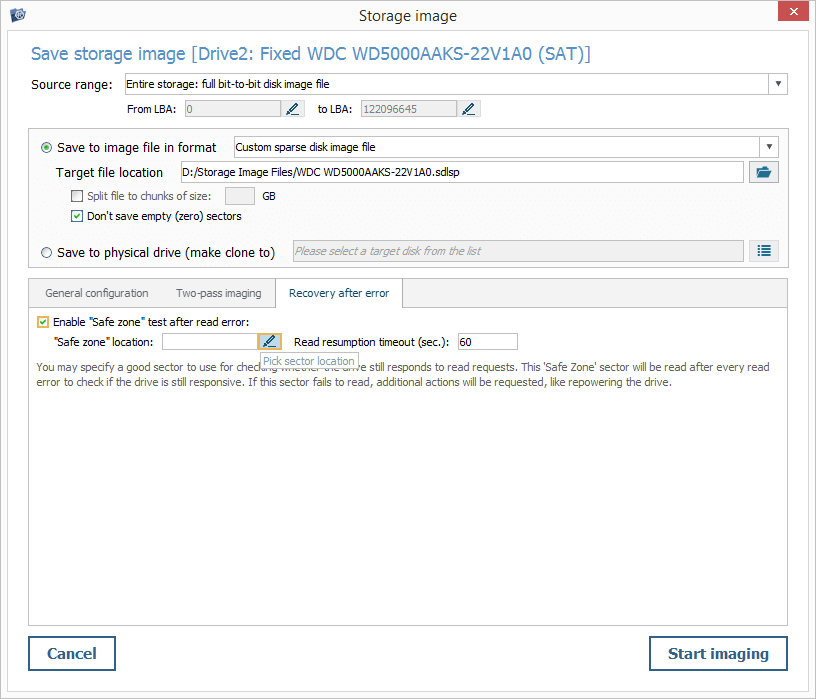
"Safe zone location" – a sector on the drive to which the test read requests will be sent each time a defect is encountered. Such requests are aimed to check if the drive is still readable, so the specified location must be assured to be intact. If reading of this sector fails, the program will assume that the drive is "hanging" and may ask to re-connect the device.
Applying an existing map of bad blocks
UFS Explorer produces its own proprietary maps of bad blocks in the process of disk imaging (the *.sdmf file format) and also supports other types of maps provided by compatible external solutions (ACE Lab software, MRT DE, DeepSpar, etc.). Such a map can be applied to the defective drive itself or the previously built disk image and used by the software during operations with the storage.
Based on the instructions in it, the program will emulate an I/O error each time it reaches the damaged area specified in the map. For instance, the area that is marked as defective will not be read during a scan or will be skipped when a disk imaged is created.
Alternatively, the blocks that are indicated as unreadable according to the map can be filled with a predefined content pattern.
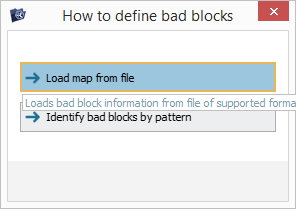
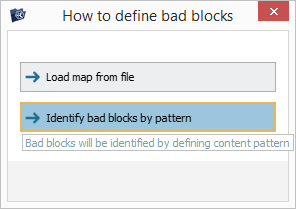
In order to start using a map of bad blocks, launch the context menu of a drive or disk image opened in the storages navigation pane and select the "Enable map of bad blocks" option.

In the opened dialog, choose the "Load map from file" method.
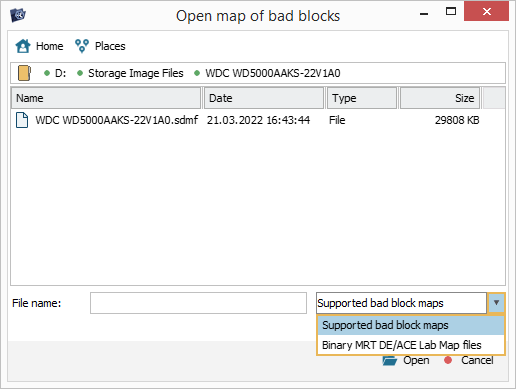
Pick out the type of map you are looking for from the drop-down list in the right-hand corner, and then navigate to the location where the file is stored. Select it and hit the "Open" button.
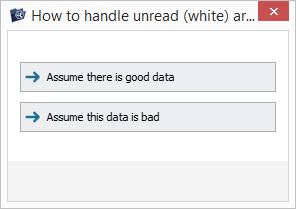
In the pop-up window, define the way of handling the areas on the storage that were not processed (as per the map). The "Assume there is good data" option will make the software try reading such areas as if they may comprise intact blocks. If you choose the "Assume this data is bad" option, the unread areas will be skipped right away.
After the map file is loaded, check out the listed parameters and choose the operation that will be performed for the defective blocks in it by configuring "Bad block action":
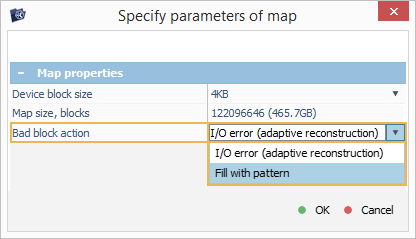
"I/O error (adaptive reconstruction)" – when a "bad area" is reached, the program will return an I/O error;
"Fill with pattern" – the approached "bad areas" will be masked with a specified pattern.
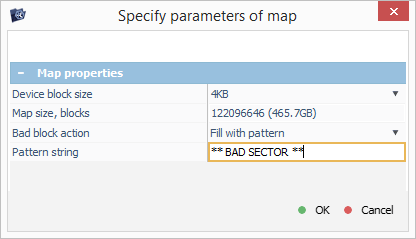
If you select the latter option, provide the "Pattern string" in the ANSI or Hexadecimal data format.
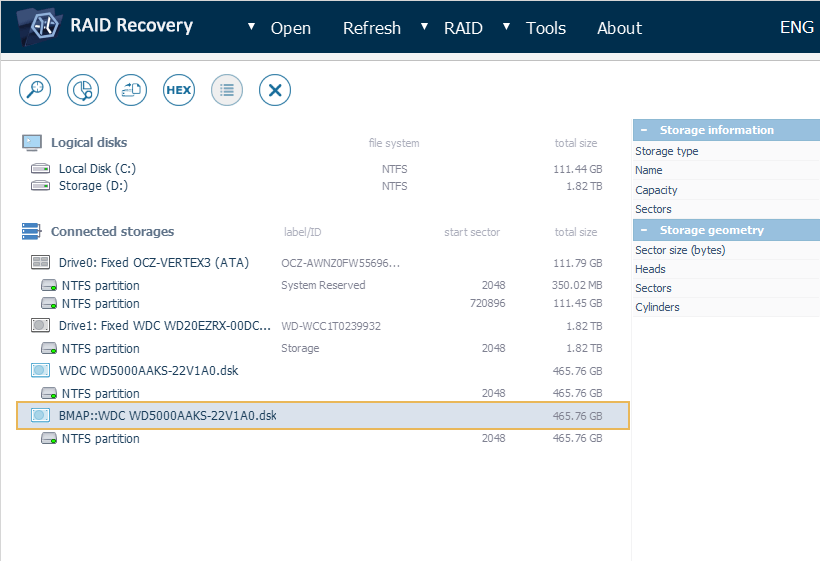
After you hit "OK", a new a virtually reconstructed copy of the storage will be opened in the storages navigation pane to which the map of bad sectors is applied.
You can launch Disk Imager for it, and the storage image will be created on the basis of the implemented map. In this case, the component will be opened in a simplified mode, without the advanced reading settings:
Creating a "dynamic" map of bad blocks
The software can identify bad blocks on a storage dynamically, by recognizing the previously defined hexadecimal template. To activate this function, open the context menu of a drive or disk image in the storages navigation pane and choose the "Enable map of bad blocks" option.

In the opened dialog, opt for the "Identify bad blocks by pattern" variant.
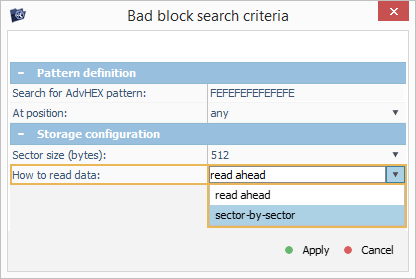
After that, specify the hexadecimal pattern for the identification of bad blocks.
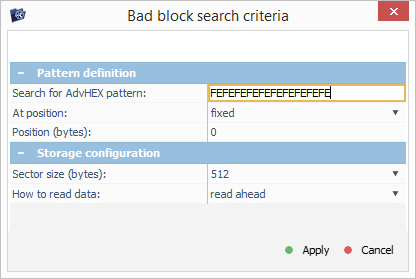
If the pattern has to be detected at a particular position, provide it after selecting the "fixed" position property.
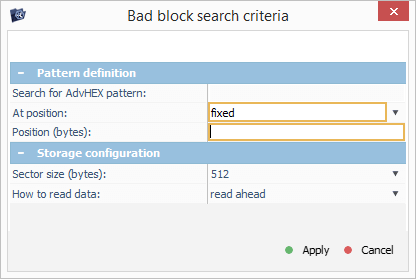
Also, set up the size of the block that will be read out.
After you hit "Apply", the program will mount a new a virtual copy of the storage in the storages navigation pane to which the "dynamic" map of bad blocks will be applied.

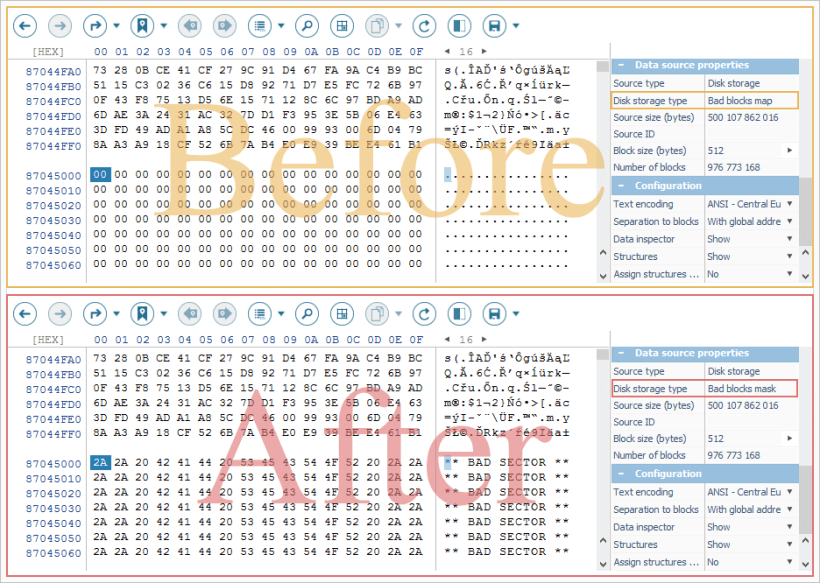
Masking bad blocks using a pattern
The software is capable of replacing the detected bad blocks using the plain text or hexadecimal pattern defined by the user.
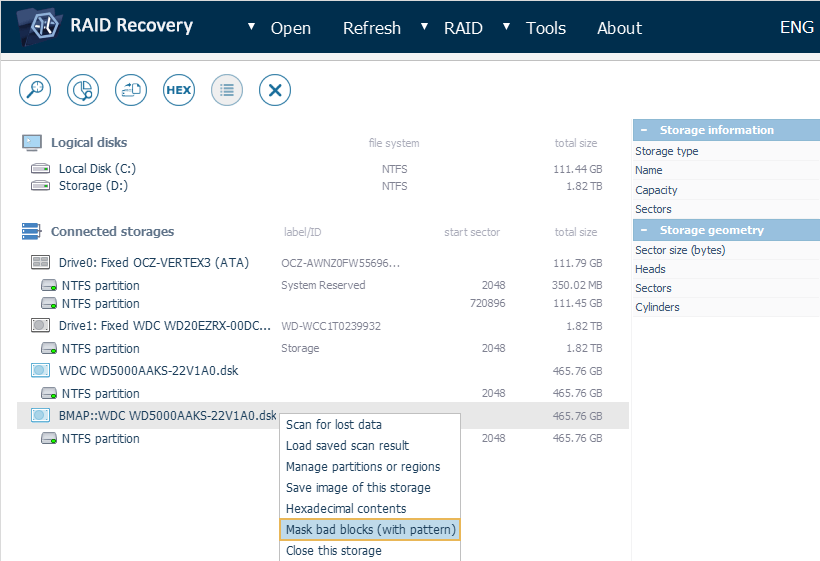
In order to create such a mask, in the storages navigation pane go to the context menu of a drive or disk image with the previously enabled map of bad blocks and select the "Mask bad blocks (with pattern)" option.
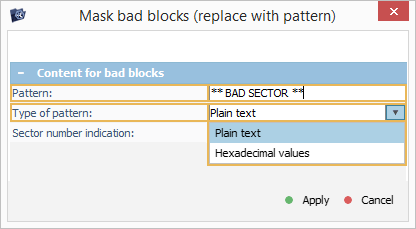
In the opened window, provide the pattern that will be used for replacement and its type: plain text or a hexadecimal value.
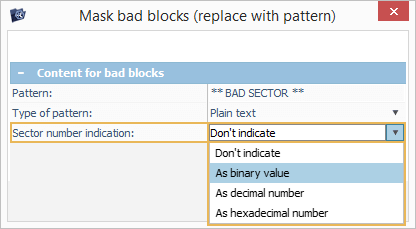
After that, choose the address mode for the indication of sector positions: binary, decimal or hexadecimal. It is also possible to disable this indication.
After you press the "Apply" button, will be a new virtual image will be opened in the program, in which the bad blocks are substituted by a pattern applied in accordance with the selected parameters.