Ways and means for work with defective disks in UFS Explorer
02.08.2022
When dealing with defective disks it is highly important to reduce the time and intensity of work with the source storage and thus extend its operating life till the moment of failure. Along with the measures directed specifically at restoring the functionality of such a device, one must ensure that the wear and tear of the hardware is kept to a minimum throughout the process of data recovery.
To minimize the extent of further degradation of a storage and delay its total failure so that the needed data could be extracted, the following steps are to be taken:
- Disable the disk polling procedure activated by default.
Disk polling procedure is accomplished through "questioning" the drive whether it is ready and search for all supported partition tables, RAID metadata, and file systems. To achieve that, a "system" reading procedure is employed which does not imply any control of connection timeout. Therefore, if a polling operation gets to a defective block or series of defects, this may cause it to "hang".
Instead of connecting the disk and running the software "by default", it is recommended to perform one of these steps:
- Connect the disk after UFS Explorer has been started and refrain from clicking the "Refresh" button;
- Run the software with the "--safe" key to disable disk polling.
- Open the disk in a "controlled" mode.
For the purpose of control over the device usage, the software offers a dedicated function "Open storage device (advanced)". Depending on the further scenario, one of the following options can be chosen:
-
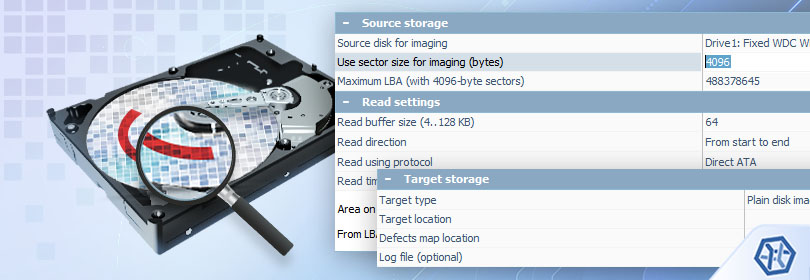
A. Opening the disk for creating its image. This option will immediately get you right to the dialog for creating an image of a disk, without any extra access to it.
This option is recommended when a complete disk image in required for further comprehensive analysis, including with the help of third-party software.
-
B. Opening the disk in the "on-demand imaging" mode. In addition to that, it is recommended to choose reading in the "direct ATA" or "direct SCSI" mode which provides the possibility to gain control over reading errors.
This option should be selected if there is a need to save only a small part of data from the disk and time is of the essence. In this mode, the software performs one-time reading of each block from the disk with a transfer of the processed data to a sparse image file. The next reads of the same block are performed from the disk image.
- 2.А. Creation of a simple disk image.
If possible, the location of defects on the disk should be analyzed and the imaging procedure is then to be performed in accordance with the obtained results. The procedure is described in detail in How to create a disk image with UFS Explorer.
- 2.B. On-demand disk imaging.
Opening a storage in this mode starts the standard procedure for polling the storage metadata, but, in contrast to the default one, each block is immediately transferred to the image file. So, if the "direct" reading is enabled, the risk of "hanging" of the polling procedure is significantly reduced (as the "hanging" may also be caused by the specifics of the bridge, failures in the disk microprogram, and other factors).
If a failure occurs during or after polling, work with the same image can be resumed by opening the disk again and using the existing image file. This will prevent extra requests to the data that has already been read out.
After completion of the polling procedure, the software will display the disk in the interface with the recognized partitions and file systems.
If the file system has not been found (the partition table has been damaged).
If the file system wasn’t located by the software, it is recommended to open the Partition Manager for the storage and check the presence of a file system by performing one-time transitions to the "standard" offsets, such as: 0x7e00, 0x100000, 0x5000, 0xC805000, and others. If the file system was found in the process, the partition can be defined manually at the specified offset. After that, the end of the partition should be checked for the probability of having a file system after it.
If not, scanning with the enabled "jumps" mode can be started. However, this kind of scanning should be carried out under supervision, with the prevention of a significant load.
If the partition still cannot be found, it is recommended to save a full image of this storage (as described in 2.A.). Yet, if the image is saved to the same sparse file, the imaging procedure takes into account the ranges that have already been saved during disk polling and partition search.
Work with the file system.
After the file system has been established, the following options are recommended:
a) A "Quick scan" (indexing) of the file system is advised if the latter has a branched structure and there is a need for the search of files to be restored.
In this case, file system indexing starts, and after it the disk should be disabled programmatically (using the "stop device" option in the disk context menu), if it is possible. This will put the disk to a sleep mode to save its resources.
b) Selecting files directly if they are visible immediately after the access to the file system.
c) Direct copying of files is recommended only if you need several small files that are not likely to be located within the defective area.
When files are visible within the file system, one needs to enable the "Permanent selection" mode, mark the files that need to be restored and start the procedure for creating an image from the content:

This will open the dialog for creating an image based on the specified file location map. This feature offers several advantages over simple data copying:
- Reading is performed in blocks of a fixed size with the "merging" of ranges in cases of file fragmentation and cross-fragmentation.
- A controlled procedure, with repeated attempts, jumps, and error handling.
The image can be created according to the instructions described in How to create a disk image with UFS Explorer. In this case, the software substitutes the "source range" with an "external map".
After the imaging procedure is completed, you can close the storage in the program, disable the disk, and continue working with files by opening a disk image file.
If you need to save more files, you can resume the work by repeating the steps described above, but it is strongly recommended to use an existing image file instead of creating a new one.
When all the files are needed, but their volume on the file system is significantly less than the size of the storage:
For most supported file systems, the software is able to create a map of occupied file system blocks as specified in the file system metadata. This map can be used to save all blocks used by the file system.
To do this, save the used space to an image after opening the file system instead of starting the search for files.
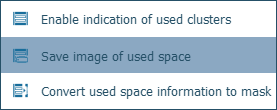
From the point of view of creating an image, the next steps will be the same (this option will save the data of all files to the image, except for the free space and the data of deleted files).
- Reduce the load on the disk.
If there is a break during work or the work is performed with the saved scan result, it is recommended to "turn off" the defective disk using the "stop device" function (if possible). This will put it to a "sleep" mode (with the spindle stopping and heads parking), which can extend its operating life as well as reduce its working temperature.