How can one recover data from a USB flash drive?
Despite their small size, USB flash drives offer plenty of storage space to keep massive amounts of data. In addition, owing to the ubiquity of USB sockets, they make it incredibly easy to transfer files between different computers. They can be read by many other electronic devices as well: media players, game consoles, digital photo frames, projectors and smart TV.
Along with much higher privacy, security and availability than any cloud service could ever offer, this type of digital media is considered fairly durable. However, the valuable information it is trusted with may be still put at risk. Improper operations or other issues with the drive may make it corrupt. Besides, the files deleted from it are immediately removed and cannot be found in the Recycle Bin/Trash. Fortunately, when there has been no physical damage to the device, one can restore the lost data with a high probability.
Still, please remember that in case of any kind of physical damage, the recovery of data from the affected USB flash drive must be performed only by a skilled and properly equipped professional. DIY-repair efforts pose a risk to destroy the storage without the possibility to retrieve the data it might still contain.
Chances to recover lost or deleted files from a USB flash drive
In fact, it doesn't really matter whether the files were intentionally or accidentally deleted from a jump drive or the OS just can’t detect and recognize its file system, the necessary data may still be present on it and can be retrieved with a data recovery program.
Nevertheless, please beware that data recovery software can only restore information that has not been overwritten yet. Therefore, you should stop using the thumb drive as soon as you realize that data loss has taken place and avoid saving anything to it, including the recovered files.
There are also a couple of more situations when the chances of successful data recovery are very low:
- low-level (full) formatting resets the drive to its factory defaults. This wipes the whole content of a storage – the file system and the data;
- some operating systems deploy "delayed writing" – a file may not be immediately written to the drive but wait until other operations will be completed. Abrupt disconnection of a drive irreversibly erases all the information pending to be written;
Note: Due to the fact that unsafe pen drive removal can provoke both logical and physical issues and result in data loss, it is highly recommended that you always eject it safely with the corresponding option of the operating system.
- file shredding utilities write zeros or some other data patterns over the files making them unrecoverable;
- pen drives protected by encryption software, like BitLocker To Go, for example, become utterly inaccessible to neither the authorized user nor to any data recovery program without the correct password or the corresponding recovery key, or after the loss/serious damage to the metadata that contains encryption information.
In other circumstances, SysDev Laboratories recommends UFS Explorer and Recovery Explorer as reliable data recovery solutions suitable for a wide variety of data loss scenarios, including the ones related to thumb drives managed by FAT32 (exFAT) or any other file system of Windows, macOS, Linux or Unix/BSD. The programs perform an extensive analysis of the drive's logical structure to locate the missing files and offer the user to copy the restored data to any safe storage.
Note: Before making attempts to recover data, try inserting your pen drive into another PC to ensure that the problem was not caused by incompatibility or a defective port.
Hint: To learn more about FAT32 and other file system types, please, refer to the basics of file systems. If you want to assess the possibility of a successful data recovery operation, familiarize yourself with the articles describing the specifics of data recovery depending on the OS and chances for data recovery.
How to recover data from a USB flash drive with UFS Explorer Standard Recovery
In order to accomplish USB flash drive recovery using the Standard edition of UFS Explorer, take the following steps:
-
Download and install the application onto the computer. Ensure that the version of the program fits the operating system your machine is running.
Hint: If you have any difficulties with the installation of the utility, please refer to the installation manual for UFS Explorer Standard Recovery.
-
Plug the USB flash drive into the computer’s USB port. If possible, opt for USB 3.0. or higher rather than USB 2.0 – this will substantially speed up data access/reading/scanning operations. Turn on the power switch, if available.
Warning: Once attached to the computer, your thumb drive may throw an error or ask for a format. Don’t try to fix anything until you finish up recovering data. This may lead to serious difficulties or even permanent data loss.
-
Launch the software and, if needed, change its settings in the corresponding pane.
-
Select your USB flash drive in the list of attached devices in the left pane and scan it for lost data using the corresponding button or the storage context menu option.
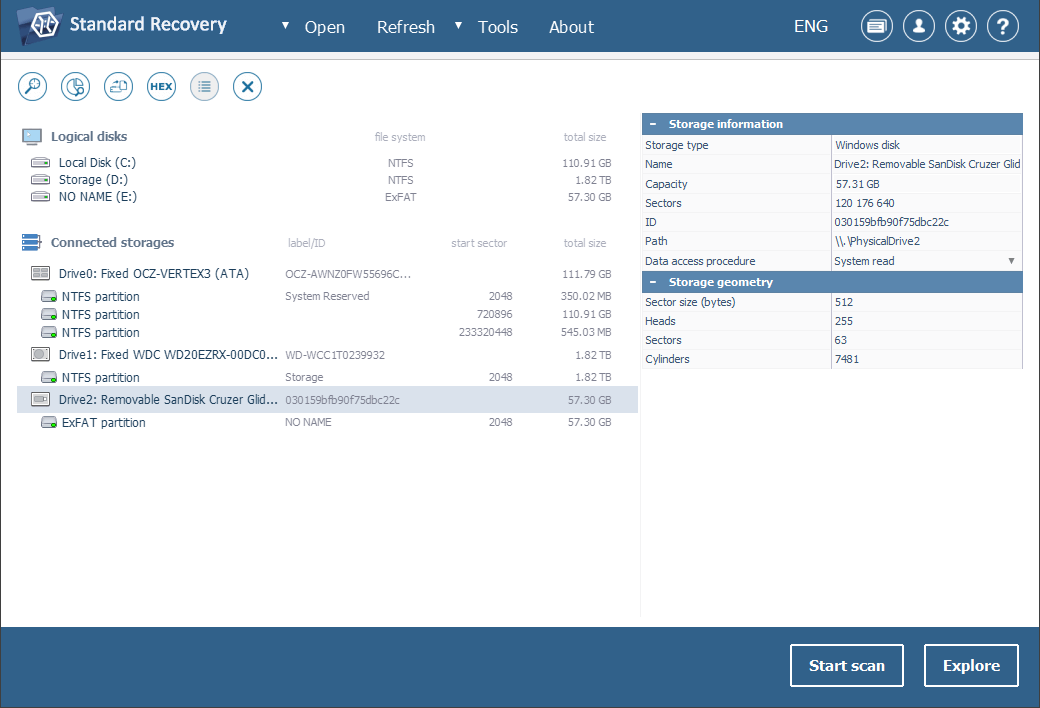
If you can’t find your thumb drive in the list of connected storages, please first press the "Refresh" button in the top bar to make the software re-check for currently attached storages. Then try reconnecting your USB drive or attaching it to another PC to make sure that the issue you’re facing is not related to the connection. If these measures do not help and neither the computer nor the data recovery program can detect the device, it is very likely that it has been physically damaged and you need to take it to a data recovery center.
-
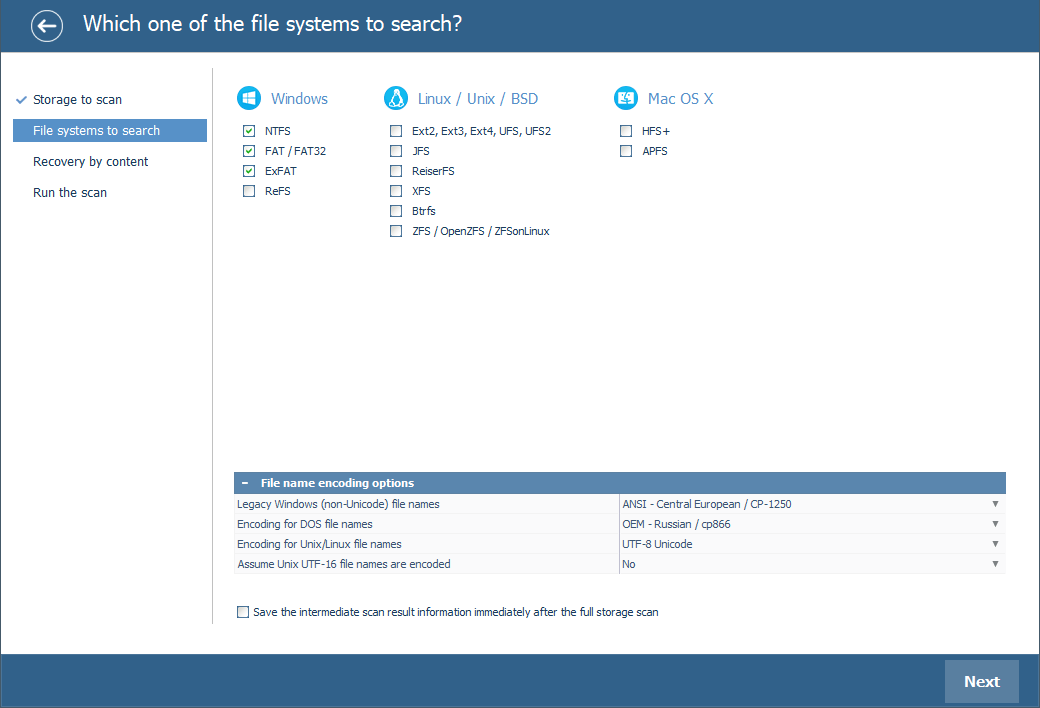
Set up the preferable scan parameters. If you know which file system type you deal with, deselect the superfluous ones. After that, press "Start scan" and wait for the process to complete.
Hint: More information about configuring the scan can be found in the instruction on scanning a drive with UFS Explorer.
-
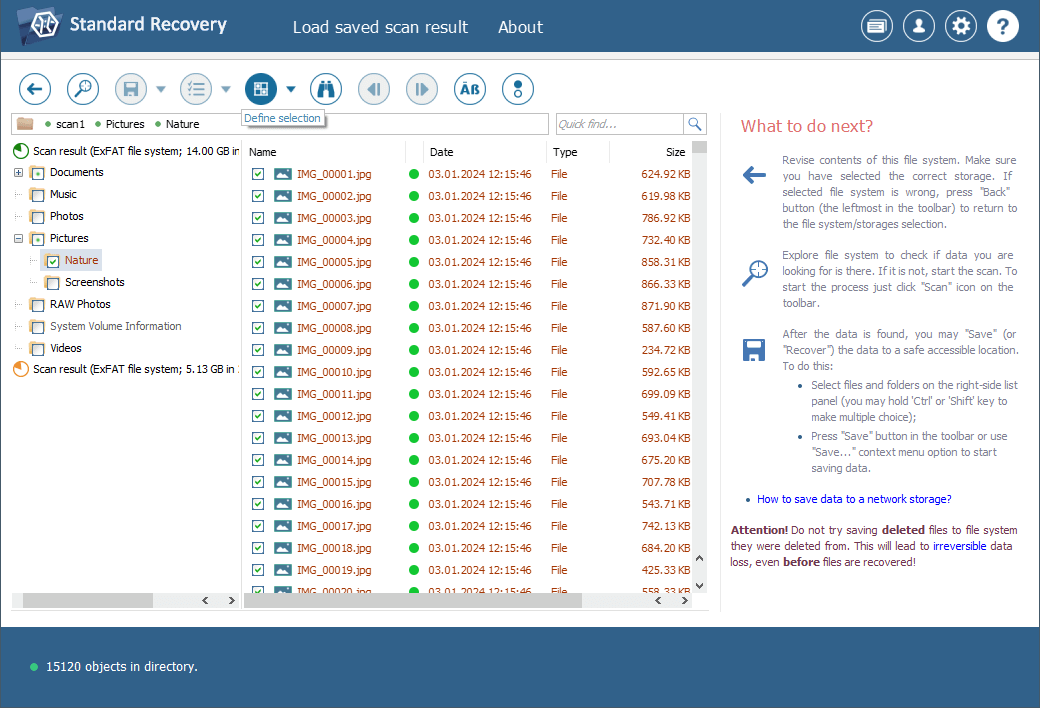
Browse through the file system reconstructed by the program. Provided that the "Set up displaying of file status" tool is activated, all files will be presented with circular icons that correspond to their state: a green icon implies a "good" file that has a valid header; a red one indicate a "bad" (zeroed) file; a gray icon may appear when a file has been partly damaged or its integrity cannot be verified in view of the format’s specifics. The undeleted folders and files can be recognized by the red color of their names.
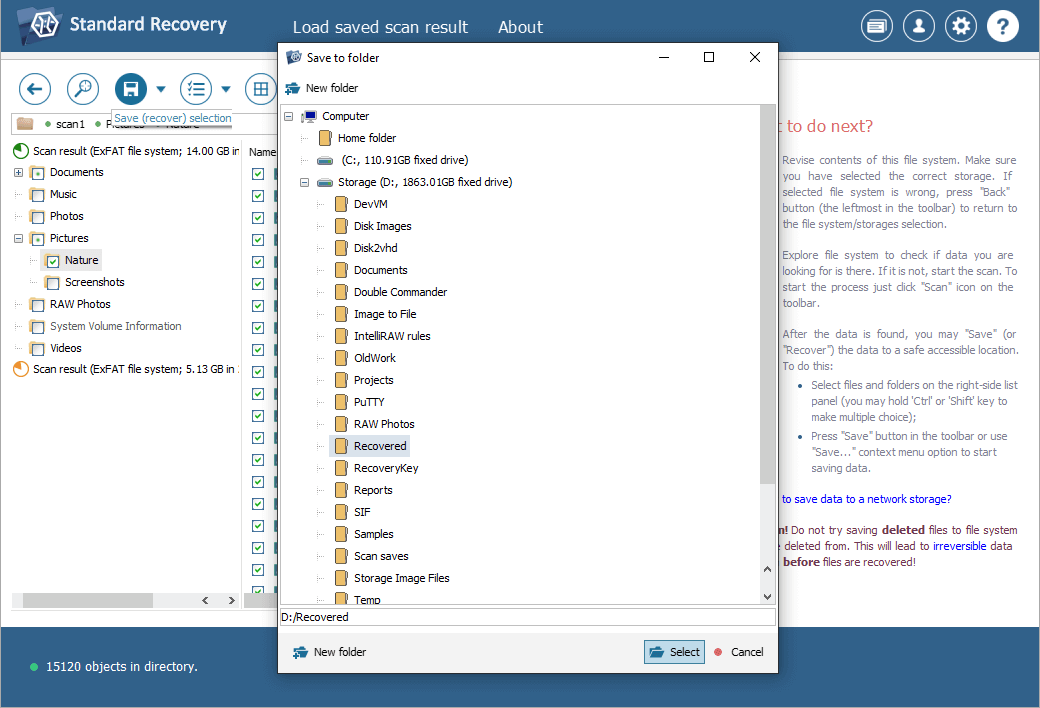
You may also sort the files by name, date, size, employ quick or advanced search and preview them in the embedded viewer to decide which ones you need. After that, click "Define selection" and check off the items you want to copy.
Hint: Please refer to the article Evaluation and saving the results of data recovery for detailed instructions on how to find, sort, preview and copy the obtained folders and files with the help of the software.
-
Choose a destination folder for these files. Make sure you are not copying them to any folder on that very USB device you’ve just restored data from. If you do it, the current information on the USB flash drive will be overwritten with the files you save to it, and you won’t have an opportunity to recover the "replaced" data.
Hint: If you are going to save the recovered data to a network storage, please check the provided guide.
Last update: May 27, 2024