What can be done to recover data from an external hard disk drive?

It would be no exaggeration to call an external hard drive a lifesaver for those who need to work with large amounts of data but don't want to clutter up the computers' internal storage. With broad compatibility and capacities of up to 22 terabytes, such drives are able to provide adequate space for huge photo or video libraries without forcing the machine to run slower. Plus, they make it possible to share them between different devices, never asking for regular monthly/annual payments. Also, special drive enclosures allow turning an idle internal drive into a portable device plugged into the PC via a USB, eSATA, Thunderbolt or FireWire cable. At the same time, owing to their increased mobility, such drives commonly suffer from mishandling and other problems which may result in the loss of valuable files, leaving the user looking for a way to deal with this unpleasant situation.
Chances to recover lost or deleted files from an external hard drive
As soon as you realize that some files are missing, immediately stop using the affected portable drive and safely disconnect it from the PC to prevent further damage or loss of the data it may still contain. In this regard, the type of the drive matters: cheaper spacious HDDs are extremely fragile and may develop serious issues due to shock or vibrations, therefore, it is necessary to be careful when working with them and keep the device horizontally on a flat surface, while external SSDs are more durable and less demanding when it comes to handling.
Another thing to take into account is that in case your storage medium shows any symptoms of physical damage, like screeching, beeping, squeaking or emits any other unusual noises, freezes, becomes unresponsive or if it is not recognized in BIOS, you should turn to a specialized data recovery service provider for help. The thing is that when dealing with a physically damaged external drive, performing any DIY recovery attempts may make the data loss situation even worse. Hence, only a data recovery professional with proper equipment can try restoring information from such a storage.
Hint: If the external drive has a RAW or uninitialized status, please, familiarize yourself with the article covering the issue of a RAW partition/drive.
If the device has faced some kind of logical failure, like accidental reformatting or improper removal, the right data recovery tool can easily restore the lost information. As there are multiple formatting options for removable drives, the actual quality of the obtained result will depend on the type of a file system which performs storage management operations, like deletion or formatting.
Hint: To learn more about file systems and their types, please, refer to the basics of file systems. If you want to assess the possibility of a successful data recovery operation, familiarize yourself with the article describing the chances for data recovery.
However, there are several situations when the chances to get files back are practically nil, even after logical data loss. To be more specific, please mind that:
- low-level (full) formatting fills the drive with zeros, therefore, data erased this way cannot be restored;
- overwriting operations are also carried out by file shredding utilities that render the data irrecoverable;
- some portable drives based on the SSD technology support the TRIM command, which irreversibly wipes the data of files soon after their deletion;
- the use of encryption on a drive usually doesn't impede data recovery as long as the encryption key is available, while its loss makes it impossible to decrypt the volume and thus retrieve its files.
In other cases, SysDev Laboratories offers UFS Explorer and Recovery Explorer as effective software solutions which provide for a wide range of data recovery needs of both home users and professionals, including ones related to rescuing deleted or lost files from intact or corrupted external disk drives with any file system of Windows, macOS, Linux or Unix/BSD. The utilities thoroughly examine the content of a storage and restore the lacking data, enabling its further copying to any safe local or network location.
Note: Before starting the process of recovery, try plugging your hard drive into another computer to exclude a faulty port or incompatibility issues.
How to recover data from an external hard drive with UFS Explorer Standard Recovery
In order to get your deleted or lost data back from an external HDD or SSD with the help of UFS Explorer Standard Recovery, please follow these steps:
-
Download and install the program onto the computer. The version of the software must correspond to the operating system your PC is running.
Hint: If you have any difficulties with the installation of the utility, please refer to the installation manual for UFS Explorer Standard Recovery.
-
Connect your external disk drive to the machine: it is preferable to use the fastest available interface. Some portable disks have an eSATA interface in addition to a USB one – its use may considerably accelerate the procedure.
Warning: When your external hard disk gets attached to the computer, the OS may show an error and suggest formatting or repairing the drive. Please do NOT accept this suggestion, as such operations may complicate your data loss case or even cause permanent data deletion.
-
Run the application and, if needed, change its parameters in the settings pane.
-
Select your portable drive in the Connected storages section in the left pane and launch its scanning for lost and deleted data with the help of the "Start scan" button in the bottom right corner of the window or with the corresponding option in its context menu or in the panel of tools at the top of the storages list.
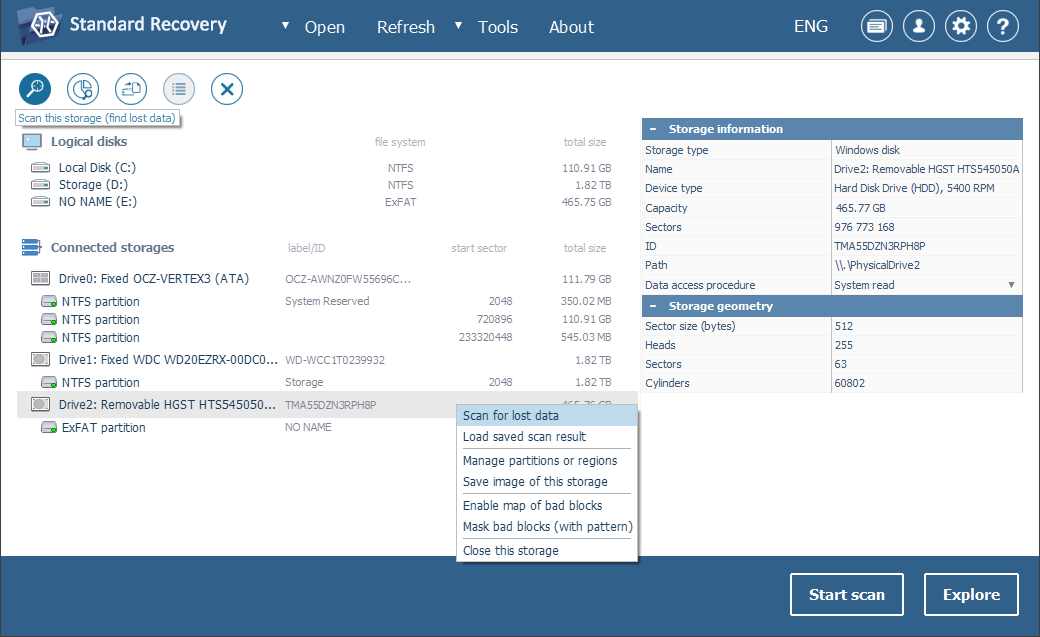
If your drive is missing in the list of detected devices, please first try using the "Refresh" option from the top bar to make the program update the list of attached storages. Then try reconnecting your portable drive, connecting it to another PC or attaching it using another cable/adapter/enclosure to make sure that it is not a connection-related issue. If nothing helps and neither the computer nor the data recovery software can detect the drive, it is very likely that you’re dealing with a physically damaged device, and it should be taken to a data recovery center.
-
Define the desired scan parameters. If you are absolutely sure which file system type you are working with, unselect the remaining ones. After that, click "Start scan" and wait for the process to finish.
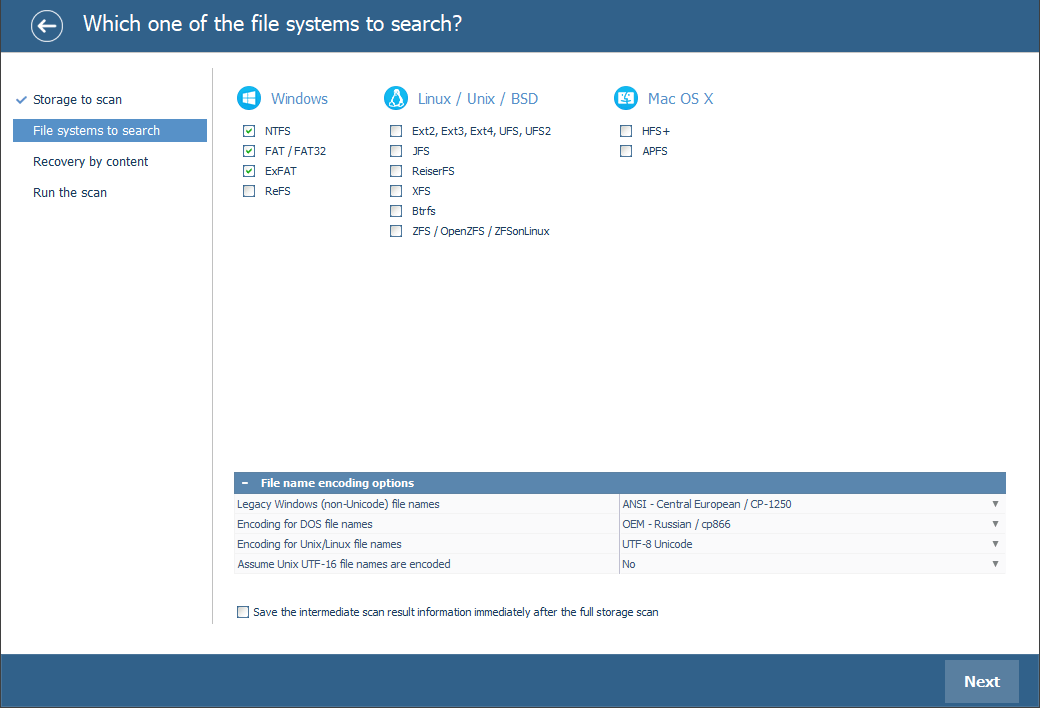
Hint: More information about configuring the scan can be found in the instruction on scanning a drive with UFS Explorer.
-
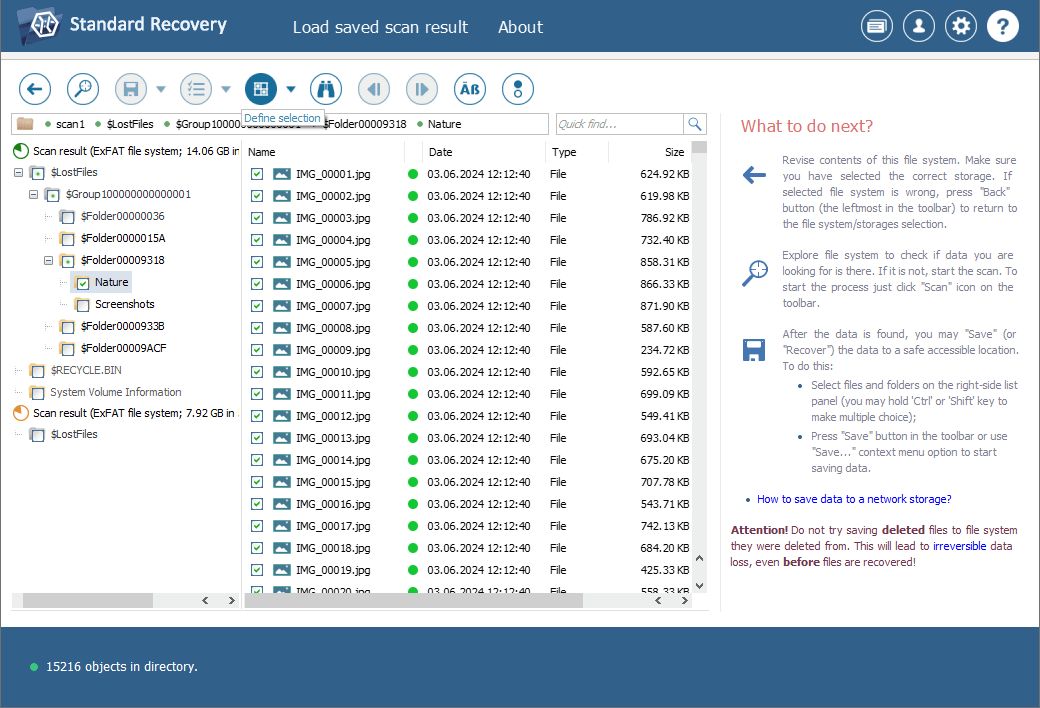
Explore the file system reconstructed by the software. If the "Set up displaying of file status" tool is enabled, all files will be displayed with circular icons next to their names. Such an icon can help you to determine the state of each file: the green color indicates that a file is "good" and has a valid header; the red color implies a "bad" (zeroed) state of a file; a file with the gray icon may be partially damaged or cannot be checked for integrity due to the specifics of its format. The undeleted files and folders can be differentiated from the current data by the red color of their names.
You may also sort the items by name, date, size, employ quick or advanced search and preview images, videos, audio files or PDF documents. After that, press "Define selection" and choose the items you want to save by putting checkmarks right next to them.
Hint: The information provided in Evaluation and saving the results of data recovery may facilitate your work with the obtained folders and files.
-
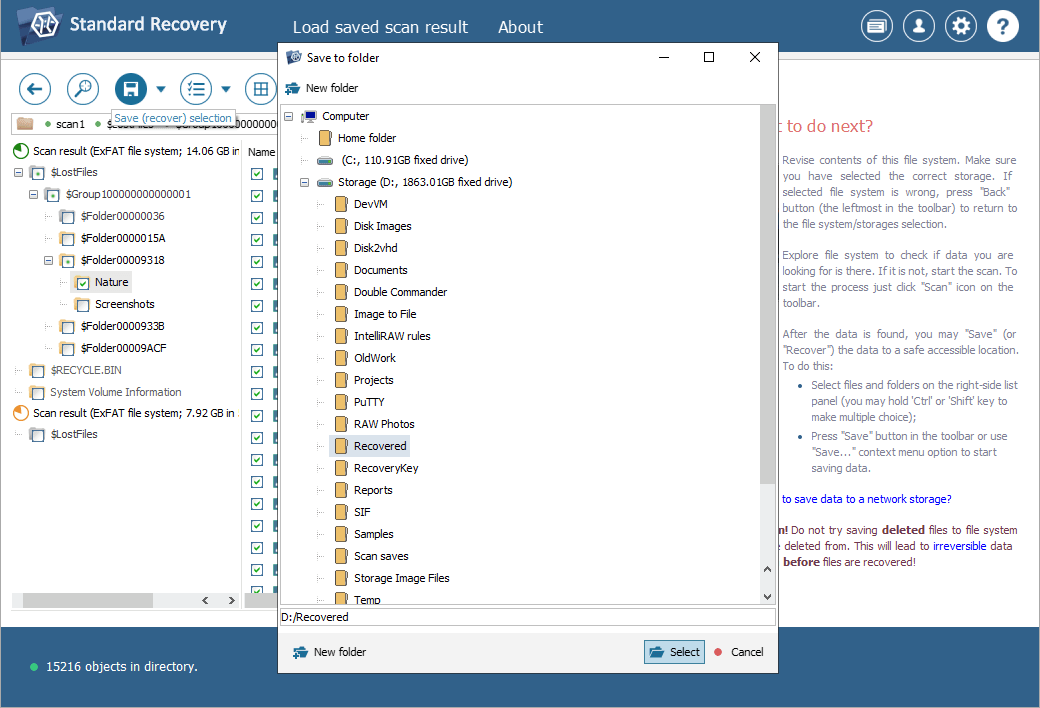
Select a destination folder for these files. Save these files to any internal or external data storage medium other than the portable drive they are being recovered from. Otherwise, the actual information in the drive will be overwritten without the possibility to restore it in the future.
Hint: If you are going to save the recovered data to a network storage, please check the provided guide.
Last update: May 28, 2024