How to create a disk image with UFS Explorer
02.08.2022
The disk imaging procedure is intended for the transfer of the data (or its part) from the source storage to a file or to another storage medium. One of the primary objectives of this operation is to extract the data located within a defective storage device before it fails and becomes completely unusable.
In view of the fact that the source storage may be running in a non-standard mode, the process of its reading may require additional configurations. The embedded disk imager function of UFS Explorer offers several sets of supplementary parameters to enable maximally efficient work with failing storage devices, including ones related to source and target storages as well as processing of reading errors.
Configurations related to the source storage
This section includes information about the source storage as well as principal settings for the process of reading data from it:
-
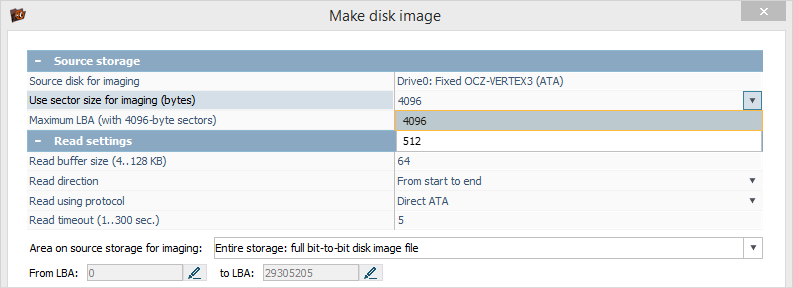
Sector size: the size of the minimum block for reading.
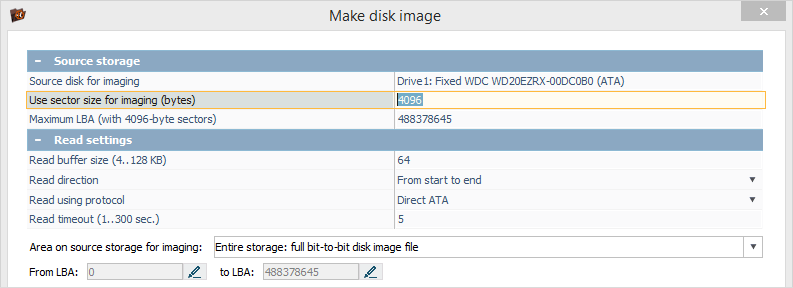
Newer disks usually have a physical sector size of 4 KB while older disks may have a sector size of 512 bytes. The program chooses the size of 4 KB by default.
The value cannot be changed for disks that have a physical sector size of 4 KB according to the disk identification data.
For disks that do not identify the physical sector size as 4 KB, values of 4 KB or 512 bytes can be selected.
-
In case of a defective sector:
Selecting 512 bytes for a disk with sectors of 4 KB will result in repeated attempts to read the same defective sector several times;
If 4 KB is selected for a disk with sectors of 512 bytes, this may lead to the skipping of extra sectors adjacent to the defective one.
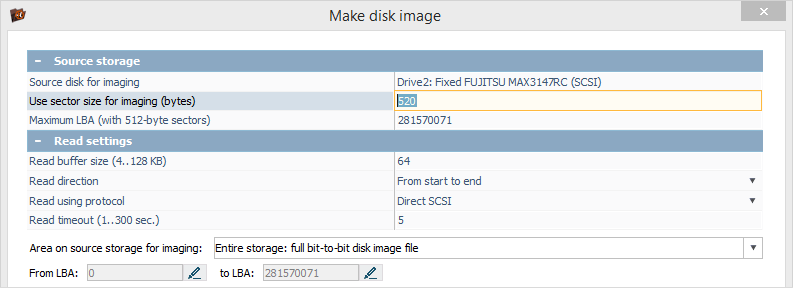
If the sector size is not a multiple of 512 bytes (for example, 520 bytes), the program selects this size without the possibility to change it. In this case, the image will be created with a rounded block size (512 bytes on the image for 520 bytes on the source).
-
Read block size: sets the size of the data block that will be read in one pass.
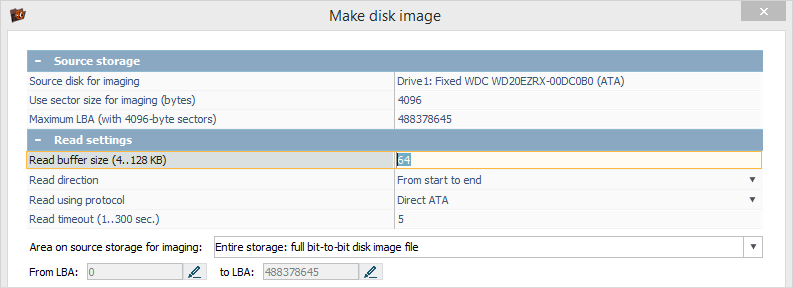
Maximum performance is usually achieved when the block size is from 64 to 128 KB. This size usually suffices for efficient linear reading and is small enough to work with sparse defective blocks. A very large size may not be supported on some connections in ATA/SCSI modes.
Note: If the size of the block is very large, it is likely to "catch" defects.
-
Reading direction: sets the direction in which the storage reading will be performed.
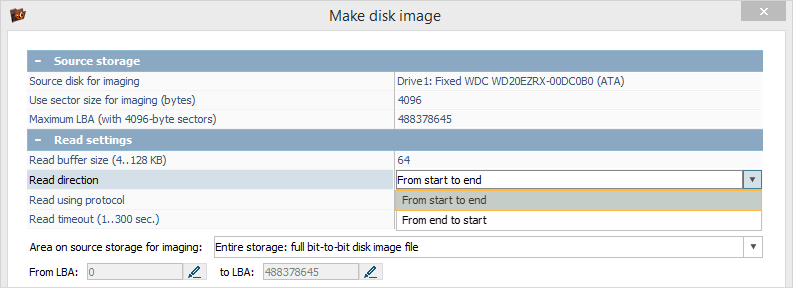
"From the start to the end" direction is chosen by default and provides the maximum speed;
"From the end to the start" is recommended to be selected when the defect of the disk surface is observed at the beginning. The software still reads the data in the "forward" direction, but in blocks of several megabytes, starting from the end of the disk. This will allow extracting as much data as possible before the disk crashes because of the rotational scoring (rotational damage to hard drive platters).
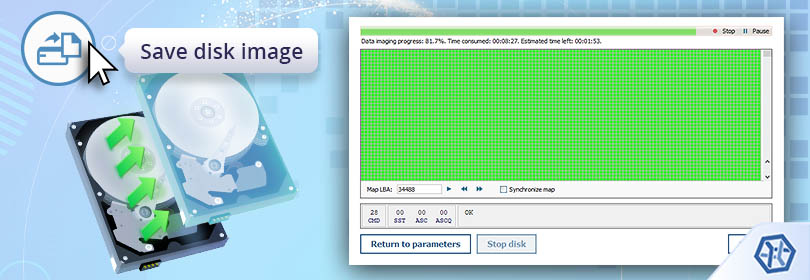
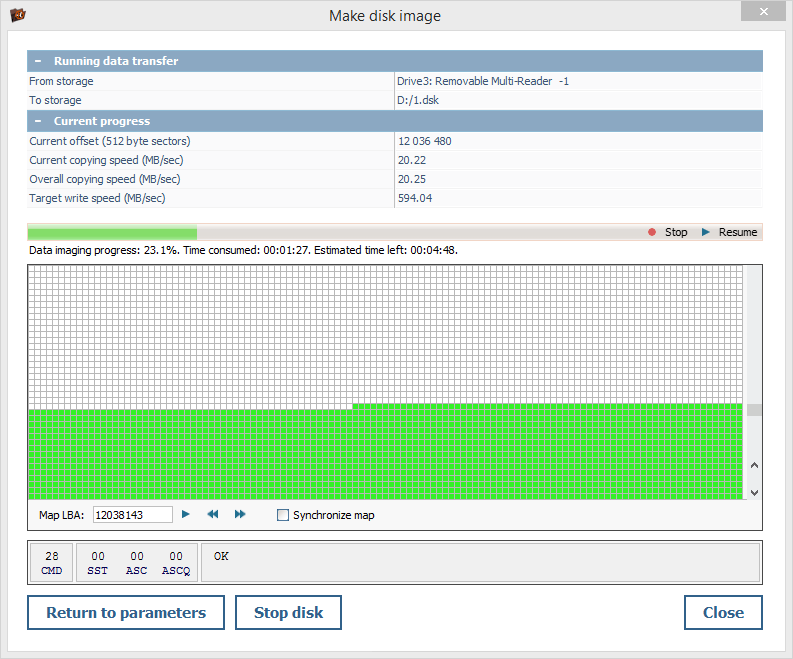
Note: The visualization of the reading process makes it possible to see how the bitmap is filled, especially with a block size of 512 bytes.
-
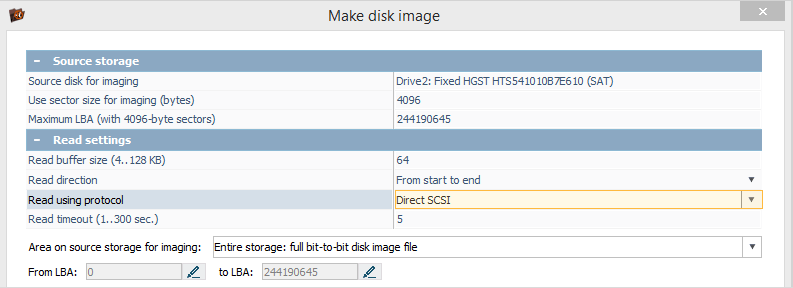
The reading procedure: sets the procedure which will be used for access to the storage.
"System procedure": the read request is processed by the standard system procedure for reading data. The procedure of this type is available for all operating systems. Its main disadvantage is the lack of control over the reading procedure, which may lead to the "hanging" of the software and/or USB adapter in case of defective blocks.

"Direct SCSI": the procedure is available in the Windows and Linux editions. The procedure of this type allows performing a controlled disk readout with the diagnostics of reading errors, though such a diagnostics may not available on a large number of USB adapters. The procedure is available for:
all Linux-based storage media;
all Windows-based storage media except PATA/SATA with a direct connection.
-
"Direct ATA": the procedure is available in the Windows edition of the software for PATA/SATA disks. It makes it possible to perform controlled reading with advanced diagnostics.

The main advantage of choosing Direct ATA/SCSI modes over the standard system procedure is the possibility to gain control over reading errors. Otherwise, when a disk polling operation performed by the system procedure gets to a defective block or series of defects, this may cause the whole process to "hang" and lead to further degradation of a storage device.
-
Read timeout: the time in seconds to wait for the data from the disk.
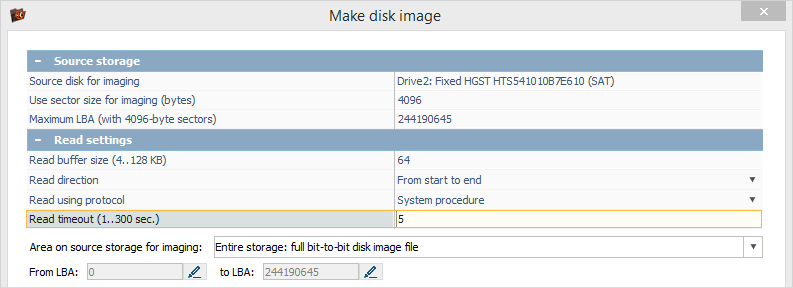
This parameter specifies the time to wait until the attempt to read the sector will not be interrupted and is critical for disks with defective or poorly readable sectors. Yet, one should keep in mind that a small timeout may lead to skipping of poorly readable sectors while a large one may cause the rotational scoring of defects.
-
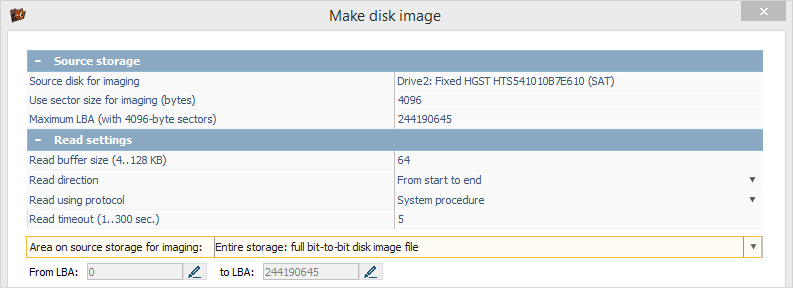
The area for reading: sets which part of the source storage will be imaged.
"The entire storage": this option allows saving everything that is possible, from the first to the last block of the physical storage. This is the default choice for creating an image of an entire disk.
-
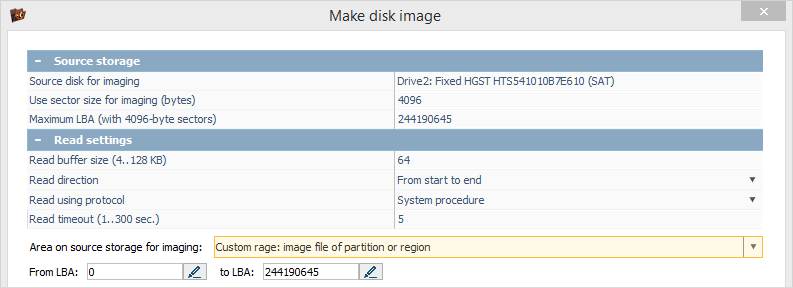
"Custom range": this option allows saving a range of blocks specified by the user. It gets activated automatically when an image of a disk partition is to be created. The values for the start and the end sectors are filled in by the software itself.
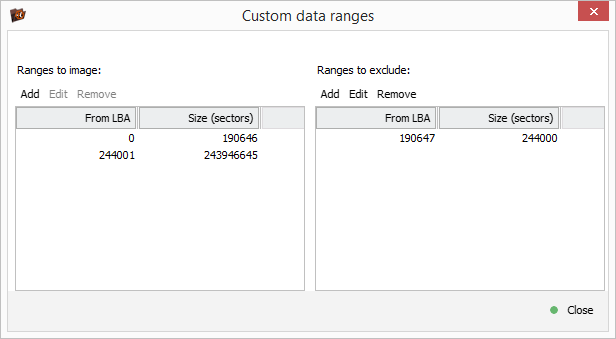
"Multiple ranges": this option enables manual definition of ranges for creating an image.
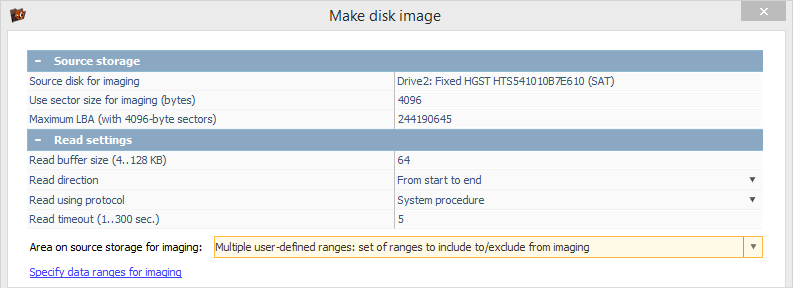
In this case, it is possible to specify either which ranges will be saved or which of them will be excluded from the image. The option is useful when a certain partition or some other data are to be excluded from the image or several known ranges are to be read out one more time.
"Specified externally": this option cannot be selected by hand but is activated automatically when the software creates an image on the basis of a block map. In this case, a software map is utilized, which includes an instruction for each block as to whether it needs to be read.
Configurations related to the target storage
The following storage options are available for saving the image file:
-
"Another physical disk": data is transferred from the source disk to another storage.

However, the target disk must be no smaller than the selected area to be imaged on the source disk. Information about the reading defects on the source disk is saved in the mandatory defect map file.
For instance, if the source disk is 3 TB in size, the target storage for saving its full image must be at least 3TB. If a 1 TB partition from a 3 TB storage is being imaged, the minimum size of the storage should be 1 TB.
-
"Image file": the default option for disk imaging.

A plain image file is created, without metadata, with a size that exactly matches the size of the area from which the image is created. Data about defects gets stored in the mandatory defect map file within the disk image.
-
"New sparse image": on-demand disk imaging.

This type should be chosen when one needs an image of just a part of the data, especially if it is scattered across the source storage (an image of the file system metadata/data, an image on the basis of a map, and so on). The state of reading is a part of a sparse file and does not require a separate map.
-
"Available (connected) sparse file": on-demand disk imaging to the connected sparse image file.
This option is activated automatically when an image is created for a disk that is already being read in the "on-demand imaging"/"one-time read" mode and has a connected active sparse file.
If the target storage is larger than the source one (a larger disk, a larger existing image, and so on), it is possible to specify the offset on the target storage in the range from zero to the difference of the storage sizes. It allows, for example, overwriting a certain partition on the target storage.

-
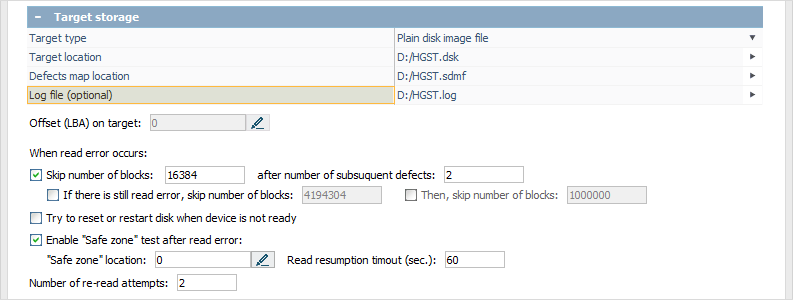
"Defects map location": the location of a file to which the defective blocks are mapped out.
In the process of reading a map file of defective blocks is created on the disk or a "simple" disk image. In addition to the header, the file has a simple map, where each byte sets the status of 4 blocks (512 Bytes or 4 KB, depending on the settings for the size of the block for reading.
-
"Log file": the location of an optional log file.
Such a file will contain events like reading errors, jumps, etc. It is not mandatory but can be useful for diagnostics.
Configurations related to the processing of reading errors
The general reading procedure is as follows:
-
Reading is performed in accordance with the reading settings.
If the requested block has not been read out completely, a request is sent to finish its reading.
If the data could not be read from the given offset, the specified number of repeated attempts is performed.
If the readout still fails after repeated reads, the block is considered defective and the situation with the defective block is handled:
-
If a "safe zone" is specified, the software its performs its test:
If the test cannot be passed, the procedure for restoring the connection to the disk is started, including a request to reconnect it by necessity.
When the test is passed, the software returns to handling the situation with defects.
-
After processing the "safe zone", or in case it hasn't been configured, the software proceeds to the next steps to process the defect.
-
-
If the jumps have been set up, the software checks whether there is a necessity to perform a jump and continues the procedure.
When disk reading is completed, the program automatically returns to the missing blocks and reads them one more time. In this case, the jump rules get disabled.
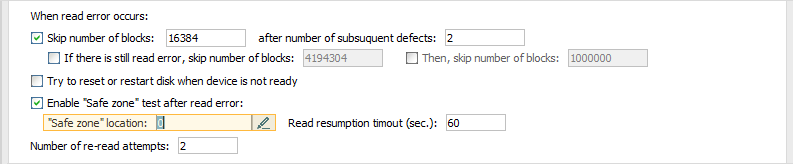
The settings for processing defects include:
-
Skipping (jump rules)
If a block is considered to be defective, the software checks the status of the jump rules.
If the rules are enabled:
The number of consecutive defects is checked. If this number is greater than or equals to the specified number, a jump is performed on the given number of blocks.
-
The reading is performed from the new location. If the readout is successful, the status gets reset and the normal mode gets resumed. If the readout failed, the jump is performed again. Its size depends on following settings:
It equals to the first if the secondary size is not activated;
It equals to the second size, if it is active;
-
If the reading is normal after the second jump, the normal mode resumes. Otherwise, the jump is performed again on the size which:
equals to the second size if the third size is not active;
equals to the third size, if it is active;
Jumps of the specified size are performed until normal reading resumes.
The block size in this case is the same as the block size for reading.
Three ranges for skipping allow setting up jumps of different levels – from a simple scratch to a defective head.
-
Reset/restart.
This function may be active in certain configurations. For SATA drives without power control the software tries restarting the disk rotation with parking of the read heads. This may force recalibration of the device.
-
A "safe zone" test.
On some connections, it is not possible to distinguish a reading defect from "hanging" of a device or bridge. To check whether there is a "hang", the software can perform a test read from an area on the disk that the user believes is guaranteed to be readable. This can be block 0, if the rotational scoring occurred somewhere in the file system metadata area, or a sector near the end of the disk, if the defect occurred near its starting blocks.
If this mode is enabled, the software will check whether the disk is readable by making read requests to the specified block. If the block cannot be read out, the program considers that the disk or the bridge to be "frozen". If it is not possible to restore the operation programmatically, a request window is displayed asking for reconnection of the disk by the user.
-
Re-read attempts.
This is the number of repeated reading attempts that will be performed on a single block that causes a read error until it is considered to be "defective".
A value of 1-2 can lead to skipping of extra blocks that are poorly read, whereas large values can lead to the rotational scoring of defects.
Options for creating disk images from other disk images
The software offers a special mode for creating disk images from other disk images and files of various formats. This mode has a simplified procedure without defect handling. This mode can be used to save a sub-image, convert formats or write data from the disk image to a physical disk.
Creating disk images from special sources
When imaging is run on a supported special storage from which the image is created (for example, when a disk is connected via DeepSpar DDI), a special dialog opens for managing the imaging process on an "external" tool instead of the standard procedure for creating images.
This procedure allows configuring and launching the process of imaging performed by an external tool while the process and its result will be displayed in the software.