How can I recover data from a RAID set with redundancy?
In order to maintain high availability of critical information and increase its safety, the majority of users prefer employing RAID configurations that provide fault tolerance. Such disk setups remain functional after the failure of a single or even several components, making it possible to perform a replacement without data loss. Yet, unfortunately, even redundant configurations are unable to preserve the data in case of software crashes, accidental formatting or deletion and other logical mishaps.
The basics of redundancy
Redundancy in RAID may be achieved through parity or mirroring. The applied method of protection determines the bare minimum of intact disks that will suffice for data recovery:
-
Mirroring
Thanks to the presence of two identical copies of data in RAID 1, it is possible to restore missing information without one member disk; -
Parity
Data is split into blocks of a certain size, then a mathematical function is calculated for these blocks and its result is written onto a single disk or distributed between the constituents, depending on the employed type of parity. Thus, in case of single parity that is used in RAID 3, RAID 4, RAID 5 and RAID 7, the array can survive the failure of only one drive, while the sets with double parity, like RAID 6, can keep functioning even when two disks fail simultaneously.
If the number of defective components exceeds the above-given figures, data recovery is only possible after the affected disks are repaired. That being said, please do not try repairing them yourself unless you are a tech professional, as this procedure should be carried out in a clean room by a properly skilled and equipped specialist. Therefore, when facing such a case, it is highly recommended to contact a specialized service center as soon as possible.
And before you proceed to data recovery with a dedicated program, please mind several other factors that may influence the success of your efforts:
Overwriting that may occur as a result of the user’s actions (in particular, saving new information to the affected array), system operations, the TRIM command automatically performed on solid-state drives or the full format of the storage results in permanent and irreversible data loss. To prevent this from happening, please stop using your RAID once you notice data disappearance or encounter a critical problem;
Software-based encryption of a RAID volume generally doesn’t impede data recovery as long as the password/decryption key is available and the area containing critical encryption metadata is intact;
Note: Please refer to the dedicated article for more details on data recovery from encrypted drives.
In case of a failing drive or a high number of corrupted sectors on it, it is recommended to create its image and work with the disk image instead of the source storage. In such a way, you can minimize the workload on the problematic drive(s) and prevent further data corruption or loss. Don’t try to replace the drive and rebuild the system before the necessary data is extracted.
How to recover data from a redundant array
If the system was affected by some logical failure, the apt data recovery instrument will be able to bring the missing information back. SysDev Laboratories offers UFS Explorer and Recovery Explorer as efficient software solutions that allow processing RAID sets of various levels and types, including standard redundant configurations – RAID 1, RAID 3, RAID 4, RAID 5, RAID 6, etc. Depending on the severity of metadata damage, the software will either detect the initial RAID parameters and reconstruct the storage or give the possibility to assemble the array from its drives or their disk images. Such a RAID set is created as a virtual storage while the data on the real disks is no way modified.
The software will either detect the initial RAID parameters and reconstruct the storage automatically or, in case of severe metadata damage, give the possibility to assemble the array manually from its drives or their disk images using the in-built RAID Builder tool. Please also mind that a RAID set assembled in the software interface is just a virtual representation of the real one, so that the data on the real disks is in no way modified during its processing.
To rescue files from such a RAID unit by means of UFS Explorer RAID Recovery you will need to act according to the following instruction:
-
Prepare a computer that will be used for data recovery and install the software onto it. It is advisable to take one with an incompatible operating system to avoid configuration updates/overwriting: for example, if you have Linux MD RAID, choose a Windows PC. Additionally, please make sure it has enough USB ports or SATA slots on its motherboard to attach all RAID drives.
-
Get a storage large enough to locate the recovered data. This may be the internal disk of the host computer you’re planning to use for data recovery, a network folder or any portable storage device.
-
Attach all the available RAID disks to the computer, paying attention to their correct order. The best shot is to use internal SATA connectors, but it is also possible to utilize USB to SATA adapters or external enclosures, in case of the shortage of ports. Yet, the latter option may affect the speed of the process.
Note: Please refer to the corresponding articles for detailed instructions on how to plug the disk into the motherboard of the computer or сonnect the drive externally using a USB to SATA adapter.
-
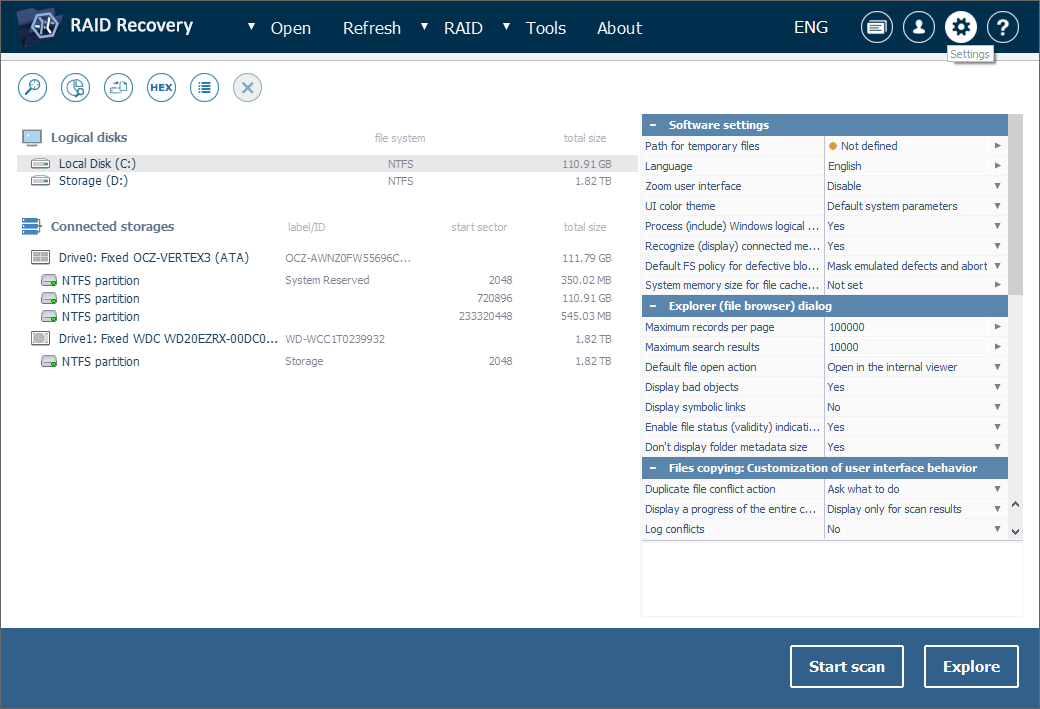
Run UFS Explorer RAID Recovery. If necessary, change the software settings in the respective pane.
Note: If you are going to use disk images instead of the original drives, open the corresponding files with the help of the "Image file or virtual disk" option from the "Open" item in the main menu.
-
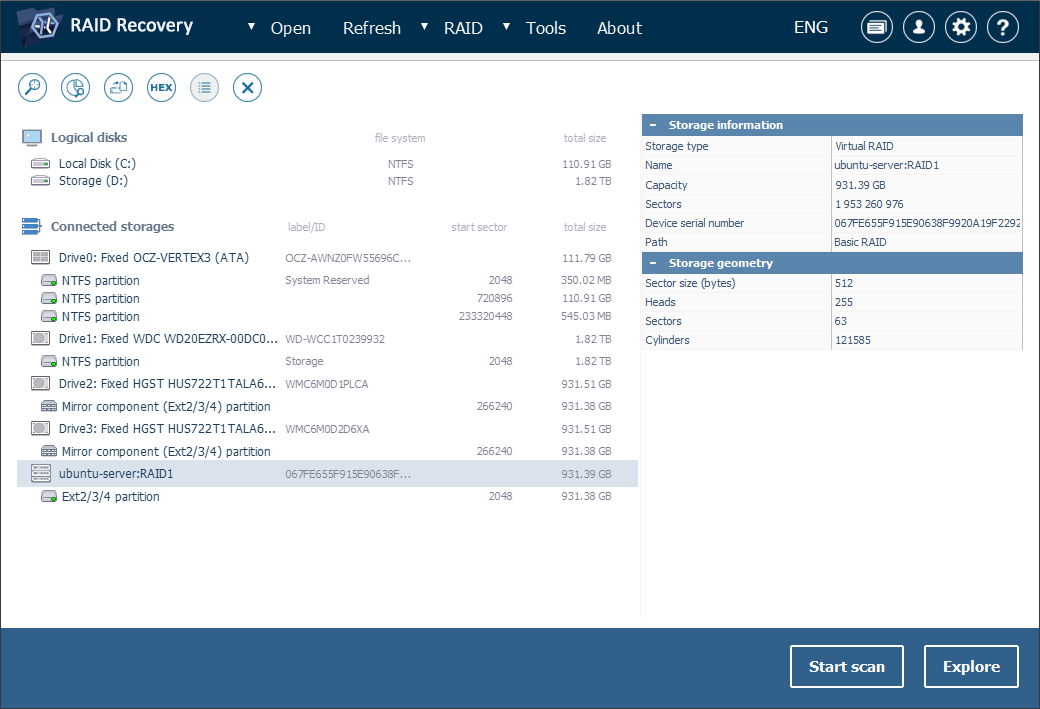
Examine the tree of connected storages on the left of the main window. If the disks contain RAID metadata and it wasn’t seriously damaged or overwritten, the array will be assembled automatically and presented in the list. You can recognize it by the special icon, RAID level or the number of disks and proceed to Step 6 right away.
-
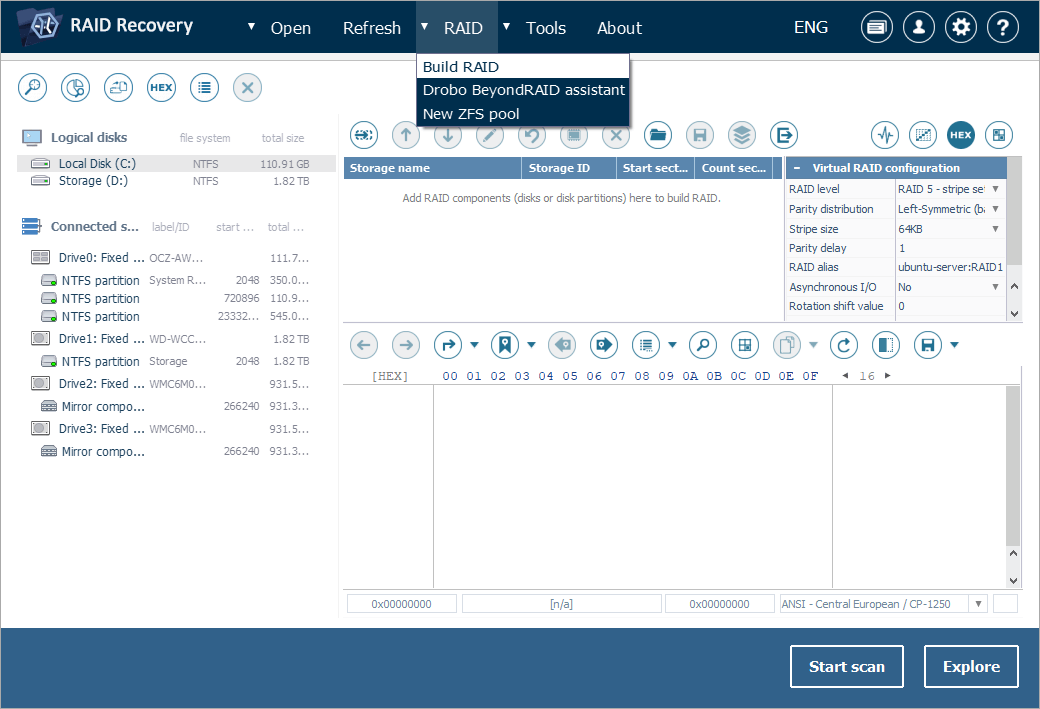
5.1 If the program hasn’t managed to assemble the RAID configuration in an automatic manner, it should be built manually from its member disks or their images. For this, open RAID Builder by pressing the "Build RAID" button and create a new virtual RAID storage. Depending on the level of your RAID, use one of the following instructions:
 RAID 1
-
Add the components of your mirrored set to a new virtual array by double-clicking the corresponding disk (partition) or using the dedicated option in its context menu.

-
If one of the constituents is not available, include a placeholder that will serve as its substitute.
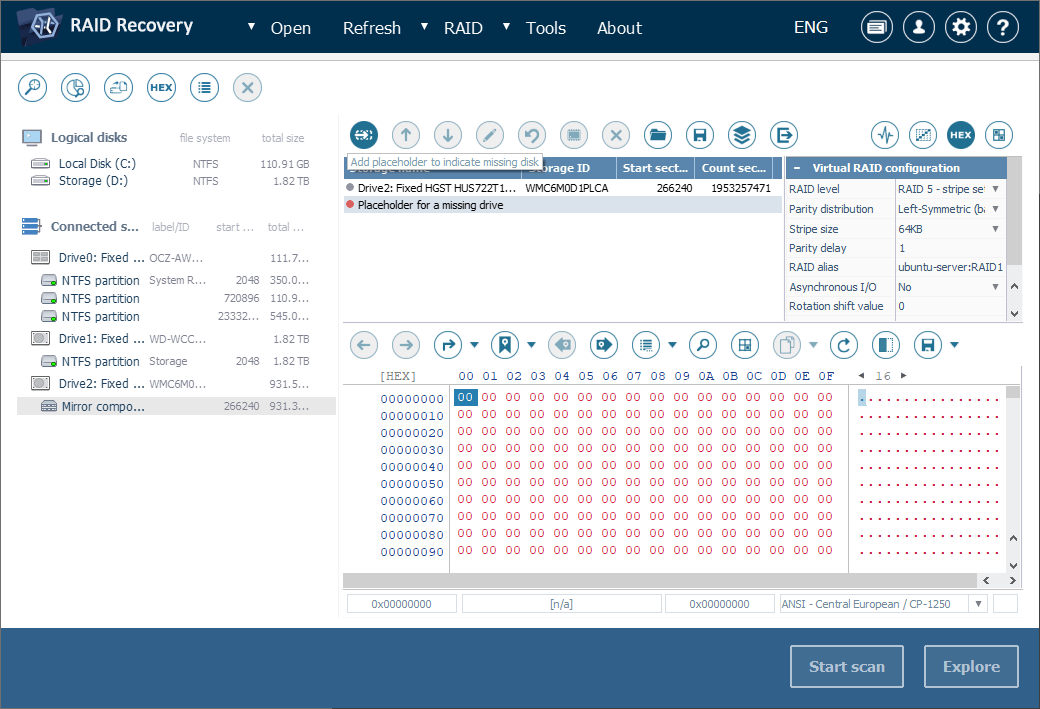
-
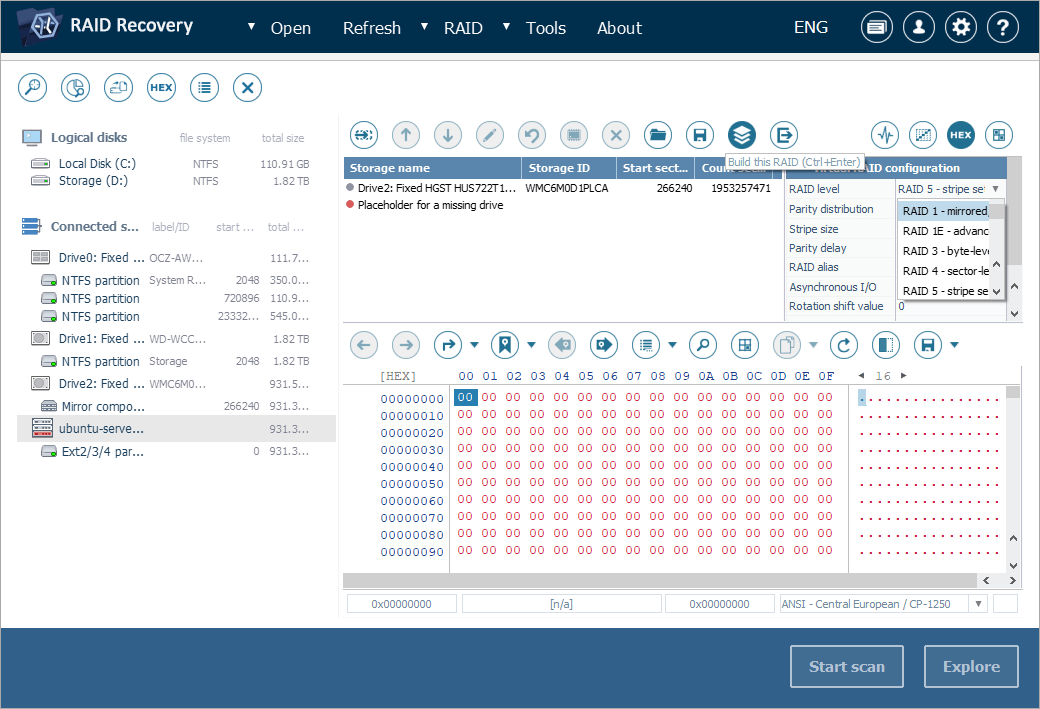
Choose RAID 1 in the virtual configuration sheet and press "Build this RAID".
 RAID 3
-
Add each member disk (partition) to a new virtual array by double-clicking the respective storage or selecting the corresponding function in its context menu.
-
If your RAID 3 is degraded, add a placeholder instead of the lacking component.
-
Adjust the order of the disks: select a constituent and relocate it up or down with the help of the arrow buttons on the RAID Builder toolbar. Make certain that the placeholder is positioned correctly.
-
Choose RAID 3 in the parameters sheet and define the correct size of the stripe.
-
As soon as you finish, click "Build this RAID".
RAID 4-
Move each drive or partition the RAID set consists of to the RAID Builder window to assemble a virtual array. For this you may use the respective option in the storage context menu or simply double-click the necessary storage item.
-
For degraded RAID 4, include a placeholder which will indicate the unavailable component.
-
Establish the accurate order of member disks: select the needed one and move it up or down using the arrow buttons from the toolbar above. Make sure that the placeholder is correctly positioned as well.
-
Choose RAID 4 in the configuration sheet and define the utilized size of the stripe.
-
Once you are done, press "Build this RAID".
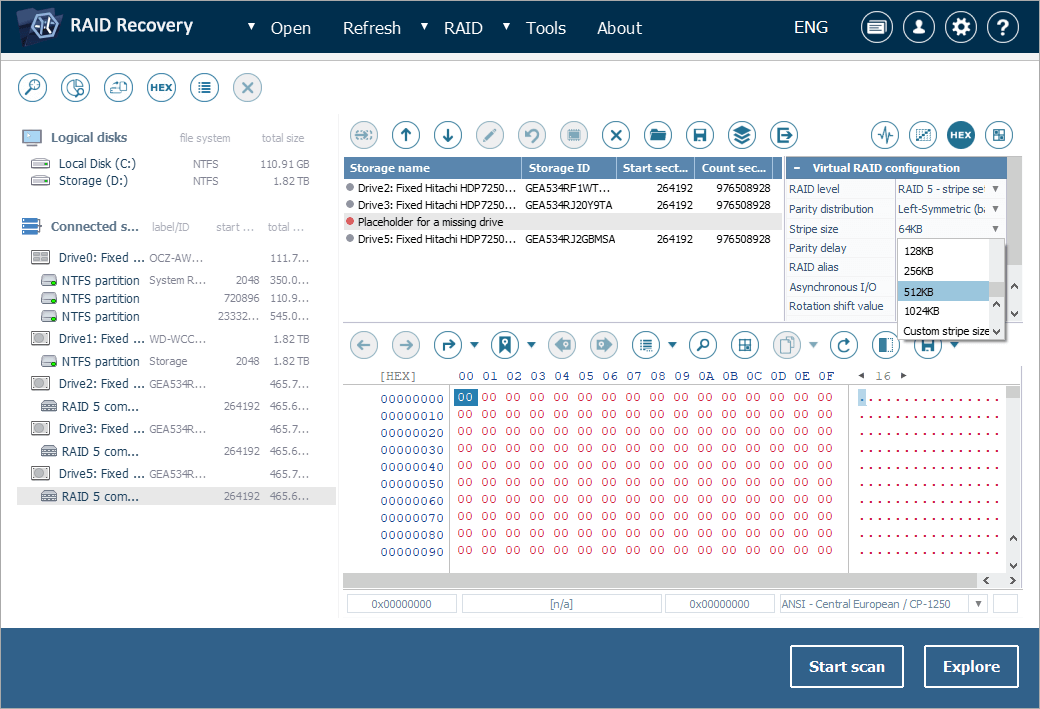
RAID 5-
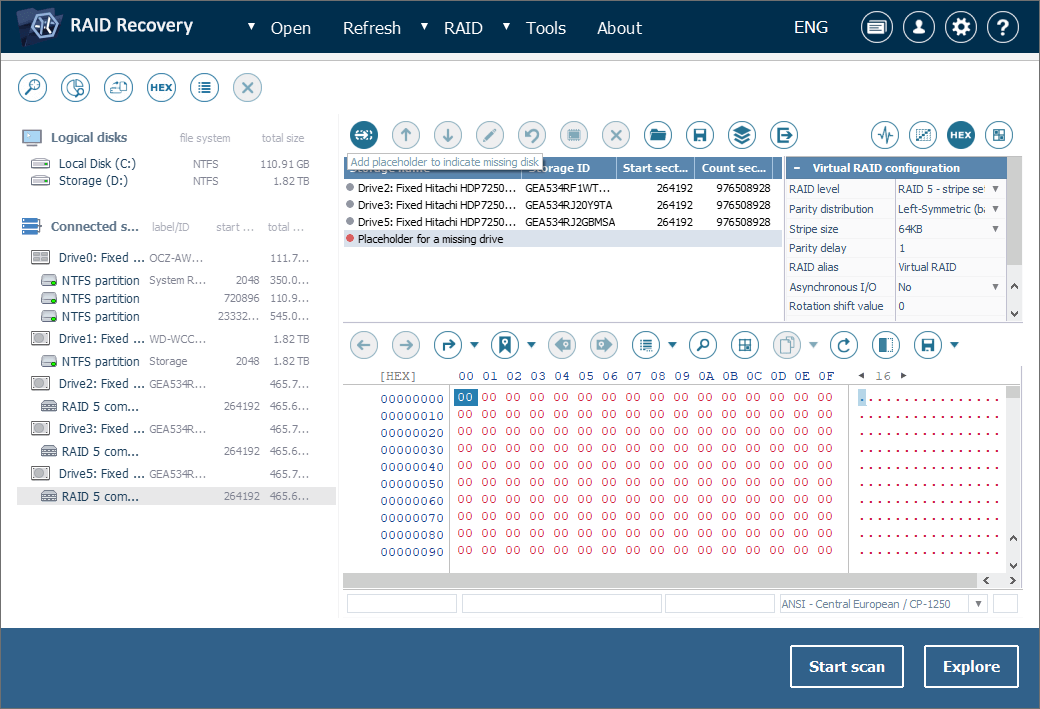
Add each drive or partition constituting the array to the new virtual RAID. For this you may double-click the storage or use the respective option in the storage context menu.

-
If your RAID 5 is in the degraded mode, include a placeholder instead of the missing disk.
-
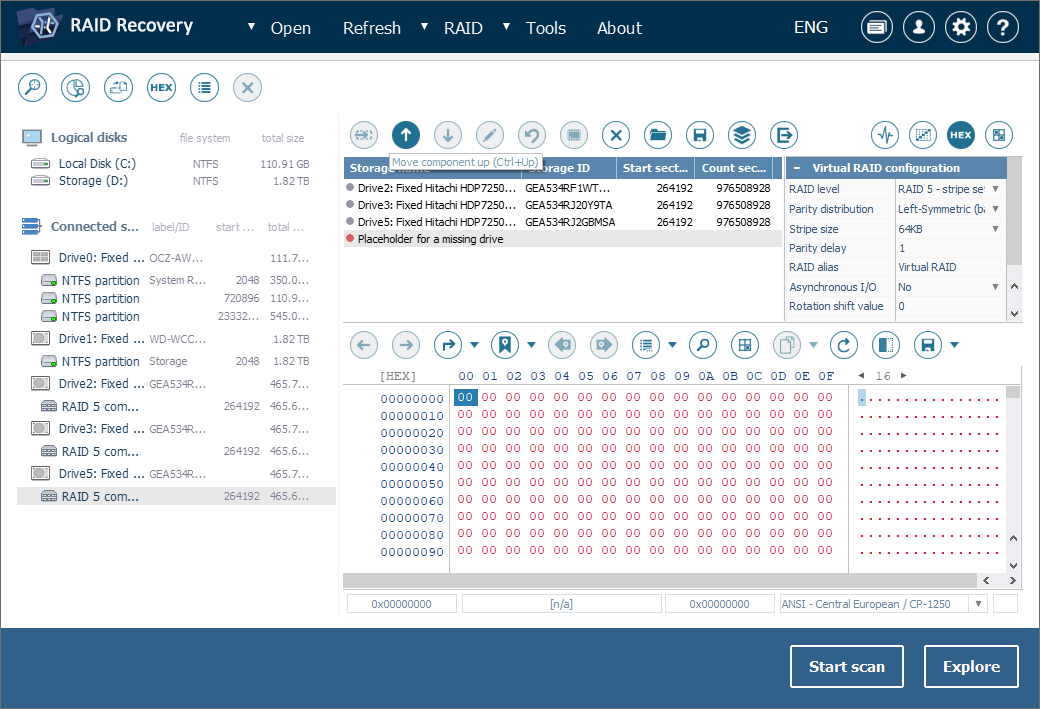
Set the order of the drives in your RAID 5: select the needed component and move it up or down using the arrow-like buttons. Mind the correct position of the placeholder.
-
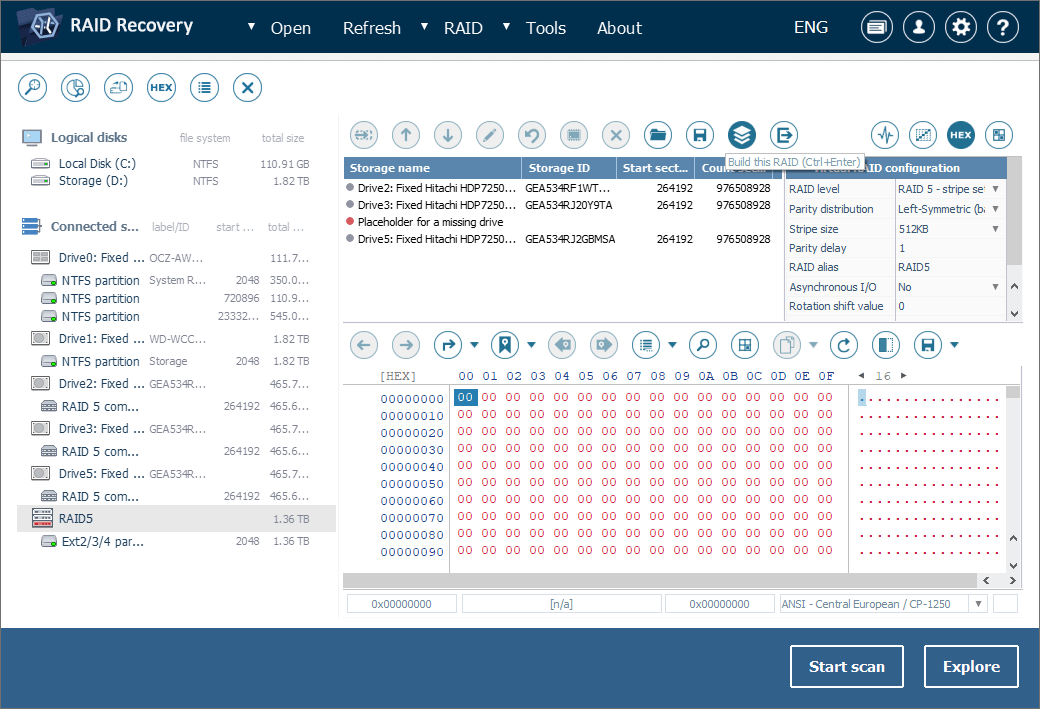
Choose RAID 5 in the configuration sheet and provide correct parameters for your array: the algorithm used for distribution of parity blocks (parity distribution), the size of each data chunk (stripe size), the number of stripes per single parity block (parity delay – if applicable) and the value for shifting the rotation of data/parity (rotation shift value).
-
Once you have finished, click "Build this RAID".
 RAID 6
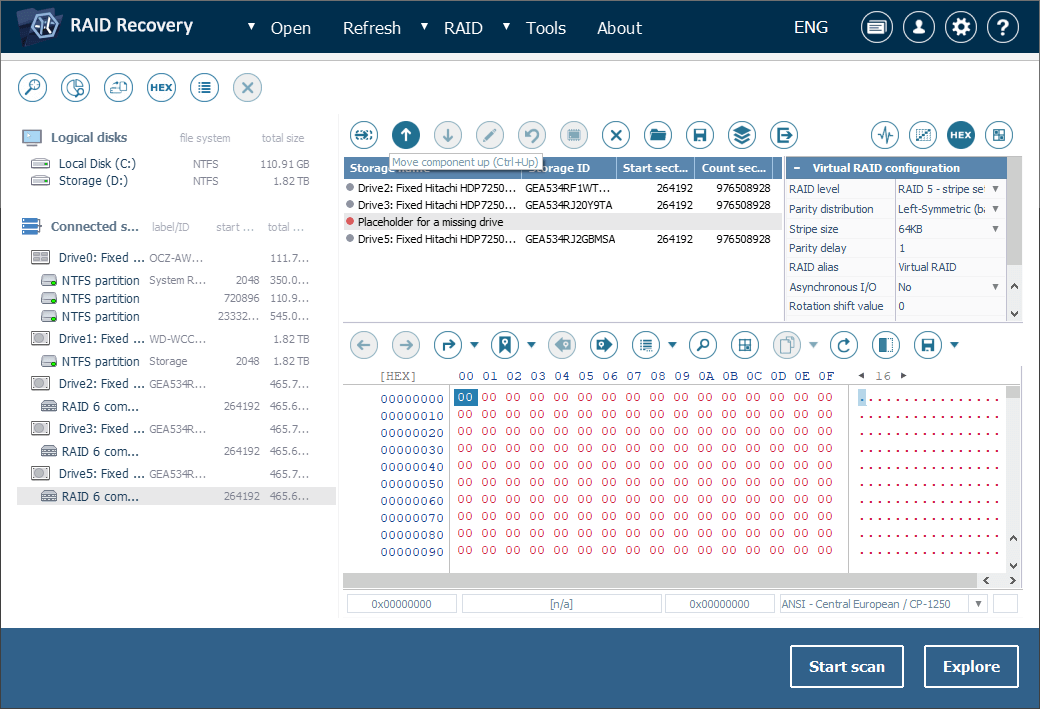
-
Add each component of your RAID 6 to the RAID Builder window. For this you may double-click the necessary disk/partition or employ the respective option of its context menu.
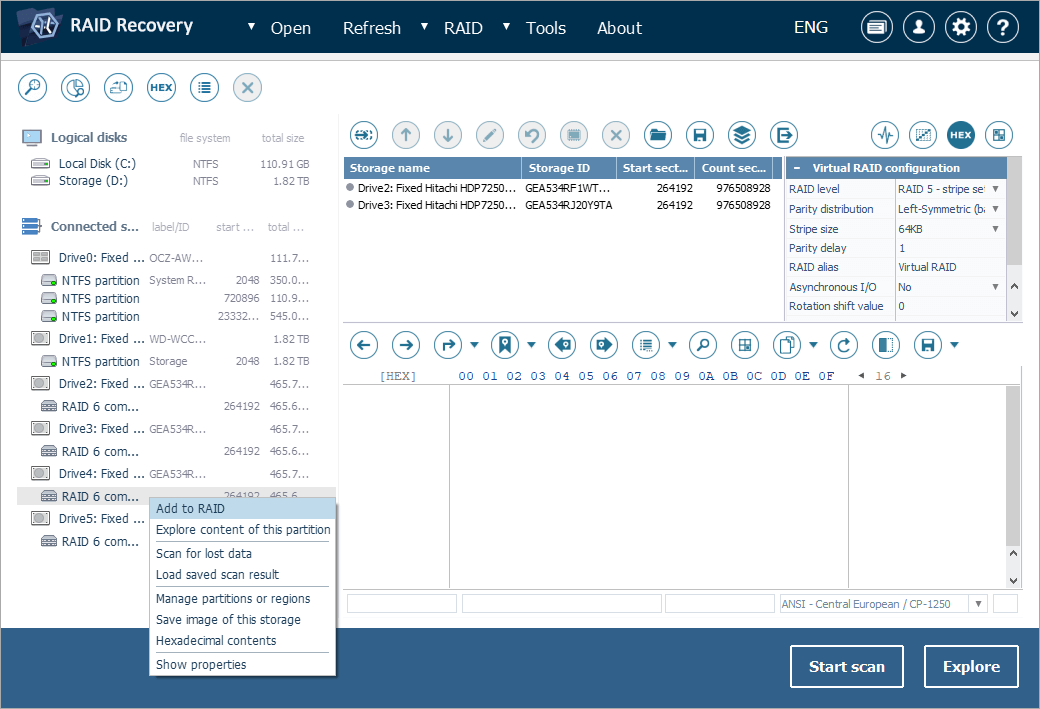
-
If one or two constituents of your RAID 6 are missing, insert placeholders to indicate them.
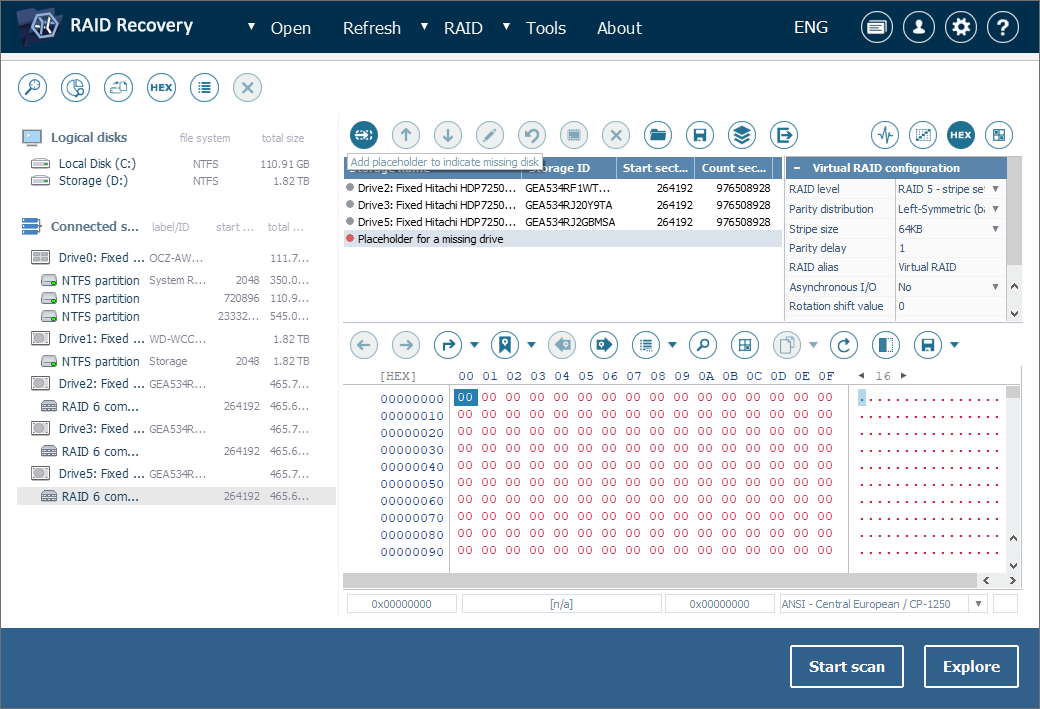
-
Define the correct order of the disks in your RAID 6: select and move each component up or down with the help of the arrow-like buttons on the toolbar above. Ensure the correct positions of placeholders in the sequence.
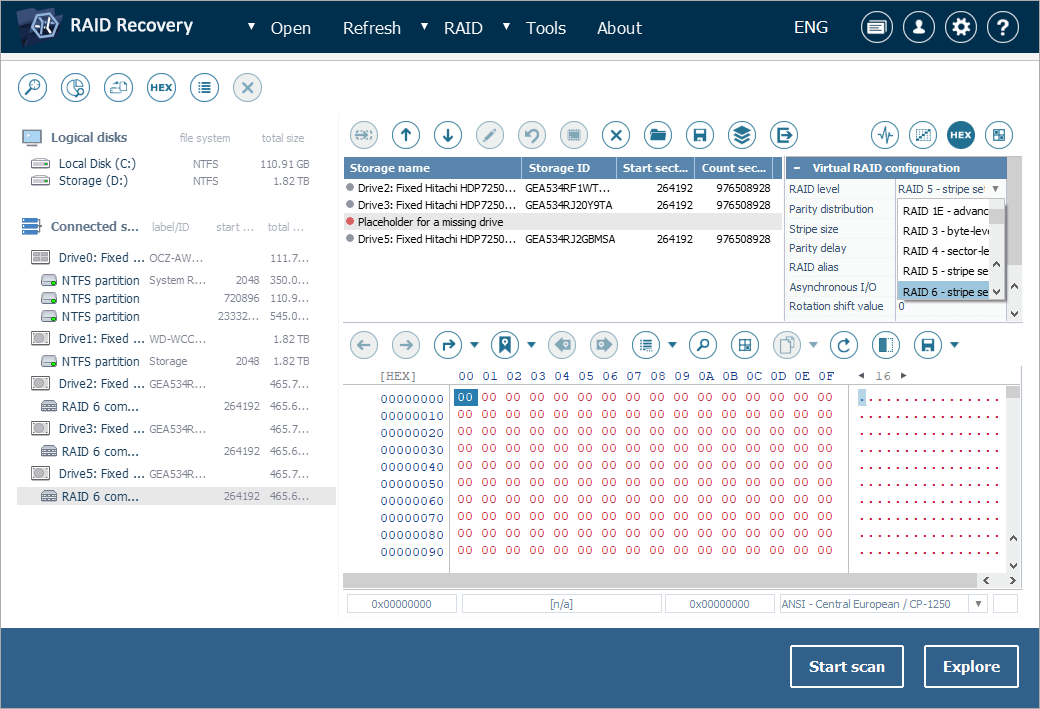
-
Choose RAID 6 in the parameters sheet and provide the correct configuration for your array: the algorithm used for distribution of parity blocks (parity distribution), the size of a data chunk (stripe size), the number of stripes per single parity block (parity delay – if applicable) and the value for shifting the rotation of data/parity (rotation shift value).
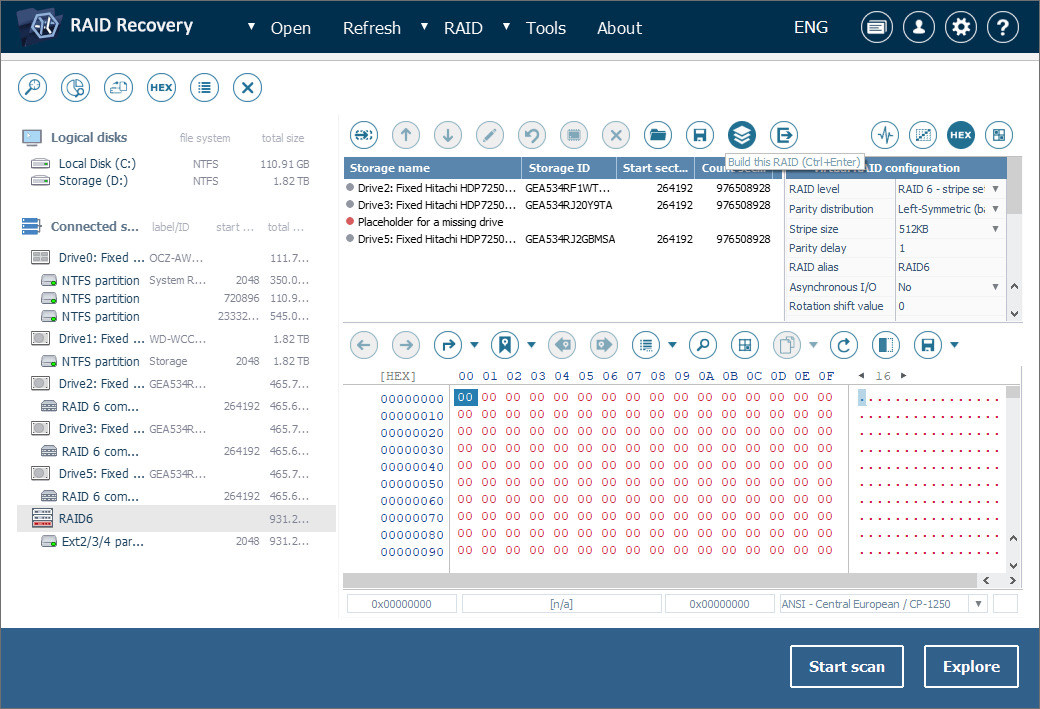
-
Once all the necessary configurations are specified, press the "Build this RAID" button.
Note: If you are not sure concerning the RAID layout, you may make as many RAID reconstruction attempts as you need to guess the right one. To revise the configuration, select "Edit RAID configuration" in the storage context menu. This will open RAID Builder for the array so that you could make the changes and assemble the storage one more time.
-
-
-
Open the volume mounted under the built RAID and explore its content. If the files look intact, that means the RAID parameters were specified correctly and you can scan the storage for lost data with the help of the respective button or the storage context menu option.
-
Define the preferred parameters of scan or leave the default ones and click "Start scan". Wait for the end of the process.
Hint: Please find more information on how to make proper scan settings in the article about scanning a drive with UFS Explorer.
-
Check the obtained scan result: you may sort the files by name, date, type, try quick or advanced search and preview images, texts, documents, etc.
Hint: Please refer to the article Evaluation and saving the results of data recovery for more instructions on how to work with the obtained folders and files.
-
Press "Define permanent selection" and select the items you want to save by putting checkmarks next to them.
-
Click "Save selection" and choose the destination folder for these items in the opened window. Please make sure that the destination folder you choose is NOT located on any drive of the array you’ve recovered files from, as this will result in overwriting of the existent data.
Last update: June 12, 2024