How to recover data from Apple Fusion Drive (Core Storage and APFS)
Some Mac computers of Apple, such as iMac and Mac Mini, provide an additional storage option referred to as Fusion Drive. This logical combination of an SSD and HDD is a great way to achieve balance between the high performance of flash storage and the low cost per gigabyte of rotating disks. Yet, the technology itself is not without its flaws from the perspective of reliability. Software issues, sudden loss of connection between the drives or various user mistakes often result in the loss of user files and urgent necessity to recover data from a Fusion Drive. However, the hybrid nature of the storage adds complexity to the procedure.
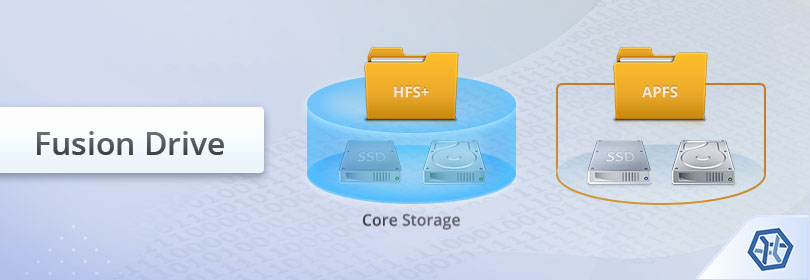
Data on Fusion Drive gets distributed between the two devices without mirroring or parity calculations. On top of that, it is heavily fragmented. The metadata needed for its correct reading is located on both components, thus, when separated, each of them becomes unusable from the point of view of data recovery. Fortunately, when both drives are physically intact and the critical metadata hasn’t been severely damaged, UFS Explorer is able to put the parts of Fusion Drive together, restore its structure and bring back integral files. Yet, to perform the procedure correctly, one needs to take into account the peculiarities of storage organization, which are basically determined by the version of macOS employed on your Mac:
Hint: Please refer to the article if you are interested in the data organization principles of Apple Fusion Drive.
macOS up to 10.13 High Sierra
Fusion Drive used with the older versions of macOS gets implemented with the help of Core Storage which is responsible for merging the two disks into a single block device. To recover data from a Core Storage volume, please, employ UFS Explorer Professional Recovery and the following instruction:
Hint: More information about the Core Storage technology can be found in the corresponding article.
-
Connect the SSD and the HDD constituents of your Fusion Drive to the computer.
Attach both of the member drives to your Mac. If one of them is missing, unfortunately, all you can get is just a bunch of corrupted files.
Hint: Please rely on the instructions to plug the disks into the motherboard or сonnect the drives externally using a USB to SATA/IDE adapter.
-
Install and run UFS Explorer Professional Recovery.
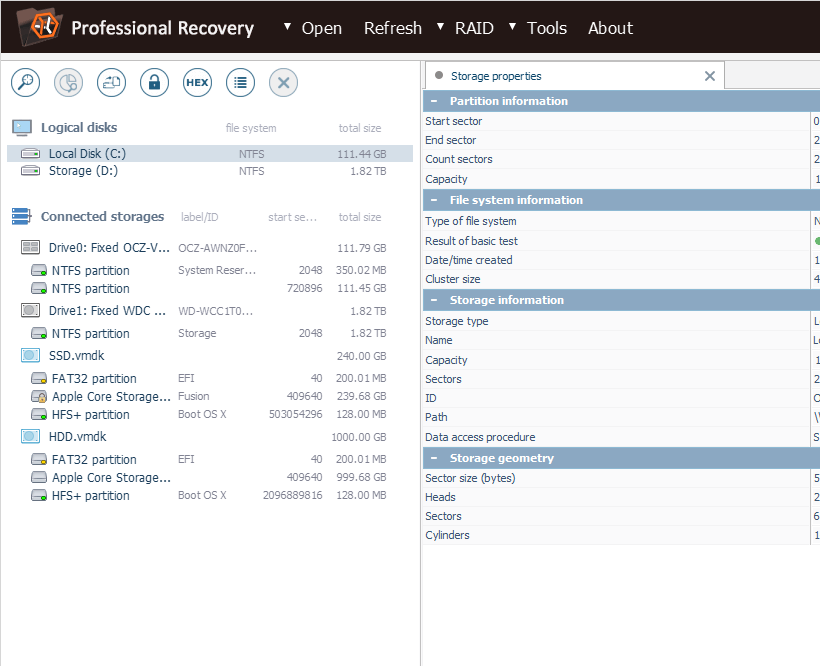
Launch this application with elevated privileges and if needed, adjust the software settings. The connected devices will appear among other detected storages in the left pane of the main window. Both of them will have three logical volumes: EFI partition (FAT32 partition), Data partition (Apple Core Storage partition) and Configuration partition (HFS+ partition).
Hint: If you have any difficulties with the installation of the utility, please refer to the installation manual for UFS Explorer Professional Recovery.
Hint: If you want to learn more about how different drives and volumes are labeled in the interface of UFS Explorer, please refer to Identification of different storages and technologies.
-
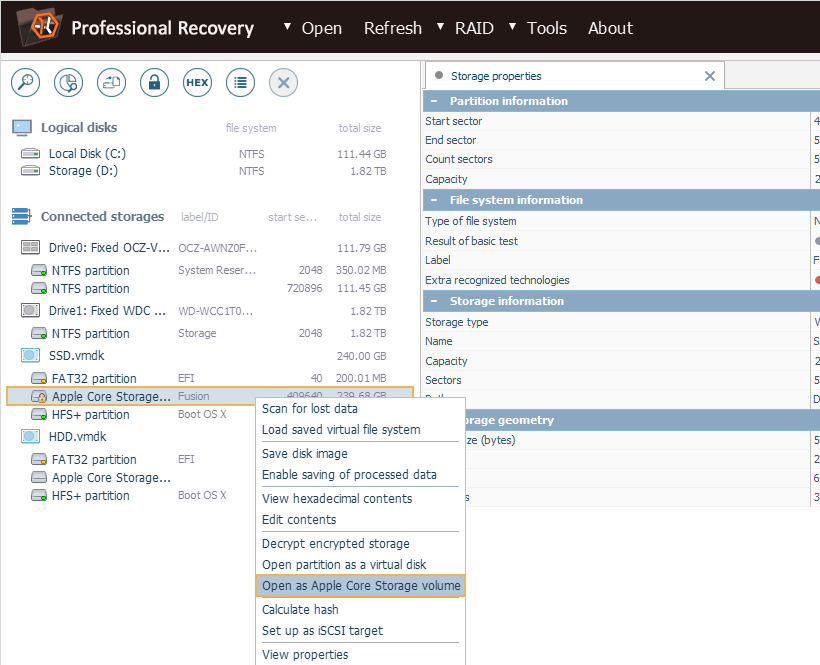
Select the Data Partition of the SSD component and open it as Apple Core Storage Volume to assemble the storage.
All the data and metadata required for the correct assembly of Fusion Drive is found on the SSD element. To bring the storage back together open the context menu of the Data Partition (Apple Core Storage partition) which is located on the SSD and choose the Open as Apple Core Storage volume menu option.
-
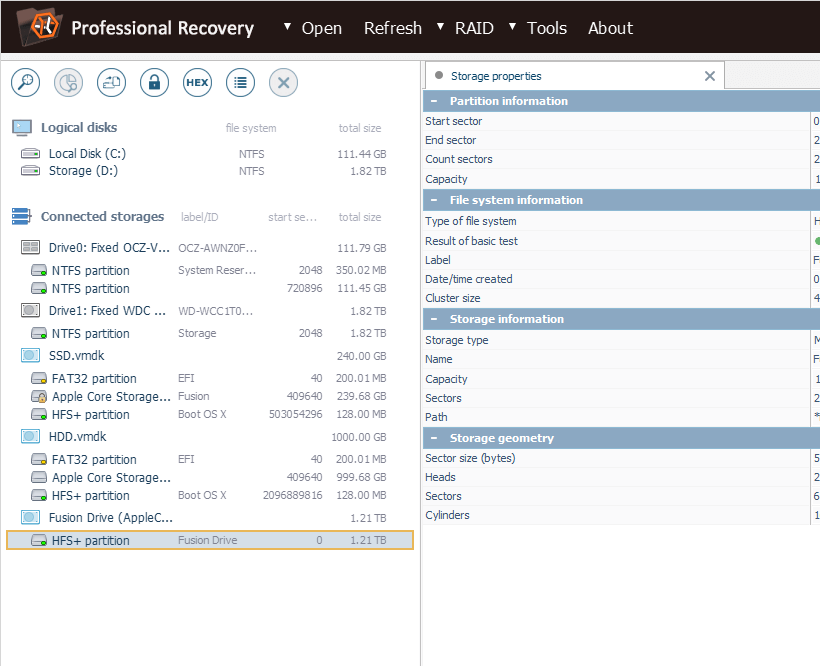
Verify the integrity of data in the newly mounted HFS+ files system.
After the successful assembly of Fusion Drive, a new virtual device will appear in the storages tree with an HFS+ partition on it. To check its content you will need to open this partition and try accessing images or text files: if they are intact, you will see the preview right in the software interface.
-
Scan the reconstructed storage to find the lost folders and files.
To rescue the lost data you will have to perform a storage scan. To do this get the respective tool from the toolbar, deactivate all extra file system types and press "Start scan".
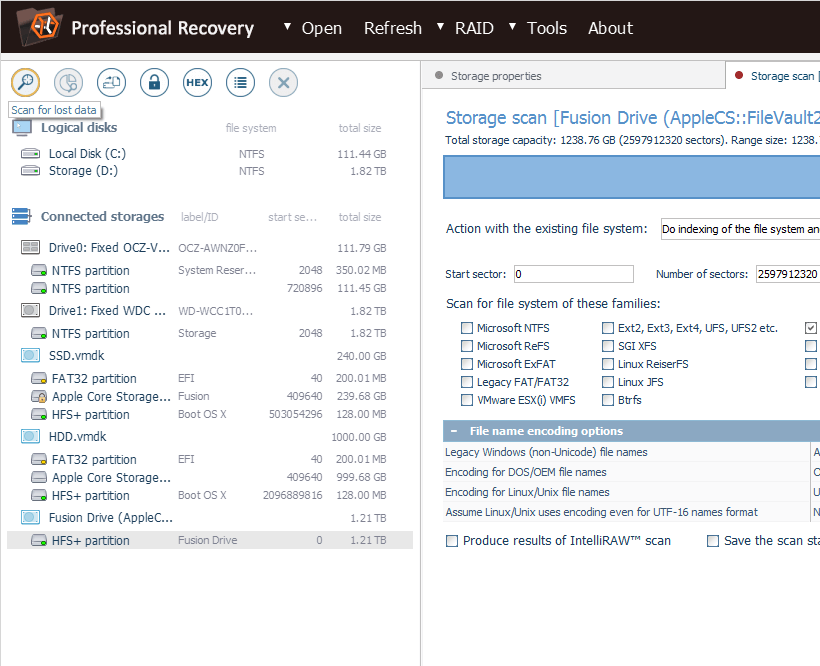

Hint: More information about configuring the scan can be found in the instruction on scanning a drive with UFS Explorer.
-
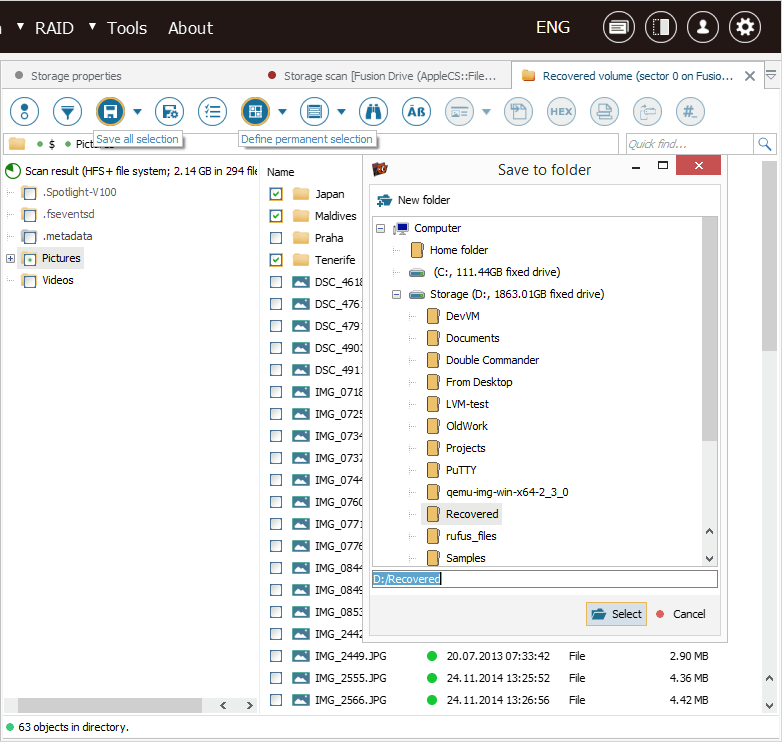
Choose which recovered items you need, select and copy them to another storage.
When the process gets completed, you can browse the content of the restored file system and find the wanted folders and files. After that, click "Define selection", put checkmarks next to them and click "Save selection". In the pop-up window specify any valid destination folder which should not be on any of the source disks.
Hint: The information provided in Evaluation and saving the results of data recovery may facilitate your work with the obtained folders and files.
macOS 10.14 Mojave and later
In newer versions of macOS Apple delegated the responsibilities of Core Storage to the APFS file system. The procedure of data recovery from such a Fusion Drive can be performed using UFS Explorer RAID Recovery, UFS Explorer Network RAID or UFS Explorer Professional Recovery and will look rather different:
Hint: Please refer to the basics of file systems to learn more APFS and other file system types.
-
Attach the SSD and the HDD parts of the Fusion Drive to the computer.
Like in the previous case, both constituents need to be connected to the Mac. Also, in order to work with the storage, you will need to disable System Integrity Protection as described in Unblocking access to macOS drives. However, data recovery from Fusion Drive cannot be performed on Mac models that employ Apple’s T2 security chips, please refer to the given article for more information.
-
Install UFS Explorer RAID Recovery, UFS Explorer Network RAID or UFS Explorer Professional Recovery and launch the software.
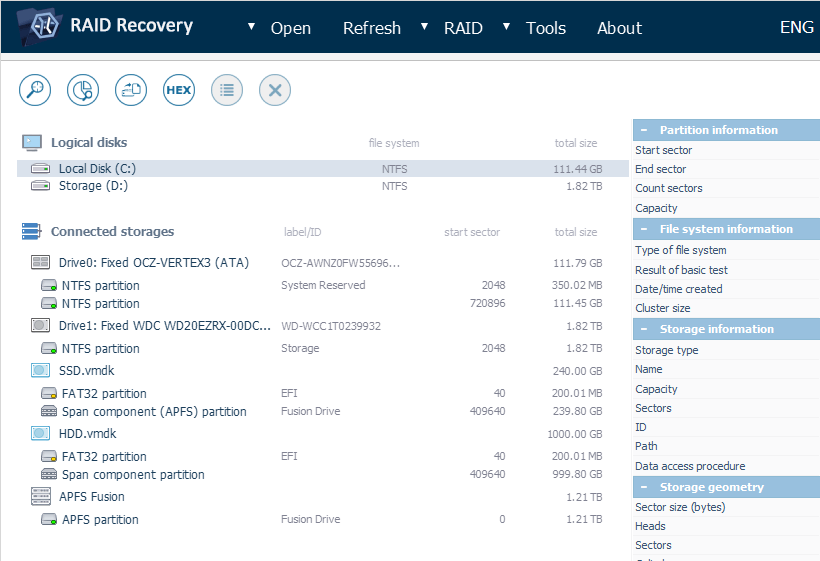
Open the program with administrator rights and if necessary, modify the parameters of the software. Both components of the Fusion Drive will show up in the list of connected storages. Each of them will contain two logical volumes: A solid-state drive will have an EFI partition (FAT32 partition) and the first part of the Data partition (APFS partition) while the mechanical disk will hold an EFI partition (FAT32 partition) and the second part of the Data partition (Unknown partition).
-
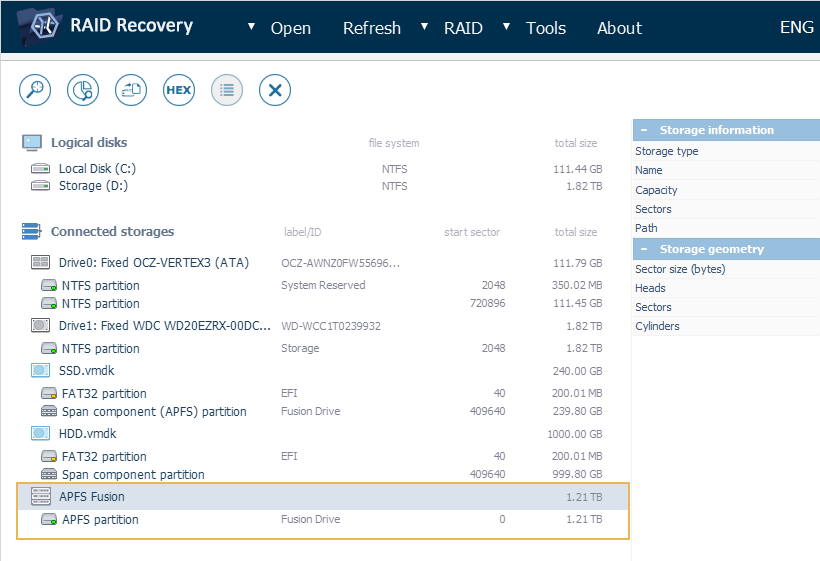
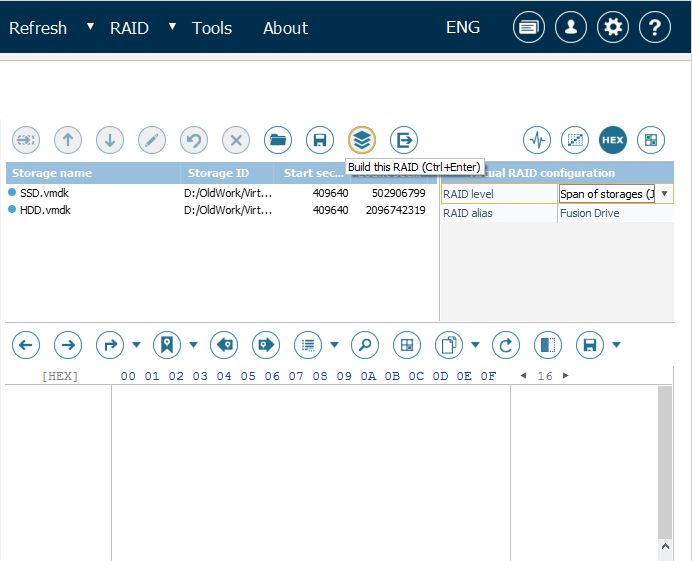
Assemble the components of the Data Partition found on the SSD and HDD as a Span of storages.
Normally, the program recognizes and puts together all components of an APFS-based Fusion Drive automatically. The assembled Fusion Drive should appear at the end of the list of connected storages. Yet, if this doesn’t happen, you will have to perform its manual assembly. You will need to open RAID Builder by using the "Build RAID" ("New RAID") item from the "RAID" menu, add both pieces of the Data Partitions to the array (the part located on the SSD should precede the one found on the HDD), choose the Span of storages option in the RAID configuration sheet and click "Build this RAID".

-
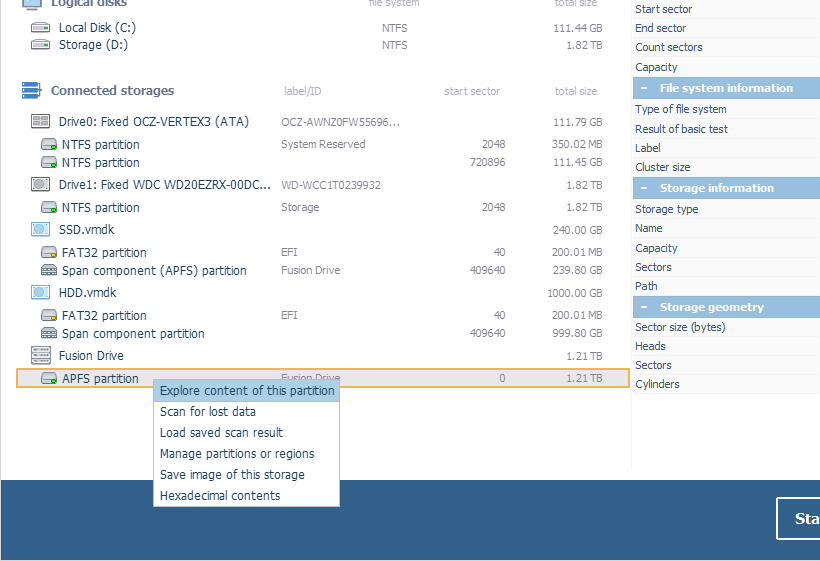
Ensure the integrity of the mounted APFS files system.
Having built the array you will see a new virtual RAID device in the list of connected storages. Open the APFS partition located on it and check its content by selecting text files or images. If the file system is not corrupted, their preview will be displayed in the software interface.

-
Find the lost data by scanning the storage and save the found folders and files.
To rescue the lost data you can follow Step 5 and Step 6 described for Fusion Drive based on Core Storage.
The overall procedure for both types of Fusion Drive is also demonstrated in the next video:

Last update: August 04, 2022