Evaluation and saving the results of data recovery with UFS Explorer

In order to get the lost data back with the help of UFS Explorer, you need to run a scan for the problem storage device or a partition as described in Performing a drive's scan. After the process is completed, the restored folders and files can be easily saved to a prepared secure location. However, in some cases, only a certain portion of the recovered data is required, and it may not be evident right away whether it was successfully retrieved. Also, there are situations when it is necessary to assess the size, consistency or overall quality of the recovery result. A set of supplementary functions provided by UFS Explorer may considerably facilitate your work with the obtained data. This article presents their brief overview and explains how you can apply them to proceed to copying as quickly as possible.
Browsing through the found data
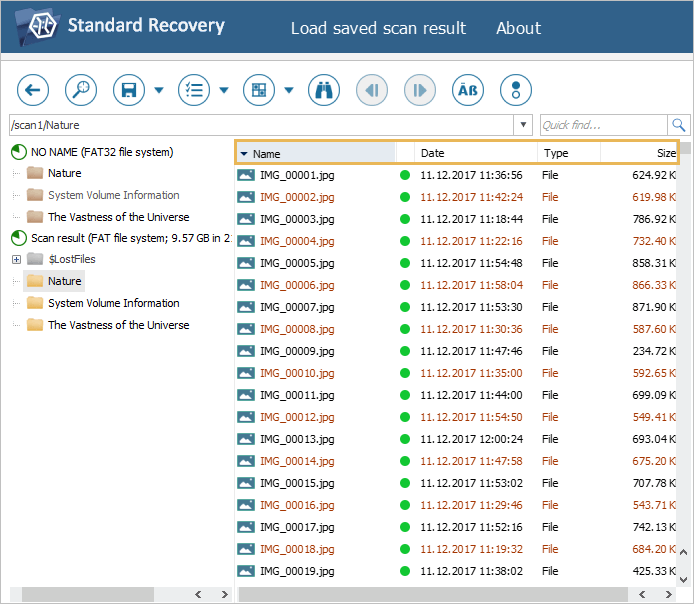
Right after a scan is accomplished, its result can be examined in the Explorer window. The main pane of Explorer will contain folders and files as they are presented in the file system, together with their names, last modification dates and sizes. The content of each folder can be opened with a single mouse click or the "Enter" key. If UFS Explorer is unable to discover a full path of an object, it may place them in the automatically created folders, such as $LostFiles and others, indicated with gray icons.
The folders that are available in the current file system are displayed with brown icons, the ones restored in the process of a scan – yellow icons. The undeleted folders and files can be identified by the red color of their names, while hidden system folders appear with gray names.

The left pane of the Explorer window includes trees of folders that can be used for fast navigation. When a folder is selected in the left pane, it will be opened in the right pane. An element which corresponds either to the available file system or the scan result item can be found at the top of each tree. The result of a file system scan can will have a green icon, whereas the result of recovery by known content – a gray icon.
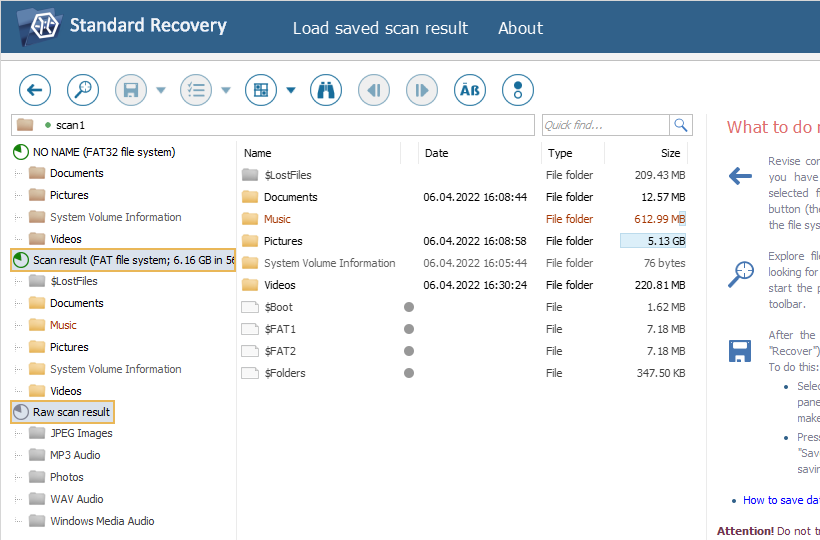
In the upper part of the Explorer window there is also an Address bar. It provides a path to the currently opened folder and navigation history, allows switching to the parent folder or move to a folder by entering its full path.
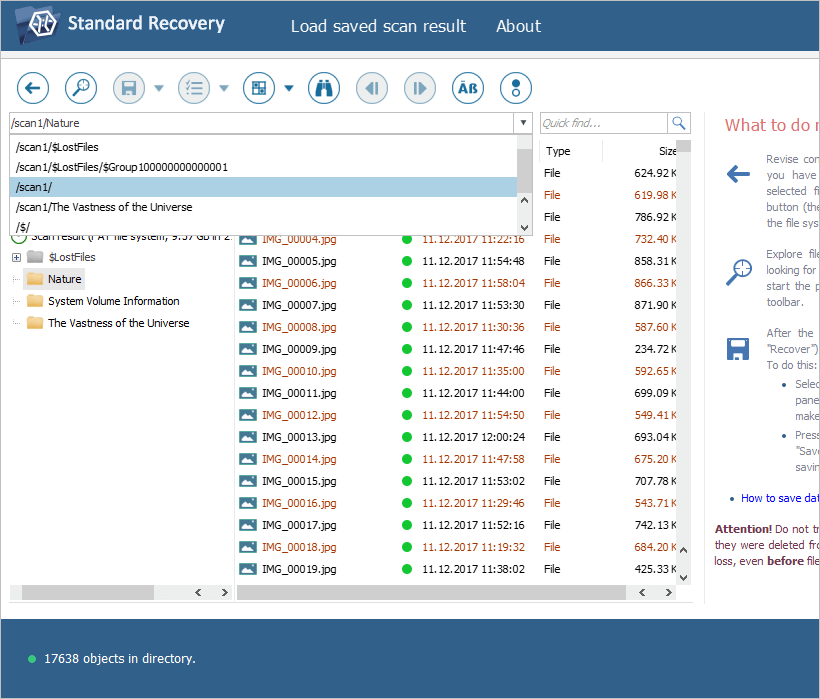
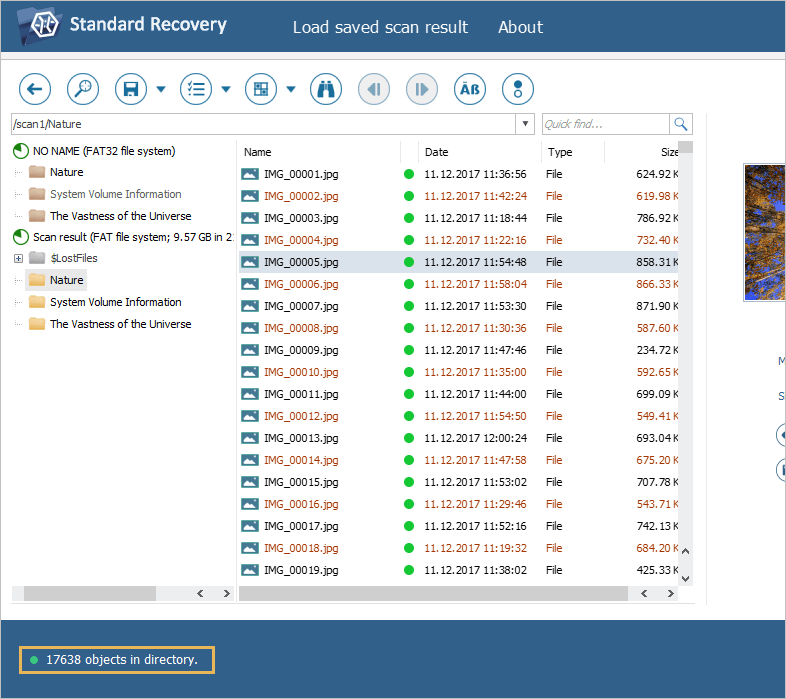
The status bar in the lower left corner of the Explorer window shows how many objects there are in the selected directory. The Professional edition of UFS Explorer also displays the name of the currently selected object and its size.

Viewing object properties
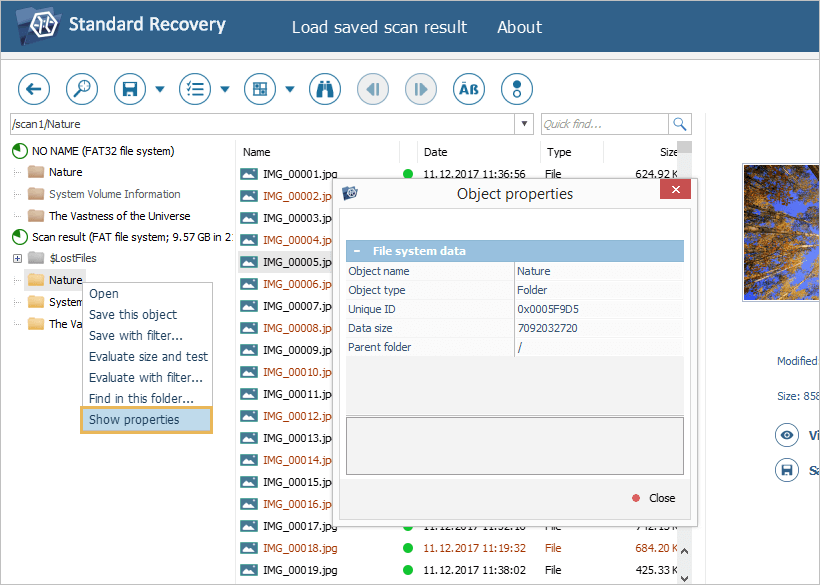
UFS Explorer allows viewing some properties of a file/folder before recovery. For this, select the needed item in Explorer, open its context menu with the right click of a mouse and choose "Show properties". The opened dialog, depending on the object type, may include such details as its name, type, ID, size, dates of last modification, access and creation as well as the parent folder.

Preview of files
UFS Explorer offers an embedded Viewer for on-the-spot preview of certain files in the software interface. This function can also be used when it is necessary to find a specific file or estimate the general chances for successful data recovery. Among the supported file types for preview are images, text documents and PDF-files. The non-supported or severely corrupted files are opened in the Hexadecimal Viewer instead.
Thumbnail preview
Click on a file in Explorer and the software will automatically show its thumbnail preview in the dedicated pane, provided that the file format is supported by the embedded Viewer.
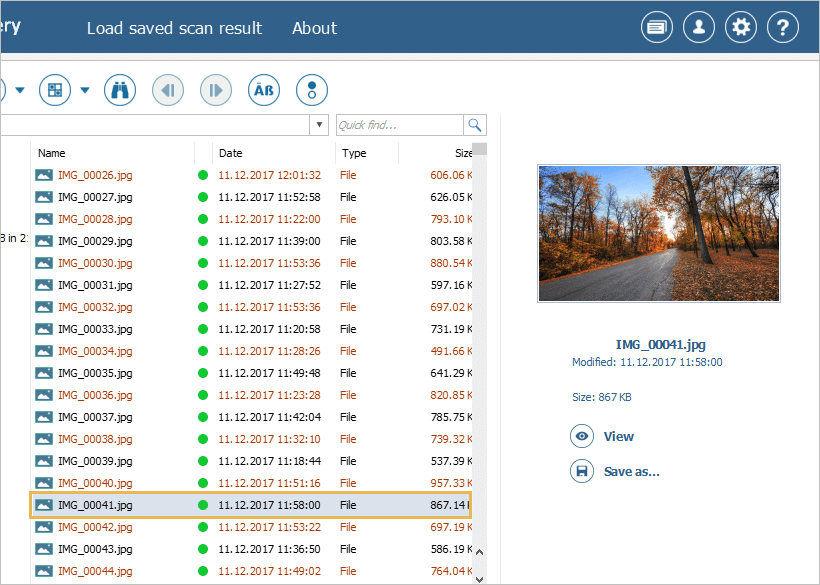
Full preview
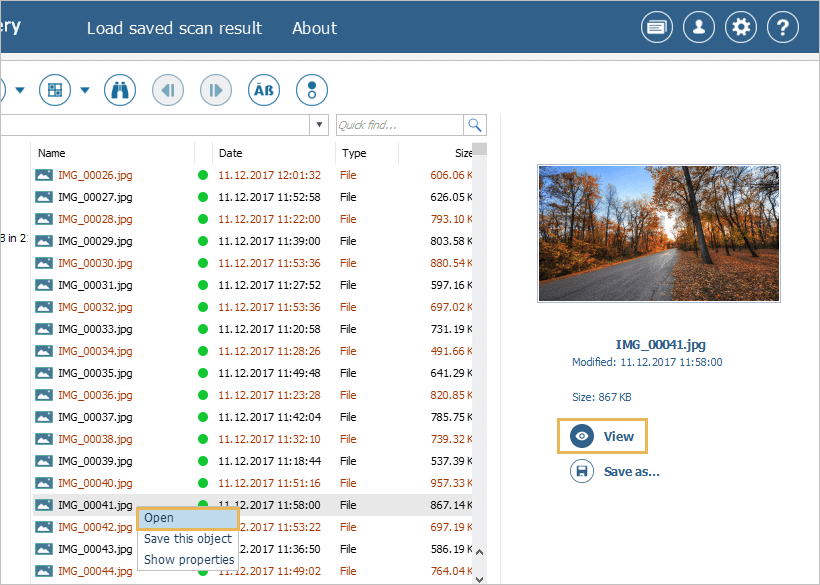
Double-click a file in Explorer to open its full preview. As an alternative, use the "Open" ("Display contents") option in its context menu or the "View" button near the thumbnail preview.
Opening with external means
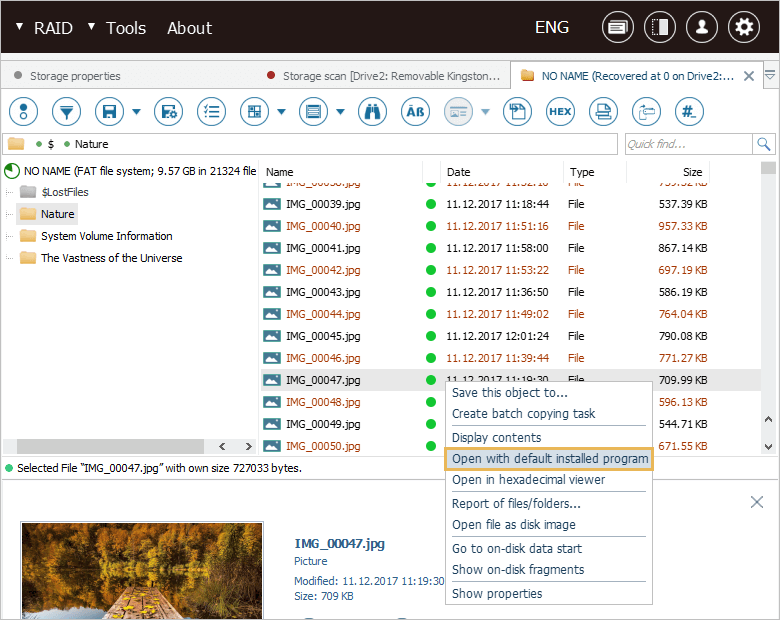
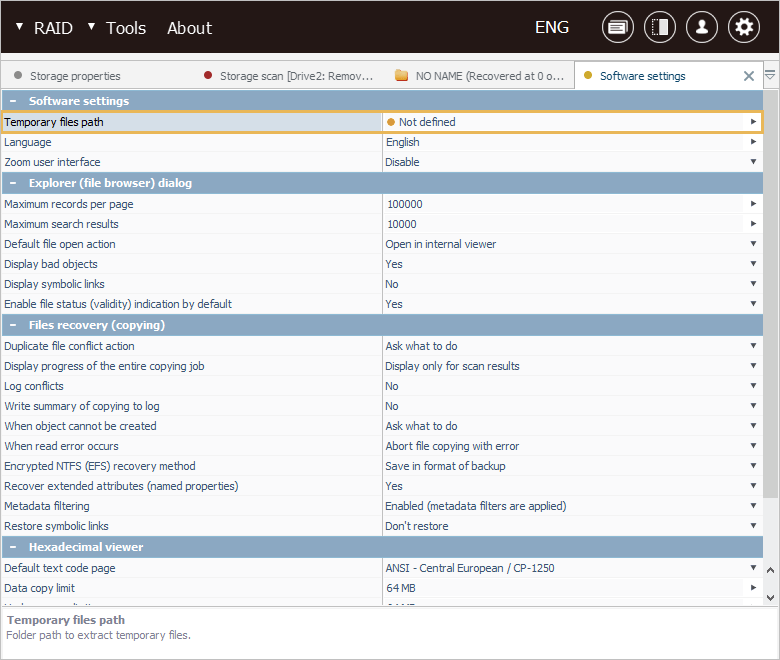
The Professional edition of UFS Explorer makes it possible to open files using the associated program installed on the computer. For this, right-click a file in Explorer and choose the "Open with default installed program" option from its context menu. However, to use this function, you will need to go to the "Software settings" tab and specify a temporary files path to which this file will be automatically saved.
Sorting folders/files
UFS Explorer presents several options for sorting folders and files in Explorer. This feature may be of much help when you need to find or select many files. To sort files by different criteria, click on the header at the top of the corresponding "property" list in the Explorer window:
Name – To sort objects by their names in the direct (reverse) alphabetical order;
Date – To sort objects by the date of their last modification;
Type – To sort objects by their type (folders, files);
Size – To sort objects by their sizes.
Automatic search for files/folders
Instead of looking for the required items manually, you may employ one of the following automatic search options. The files (folders) found with this method will be listed in the Explorer window. You can right-click the needed file and select the corresponding item in its context menu to open its preview, save it right away, mark it for copying, see its extended attributes or properties.
Quick file search
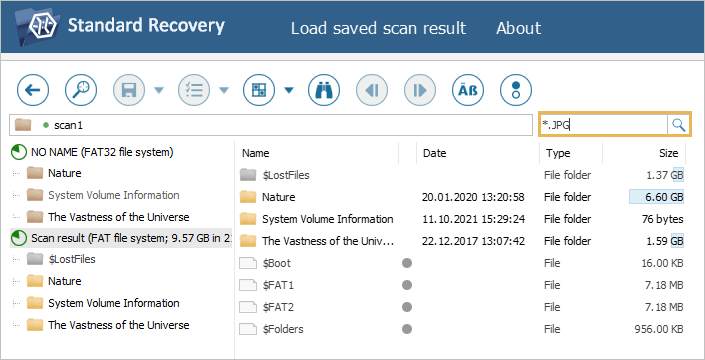
Specify the name of the file (or its part) in the "Quick search" field in the upper right corner of Explorer and press the "Search" button or simply hit the "Enter" key. If needed, you may also include the wildcard symbols or a combination thereof: "?" for one missing character and "*" – for multiple missing characters. For example, if you need to find all JPG-files, simply enter "*.jpg" into the field.
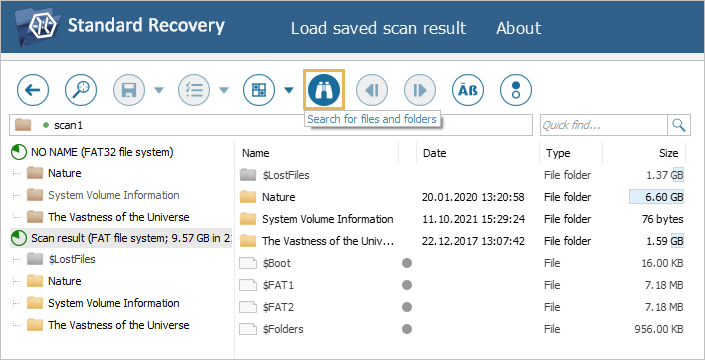
Advanced search for files and folders
Get the "Search for files and folders" tool from the toolbar. In the opened window, provide the desired criteria for the search:
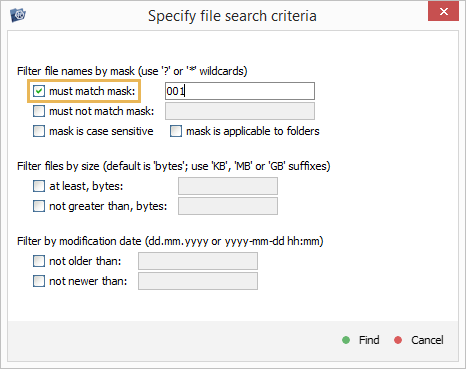
- Filters for the name
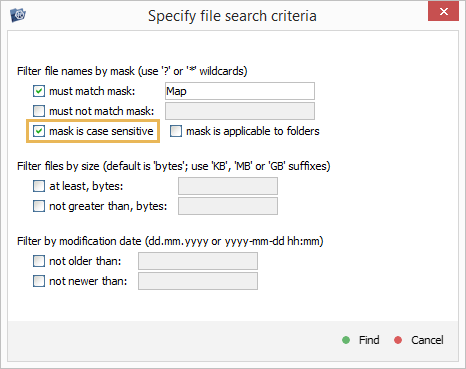
Must match mask – When this filter is applied, UFS Explorer looks for items with names that match the specified string. You may also use the wildcard symbols: "?" for one missing character and "*" – for multiple missing characters.
Examples of "include" masks for file names:
-
"*.*" – will return all files with any extensions;
-
"*.txt" – will return all TXT-files;
-
"*.p*" – will return files whose extensions start with "p", for instance, PDF-, PPT-, -PHP, -PUB and others;
-
"phot*.*" – will return all files starting with "phot", for example, "photo.jpg", "photos.jpeg", "photographer.png", "photogallery.doc", etc.;
-
"*sign?.html" – will return HTML-files whose name starts with any sequence of characters and ends with "sing" followed by a single character, for instance, "designs.html", "signs.html", "page_sign1.html" and others;
-
"doc?????.docx" – will return DOCX-files starting with "doc" and followed by any five characters, like "document.docx", "doc_1234.docx", "doctor12.docx".
-
"?????" – will return files that do not have an extension and whose names consist of five characters: "field", "image", "photo" and others.
Must not match mask – When this option is enabled, UFS Explorer looks for items with names that do not match the provided string. You may also use the wildcard symbols: "?" for one missing character and "*" – for multiple missing characters.
Examples of "exclude" masks for file names:
-
"*.pdf" – will exclude all files with the PDF-extension;
-
"a*.mp3" – will exclude all MP3-files whose names start with "a", like "album.mp3", "accords.mp3" and others;
-
"??.*"– will exclude all files whose names consist of two characters;
-
"*.*" – will return only files that do not have an extension.
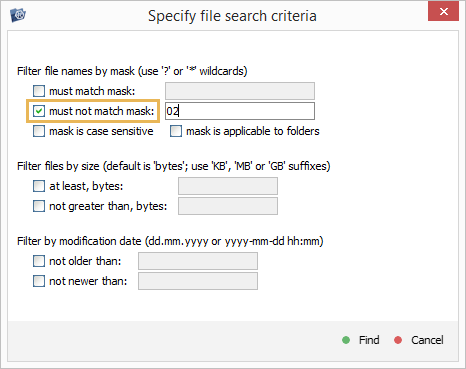
Mask is case-sensitive – When this checkbox is selected, UFS Explorer performs case-sensitive search;
Mask is applicable to folders – When this checkbox is enabled, UFS Explorer performs the search among folders as well.

-Filters for the size
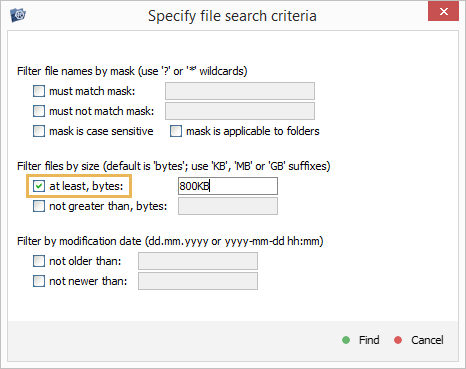
When no unit is specified after the value, UFS Explorer assumes bytes by default. The following units can be used as well: KB (1 KB = 2^10=1024 bytes), MB (1 MB = 2^20=104857 bytes), GB (1 gb = 2^30=1073741824 bytes).
At least – Defines the minimum limit for the file size.
For example, the string "1MB" will return only files that are bigger than or equal to 1 MB.
Not greater than – Defines the maximum limit for the file size.
For example, the string "768KB" will return only files that are smaller or equal to 768 KB.

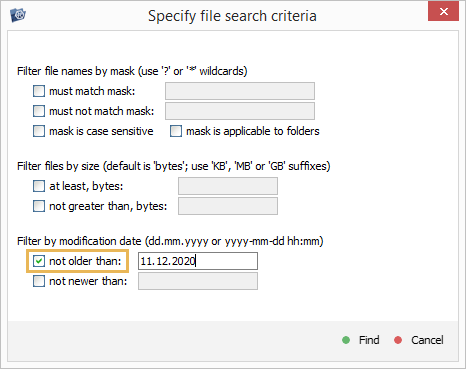
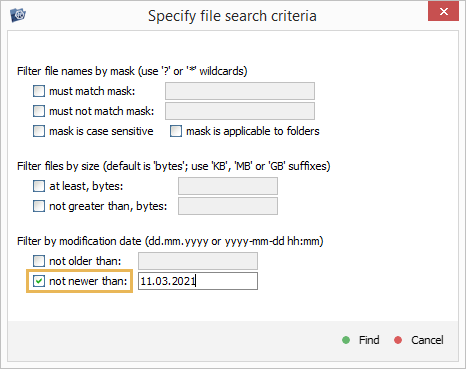
- Filters for the date of last modification
Not older than – Allows finding items that were modified after the specified timestamp.
For example, the "11.12.2020" string makes it possible to find all files that have been modified since 11.12.2020.
Not newer than – Allows finding items that were modified before the specified timestamp.
For example, the "11.03.2021" string allows finding all files that have not been modified since 11.03.2021.
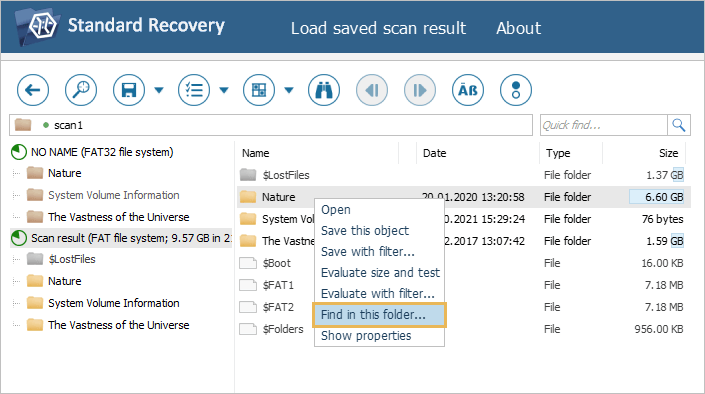
Search in a specific folder
Right-click the needed folder and choose the "Find in this folder" option in its context menu.
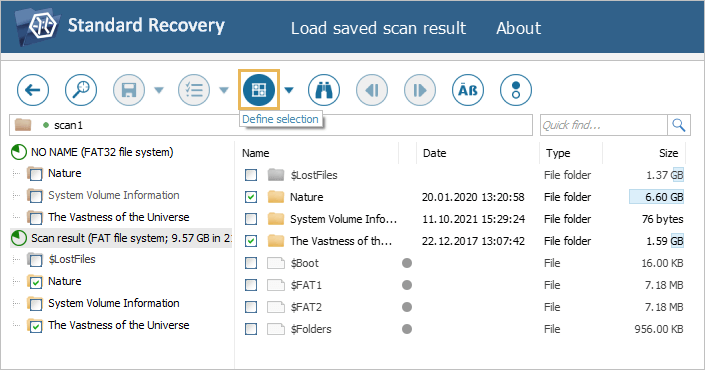
Alternatively, select the folder(s) using the "Define selection" option from the toolbar and use "Quick search" field or the "Search for files and folders" function.
Selection of multiple files/folders
Multiple folders and files can be selected in Explorer using the "Define selection" tool from the Explorer toolbar. After it is activated, you can select/deselect objects by clicking on the checkboxes next to them. Another way to perform this operation is to choose the "Mark for copying" or "Unmark for copying" options from the context menu of a folder/file. The same methods can be also applied to the objects in the folders navigation trees.
It is also possible to select multiple files or folders in the same parent folder by clicking on them one by one while holding the "Shift" or "Ctrl" key.
Evaluation of size/consistency
The "Set up displaying of file status" tool from the toolbar of Explorer allows activating the display of a status for each file in the recovery results.
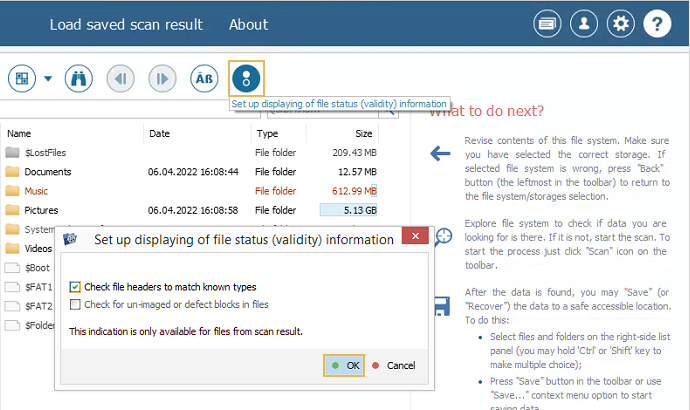
When this function is enabled, all files are presented with circular icons next to their names. A green icon of a file signifies that it is "good" and its header matches the data of a known and valid type. A red icon means a "bad" (zeroed) state of a file. When an icon is gray, the file may be partly damaged or its integrity cannot be verified due to the format’s specifics.
![]()
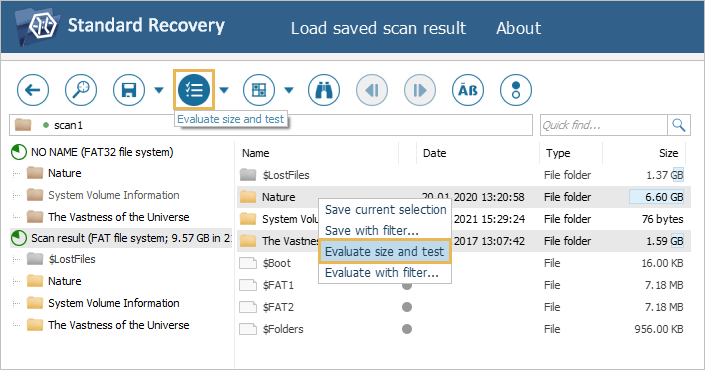
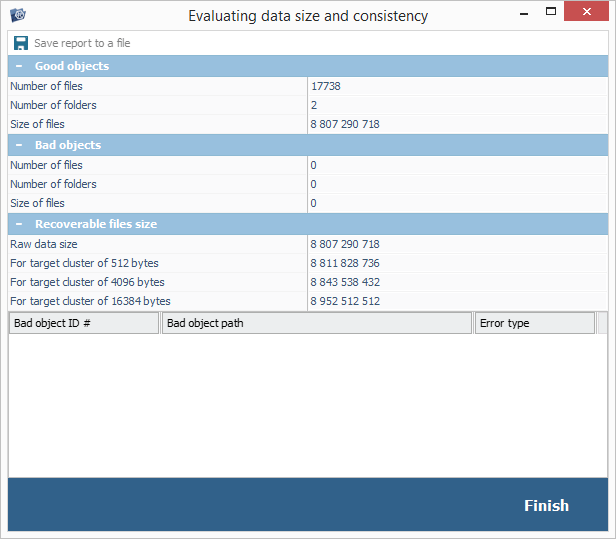
Before proceeding to saving the recovered data, it's also recommended to evaluate its size and ensure it doesn’t exceed the amount of free space provided by the target storage:
For the Standard, RAID and Network RAID Editions of UFS Explorer
In these software editions you may employ the "Evaluate size and test" option presented in the context menu of a folder or objects group. Alternatively, when the items are selected, choose the "Evaluate size and test" tool from the Explorer toolbar. In the opened window, you will see the number of selected files, folders and their total size. In addition, it will provide the number of bad objects, their size, IDs, paths and error types obtained through a quick metadata test.
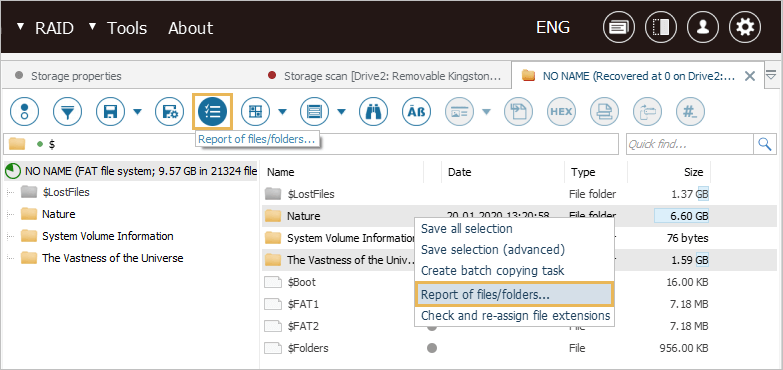
For UFS Explorer Professional Recovery
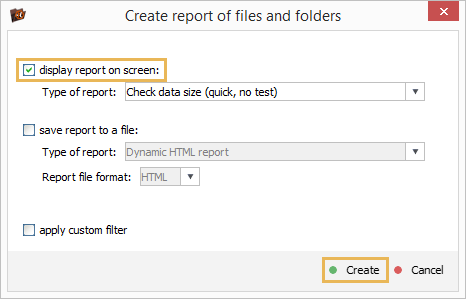
The Professional Edition of UFS Explorer offers several possibilities for creating a report as to the size of the selected data – with or without an additional test of metadata.
The "Report of files/folders…" option is available in the context menu of each object in Explorer. Also, it can be applied to multiple selected items via the "Report of files/folders…" tool from the toolbar of the Explorer tab. In the opened window, enable the "display report on screen" checkbox and then choose between the faster or slower data size calculation options.
Saving the data
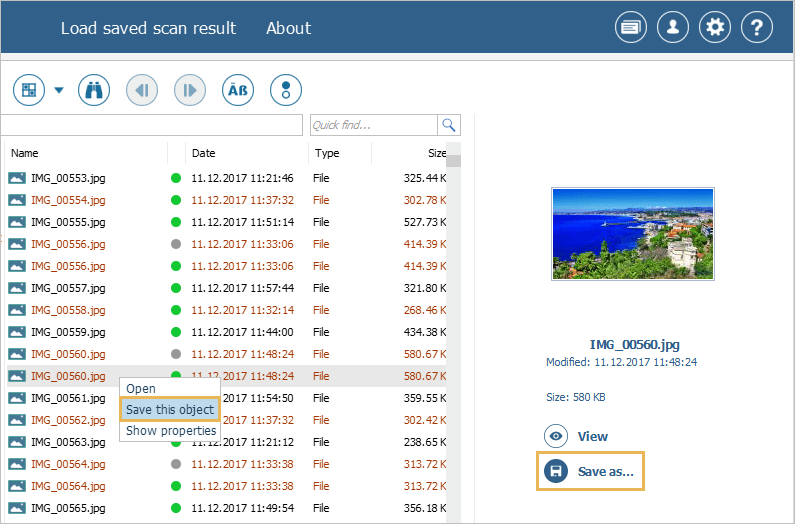
A single file/folder in Explorer can be saved with the help of the "Save this object" option from its context menu. It is also possible to save a file by selecting it and pressing the "Save as…" button from the thumbnail file preview pane.
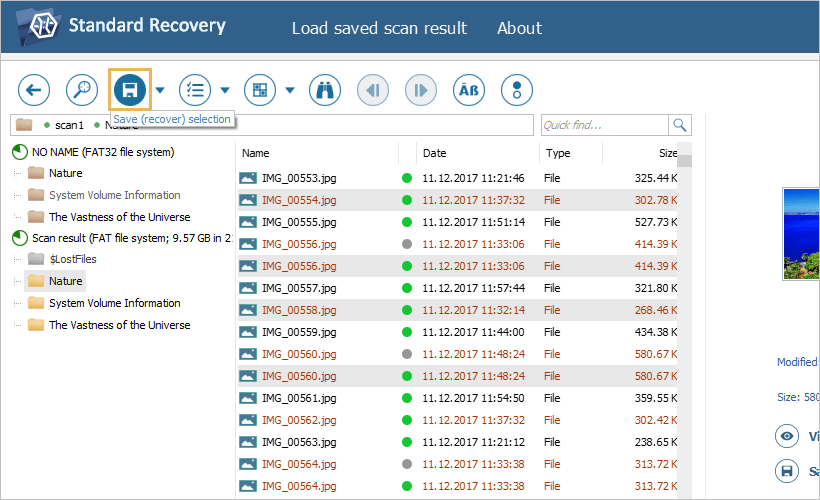
Multiple selected objects can be saved using the "Save (recover) selection" tool from the main toolbar of Explorer.
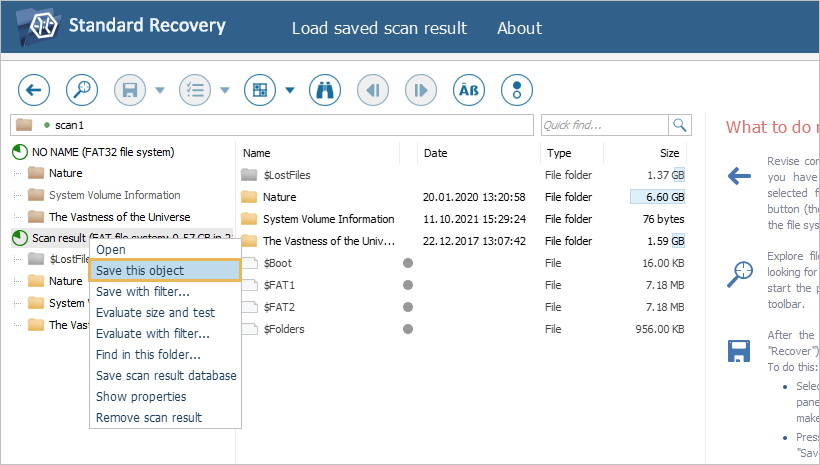
The mentioned methods are applicable to the objects in the folders navigation trees as well, except for "file system" and "scan result" items – these can be saved only with the help of the "Save this object" context menu option.
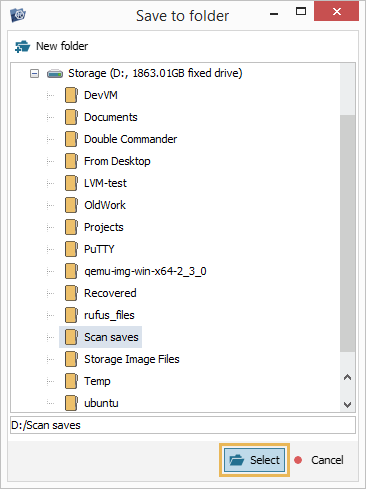
Having chosen the preferred way of saving the data, you can specify the target folder for it in the opened dialog and hit "Select".
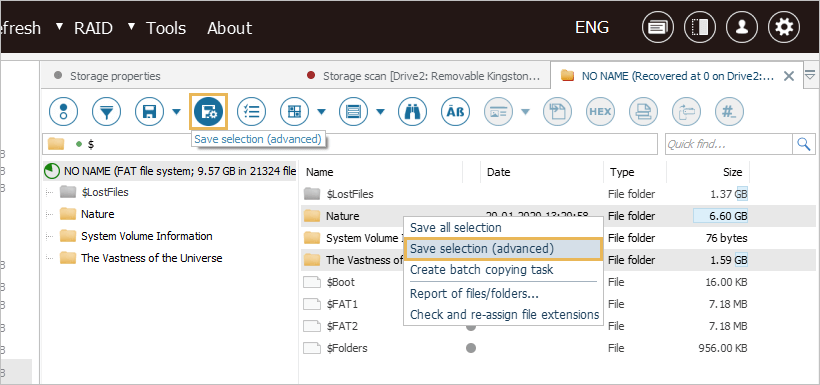
Saving the data with filters
UFS Explorer makes it possible to save only the files (folders) that match a particular predefined mask. In the Standard, RAID and Network RAID Editions of UFS Explorer this function is presented as the "Save with filter…" option of the "Save (recover) selection" tool from the Explorer toolbar.
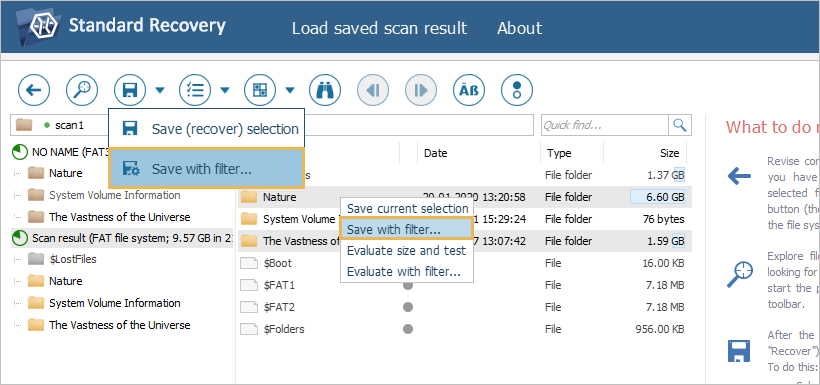
Also, there is such an option in the context menu of each object. UFS Explorer Professional Recovery offers a separate tool for this purpose – "Save selection (advanced)".
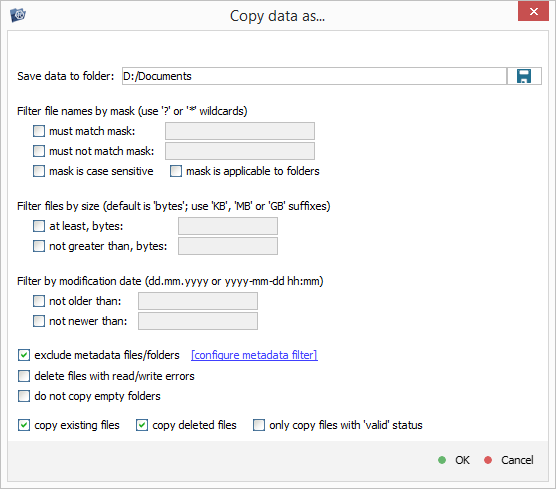
Most of the filters available for saving the data coincide to the ones used for an advanced search for files and folders. In addition, one can omit metadata files/folders specified using particular rules, delete files with read/write errors and leave out empty folders.
It is also possible to filter out files in a specific "state": copy solely the files that are present in the current file system, pick out the files that were restored after deletion, or choose only the "good" files.
Last update: August 11, 2022