How to recover data from volumes that use Microsoft data deduplication
NTFS and ReFS volumes with enabled deduplication require a specialized approach to data recovery, as in contrast to traditional Microsoft partitions containing many redundant copies of data, they store only unique instances of data chunks while files in them are represented as references to particular chunks in that chunks set. When a file gets deleted from such a partition, its references get removed, but the chunks themselves remain in the set and can be used to reconstruct a file, but only if they get interpreted properly. Such cases are covered by the Professional edition of UFS Explorer which is equipped with special techniques for correct reading of data on Microsoft partitions optimized through deduplication. Follow the offered instruction to learn how you can use the software to recover data lost from such volumes.
Hint: More information about the file systems of Microsoft can be found in the basics of file systems.
- Connect the storage device containing your deduplicated NTFS or ReFS volume to the computer.
If you need to work with a deduplicated system volume, it is recommended to extract the disk it is located on and connect it to another PC as a secondary drive or boot the computer a safe environment using UFS Explorer Backup and Emergency Recovery CD. If such a volume is located on an external drive, attach it to the machine using the corresponding interface. In case of a non-system partition, simply skip this step.
Hint: Please rely on the instructions to plug the disk into the motherboard or сonnect the drive externally using a USB to SATA/IDE adapter.
- Install and run UFS Explorer Professional Recovery.
Launch the software with elevated privileges and change its settings, if needed. All the connected physical drives will be listed in the left pane of the main screen while their logical volumes will be located below them.
Hint: If you have any difficulties with the installation of the utility, please refer to the installation manual for UFS Explorer Professional Recovery.
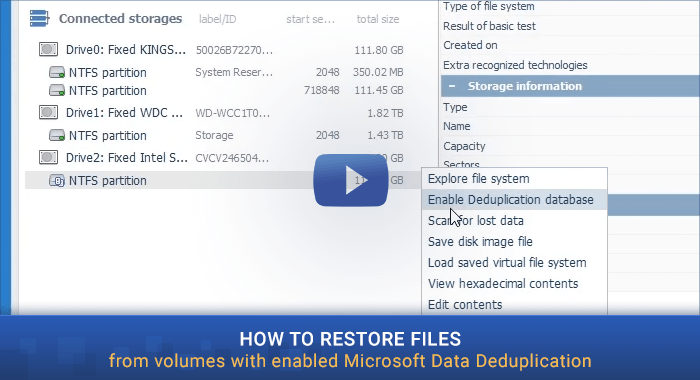
- Choose the needed deduplicated volume from the list of attached storages.
Look through the tree of storages and find the necessary deduplicated NTFS or ReFS partition. It will be labeled with a special deduplication icon.
- Tell the program to find the respective deduplication database and interpret the data.
Correct reading of the data within such a volume is impossible without its deduplication database. To apply it, open the volume context menu, choose the "Enable deduplication database" option and simply wait for the software to find and load it.
- Scan the transformed storage to regain the missing data.
After the process is completed, the content of the volume can be explored in the software interface, yet, to restore deleted or lost files a scan operation is needed. To run it select the respective tool in the toolbar, untick all file systems except NTFS/ReFS and press "Start scan".
- Choose the needed recovered items and save them to any safe location.
When the sacn is over, you can explore the folders and files of the reconstructed file system to find the needed ones. To determine the items to be copied press "Define selection", mark them off and click "Save selection". After that, specify any valid destination folder which is not located on the source storage.
The described procedure is available in the following video:
Last update: August 05, 2022