How to connect SATA drives to a PC using a PCIe expansion card
In case the computer’s mainboard has an insufficient number of SATA ports for direct installation of your drives, the best possible way out is to expand it with the help of the standard PCI Express socket used for connecting internal peripherals. Abbreviated as PCIe, it may deliver 1 (x1), 4 (x4), 8 (x8) or 16 (x16) data-transmission lanes to a wide range of components, typically designed in the form of add-on cards. The cards that enhance the storage capabilities of the system are referred to as Host Bus Adapters (HBAs) or interface cards. They provide a supplementary host controller and connectors similar to the ones available on the motherboard. This article will aid you in choosing an HBA card that is most suitable for your SATA hard drives and provide further guidance on how it can be used to plug them into the computer.
Hint: Please rely on the article on the identification of a hard drive’s interface type to aid you in determining whether your hard drive features SATA or some other type of connector.
Warning: The recommendations presented in this article assume that you have adequate skills in handling hardware. Improper actions may result in physical damage to the drive and permanent data loss.
Which type of interface card is optimal to attach SATA drives?
When it comes to SATA drives, getting a plain SATA HBA looks like an obvious choice. Such a board features a SATA controller chip and two or more SATA ports for drives connection. Each port hosts only one SATA drive, and there may be up to 10 of them on the highest-end options. The majority of these devices are quite affordable, they also have smaller sizes and generate less heat. But the problem is that, in order to maintain compatibility with the broadest spectrum of motherboards, they are mostly designed as PCIe x1 cards. Meanwhile, the transfer speed offered by a one-lane configuration may be inadequate for concurrent communication with multiple drives. Another important concern is the quality of the adapter. A low-grade one may not perform well, cause the drives to go missing or, in the worst case, become a reason for their failures. Hence, SATA HBA cards should be purchased with cation and only from reputable vendors.
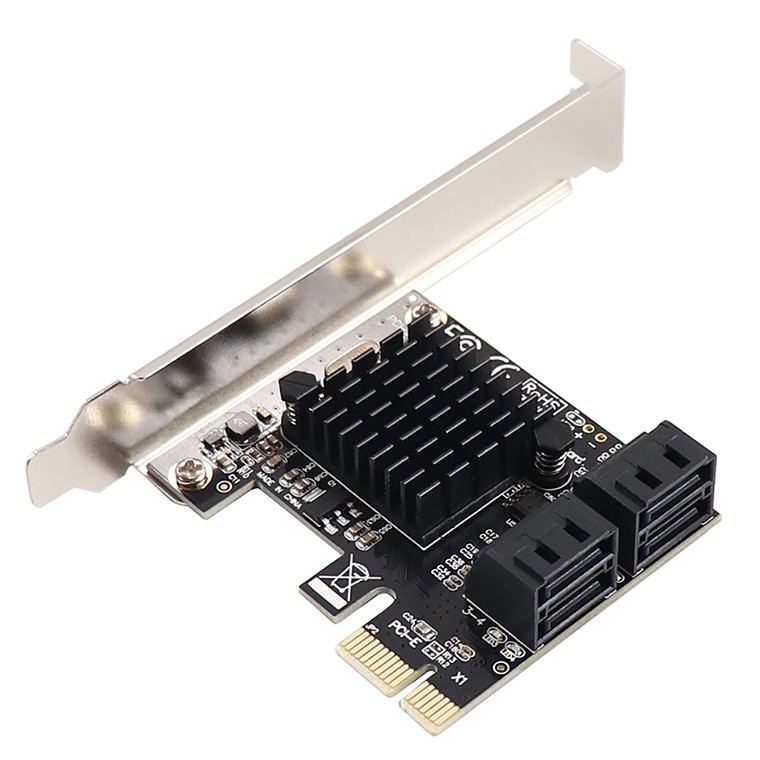
Pic. 1. SATA HBA card.
SATA HBA cards are also not to be confused with SATA port multipliers, the use of which is even more discouraged. Such a device doesn’t have its own SATA controller, it simply distributes the bandwidth provided by a single mainboard connector between several drives. Few motherboards support this kind of multiplication, so chances are that the whole assembly will turn out to be unusable. In addition, a single defective medium attached to it may lock up the host port, impeding access to the rest of the drives.
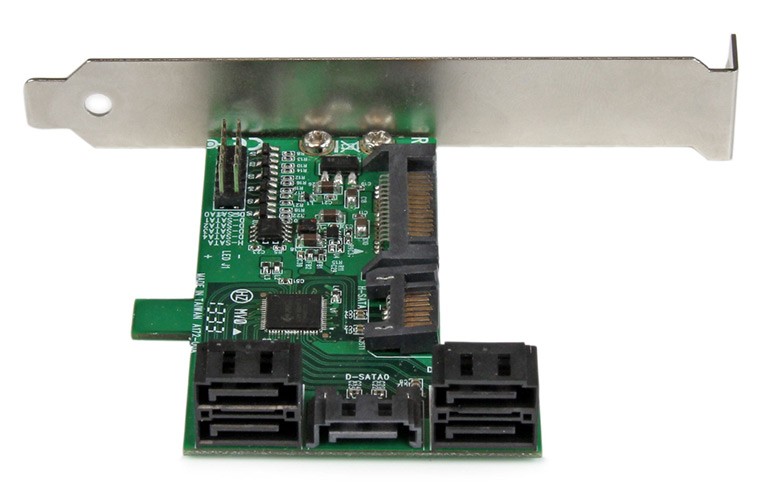
Pic. 2. SATA port multiplier.
Fortunately, it is possible to overcome these drawbacks by using an enterprise-class SAS HBA card. They generally surpass their SATA counterparts, both in terms of transfer speeds and reliability. And despite being supplied with a SAS controller chip and connectors, these interface cards support SATA drives by default. The "conversion" is solely based on the employed cabling. In fact, they are even sometimes sold as SAS/SATA devices. The card may contain two or more SAS sockets, and each of them is capable of hosting four SATA drives via a special breakout cable.
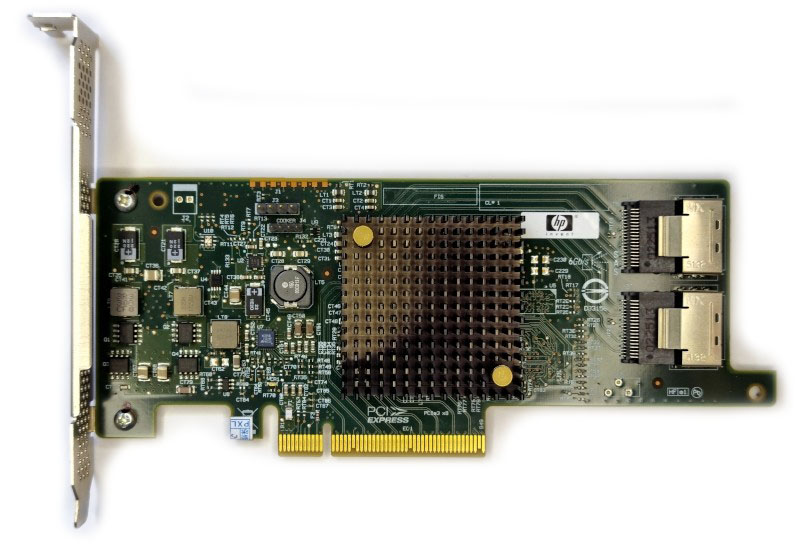
Pic. 3. SAS HBA card.
It is quite easy to confuse this type of cards with RAID controllers or adapters. They are similar to HBAs and may also feature SAS ports. However, an HBA presents each attached drive individually to the operating system, whereas a RAID adapter combines them into a single logical device. RAID cards also offer different forms of redundancy for increased data protection and may even have their own built-in cache. If you decide to use a RAID adapter, ensure that it can be put into the Initiator Target (IT) or HBA mode, so that the RAID functionality won’t be used by the controller and each drive will be visible to the OS. The support for this mode depends on the controller and may require flashing firmware on the card. Yet, on the whole, the use of RAID adapters is not recommended due to their higher costs and the need for additional manipulations. Also, it may be quite risky if the drives plugged into it already belong to a RAID set. In this case, the existing metadata on the member drives may get overwritten, which will create problems during the reassembly of the array.
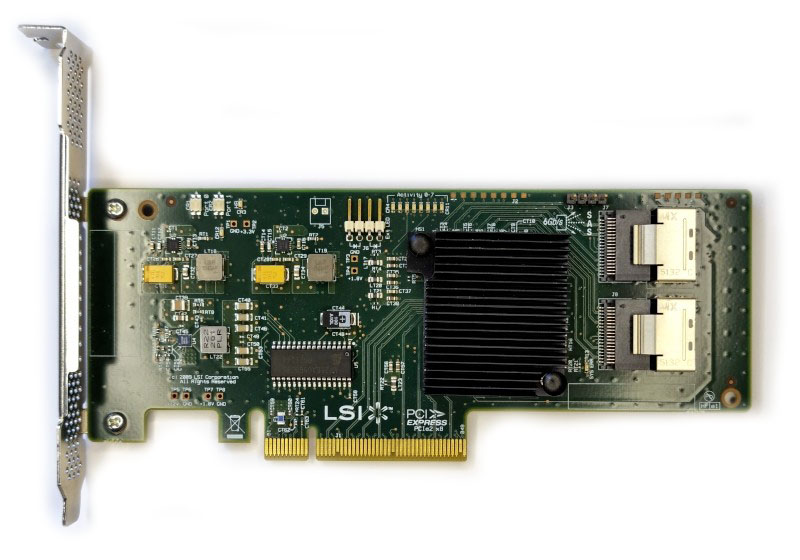
Pic. 4. RAID controller card with SAS ports.
In addition, be aware that old SAS HBA cards denoted as SAS 3.0 Gb/s or SAS-1 have the 2 TB size limitation. If you put a SATA drive over 2 TB on such a card, it will show up as a 2 TB drive. Later versions do not have that limit, so, if you have more capacious devices, you should check whether they are supported by the card of your choice.
What should be prepared for the procedure?
If you are going to apply a SAS HBA card, in the first place, your computer must have at least one available PCIe slot. This should not be mistaken with the old PCI ports that were popular in 1995-2005, but are still found in some computers. They are fundamentally different, so a PCIe card won’t work in a PCI slot and vice versa. On most motherboards, the PCI slots are made of white plastic, while and the PCIe slots may be black or colored (blue, yellow, green). However, such a distinction doesn’t relate to all hardware manufacturers.
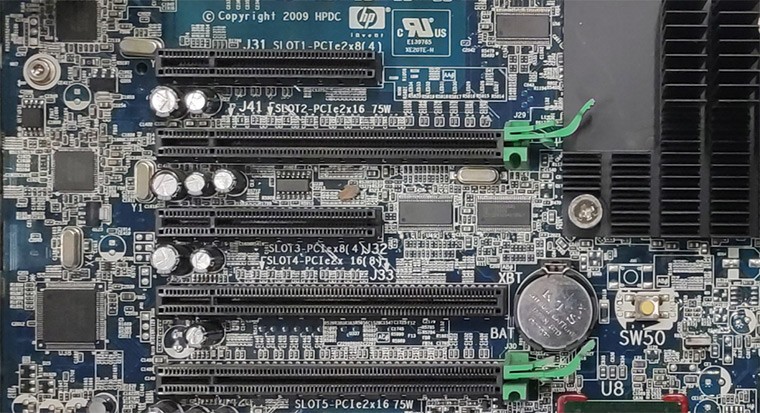
Pic. 5. PCI Express slots on the mainboard.
Different SAS interface cards may have different PCIe lane requirements. This determines their compatibility with the respective PCIe slots. For example, a shorter 1x or 4x card will work well in a longer 8x or 16x PCIe slot, yet, it will be too big to fit into a 1x slot. Therefore, you will need to make certain that the slot you are going to use will be able to house the given card type.
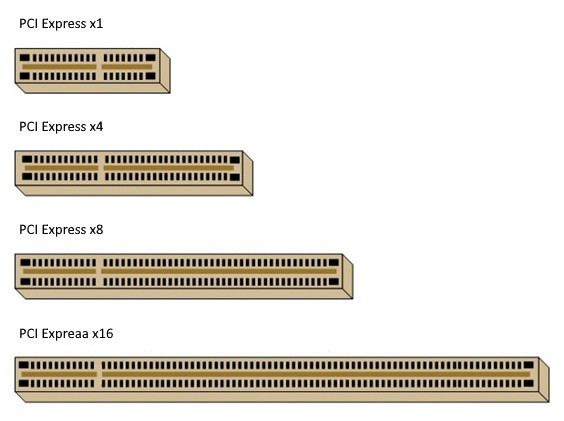
Pic. 6. PCIe slots of different configurations (x1, x4, x8, x16).
If the necessary slot is already occupied by other hardware, you may split it with the help of a PCIe riser card. Yet, it should be pointed out that you will only get some extra physical slots, the bandwidth provided by the PCIe bus will remain the same and will be divided between them.
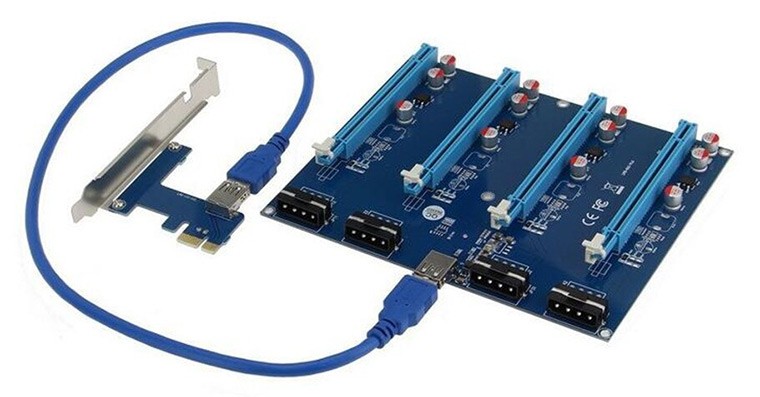
Pic. 7. PCIe riser card.
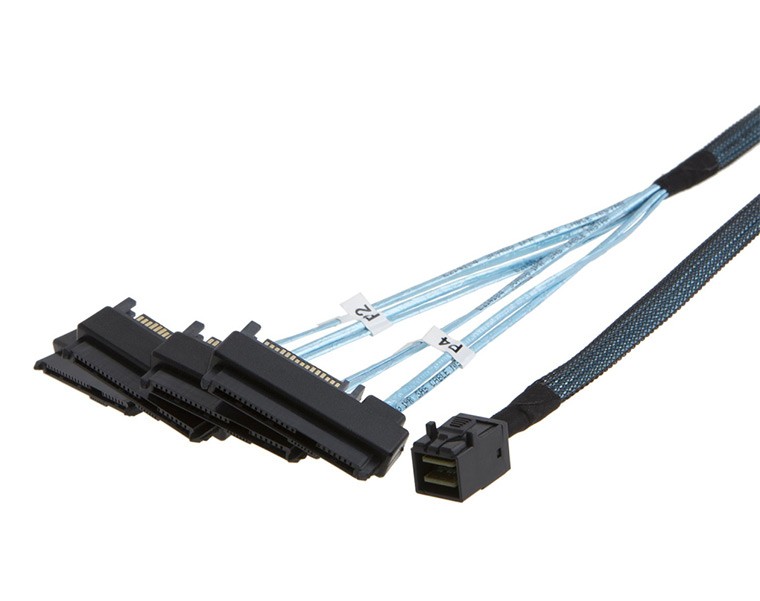
Secondly, you will need to prepare a SAS to SATA forward breakout cable for each SAS port on your HBA. A single cable should convert the internal miniSAS port (SFF-8643, SFF-8087 or SFF-8484, depending on the card generation) into four individual SATA connectors for the drives. In addition, the respective number of SATA power cables is necessary to power the drives from the system’s PSU.
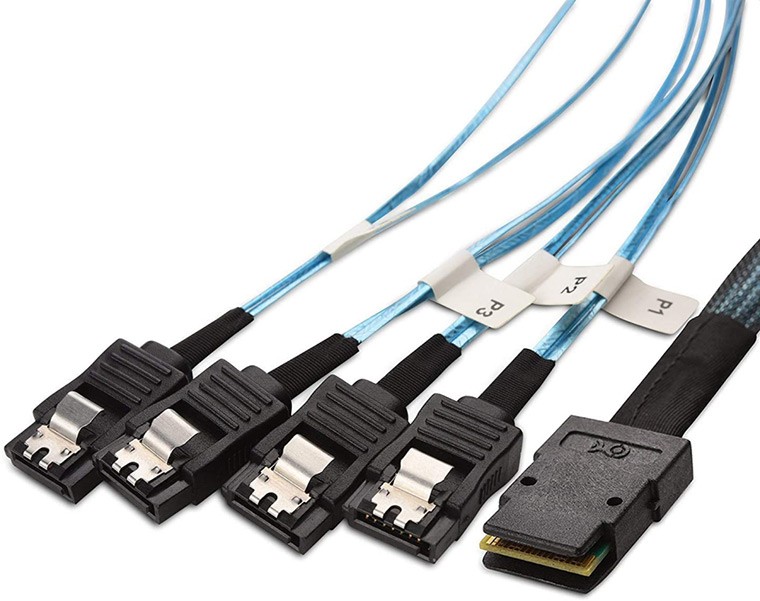
Pic. 8. SAS to SATA forward breakout cable.
As an alternative, it is possible to use a SAS breakout cable that will convert the miniSAS port into four SFF-8482 SAS connectors with a SATA power port at their back sides. In this case, a standard SATA power cable is inserted into the SAS connector, instead of the rear panel of the drive.
Pic. 9. miniSAS to 4x SFF-8482 SAS breakout cable with SATA power.
Furthermore, the interface card itself needs a certain amount of electrical power derived from the computer’s PSU. The power consumption may differ depending on the model, but is usually in the range between 10-20 watts. Plus, about 15 watts is required for each connected drive. If the PSU is already close to its maximum limit, it is easy to overload it by adding new devices, which will lead to its shutdown. The overall power load should not exceed 80%-90%. If possible, disconnect some unnecessary energy consumers or replace the PSU with one that provides more wattage.
Over and above, SAS host bus adapters tend to produce much heat. Typical consumer towers are usually not adapted for cooling components that operate at such high temperatures. Thus, you should come up with a method that will bring some additional airflow to the system. For instance, you can mount a cooler at the top of the PCIe bracket area.
And, finally, to be able to deal with the hardware internals, prepare a Phillips-head screwdriver and an anti-static wristband. The latter will make it easier to protect the insides from static electricity. As an alternative, you may take other antistatic precautions.
Connecting SATA drives via a SAS HBA card step by step
Before starting the procedure, it is important to remember that SAS HBA cards are easy to break, so they should be handled with care. It is not recommended to touch the gold-plated connectors, the best way to hold them is by the metal mounting bracket or by the edge of the PCB. Leave the board in its antistatic bag until you are prepared to install it into the system. After that, use only a flat, static-free work area. Also, please mind that installation instructions for your particular device model may differ from the ones provided below. Thus, it is highly advised to consult with the user manual as well.
-
Prepare the HBA card.
Remove the card from its antistatic bag and inspect the device thoroughly for any possible damage.
-
Make your computer ready for installation of the card.
Shut down the system and unplug the power cord from the power supply. After that, ground yourself by touching a metal object or put on an anti-static wristband.
Remove the screws on the back panel of the computer’s case that hold the side panel and eject it to get access to the inner parts. In case of a different assembly, refer to your system’s user manual for more specific instructions.
-
Check the card’s mounting bracket.
Ensure that the standard PCIe mounting bracket pre-installed on your HBA card fits into your system. If not, replace it with a low-profile PCIe mounting bracket that should be included into the package.
-
Plug the SAS HBA into a vacant PCIe slot.
Identify a free PCIe port compatible with your card. They are usually located at the bottom part of the mainboard. Take out the blank bracket panel at the back of the case that corresponds to the chosen PCIe socket. If there is a screw, employ a screwdriver. After that, adjust the interface card into the PCIe port. Make certain that it seats correctly and doesn’t interfere with the rest of the components.
-
Secure the HBA bracket to the computer’s case.
Secure the HBA mounting bracket to the case by installing a screw or using other available means, depending on the construction of the chassis.
-
Attach your drives to the HBA card.
Connect the miniSAS connector on one end of the SAS to SATA forward breakout cable (or a SAS breakout cable) to the internal miniSAS port on the interface card. Then insert each of the SATA connectors (or SFF-8482 SAS connectors) on the other end of the cable into the ports at the back panel of the SATA drives. After that, get a free SATA power cable that comes from the PSU and connect it to the wider SATA power port on the drive (or directly to the SAS connector, if you are using a SAS breakout cable).
-
Check whether the drives are detected.
Power up the computer and boot the system. If necessary, download and install the additional drives to work with your SAS HBA. After that, make sure that the drives have been recognized. For this, launch the Disk Management utility and search for them in the list. If the drives are not available there, shut off the system, unplug the computer and check the contacts.
Such cards themselves also make it possible to identify the connected storage devices and are able to show the drives before the start of the OS. You can go to the board's HBA settings using a hotkey combination and view all the detected drives drives there, including the ones being "hot-plugged" while the menu is opened. Thereby, the new devices are also visible in the list together with the previously attached drives.
To learn more about interface type identification as well as other possible installation methods, please, refer to the article devoted to the identification of a hard drive’s interface type and means for its connection to a computer.
Last update: November 15, 2022