How to recover data from a Linux LVM volume with Thin Provisioning
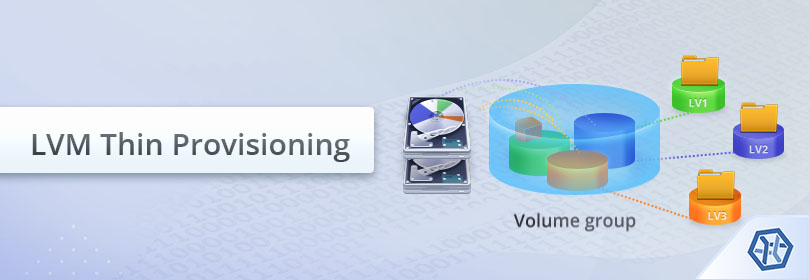
Besides standard logical volumes, Linux LVM allows users to create thinly-provisioned ones with a virtual size which can potentially exceed the amount of physically available storage space. Such volumes are to be treated differently during data recovery, as blocks in them are just references to real blocks of physical storage and get allocated from a special Thin Pool only when actual data is being written. A Thin Pool in the simplest case consists of a large Data Partition with real data and a small Metadata partition, which holds the information about the distribution of the data blocks between the available Thin logical volumes. Thus, the correct interpretation of data on such Thin volumes is only possible as long as the Metadata partition is intact.
Hint: Please refer to the article to learn more about Logical Volume Manager of Linux and its prospects of data recovery.
UFS Explorer Professional Recovery is capable of translating the data using the information contained within the Metadata partition and provides effective means for the recovery of files deleted or lost or from a Thin LVM volume. Follow the given steps to carry out the process.
- Connect the storage with your Thin LVM volume to the computer.
If your Thin LVM volume is located on an external drive, connect it to the computer using the corresponding interface. In case of an internal drive, simply skip this step.
Hint: If you need to attach an internal hard drive from another computer, you can plug the disk into the motherboard of your PC or сonnect the drive externally using a USB to SATA/IDE adapter.
- Install and launch UFS Explorer Professional Recovery.
Open the program with administrative rights and, if needed, change its settings. All the connected drives will be presented in the left pane of the main window. The logical volumes will be listed below each of the drives.
Hint: If you have any difficulties with the installation of the utility, please refer to the installation manual for UFS Explorer Professional Recovery.
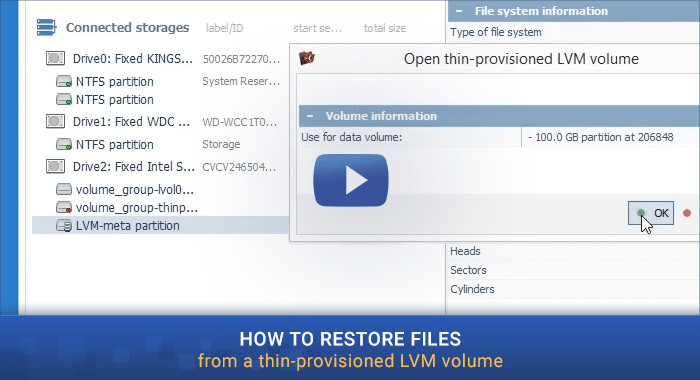
- Find the partition which contains LVM Metadata in the list of available storages.
Look through the tree of storages and find the necessary drive. It will consist of several volumes, one of which will be labeled as LVM-meta partition.
- Open the LVM-meta partition and the program will use the information within it for data translation.
Though all the data is located on the Data partition which may be even marked as accessible, it cannot be read without metadata being applied. For this select the LVM-meta partition, choose the "Open thin-provisioned LVM volume" context menu option and click "OK". Yet, if there is more than one Thin LVM volume, one needs to specify its number.
- Scan the new virtually mounted storage to recover your lost files (folders).
After the operation is completed, a new virtual partition will be mounted in the software interface. Select it to check its content and run a storage scan with the respective tool from the toolbar to find deleted or lost files. Adjust the parameters of the scanning process, if needed, and press the "Start scan" button.
- Pick the necessary recovered items and copy them to another storage.
Wait for the program to finish the procedure. After that, explore the presented reconstructed file system and find the needed folders and files. Press "Define selection", select all the items to be saved and press "Save selection". In the pop-up window provide any valid destination folder which cannot be located on the source storage.
For better understanding of the process watch the following video tutorial:
To learn about other technologies used to store and manipulate data, please, refer to the storage technologies section.
Last update: August 6, 2022