How to recover data from an encrypted Apple APFS volume
Apple sets a high standard for safeguarding user data, integrating a variety of security features across all devices within its ecosystem. At the core of this protection is encryption, the primary defense against unauthorized access and an essential part of the modern APFS file system. APFS encryption is highly effective in securing information from intruders, yet, on the flip side, it may present challenges for legitimate users. When data loss occurs on an encrypted APFS volume – whether due to human error, power failure or other issues – data recovery is only possible under specific conditions that permit decryption of the storage. Fortunately, in most cases, files lost from an encrypted APFS volume, whether on an internal drive or external device, can be restored if the correct password or recovery key is available and the appropriate software is used. This guide will demonstrate how to safely decrypt the APFS storage and rescue the lost data with different editions of UFS Explorer.
General specifics of APFS encryption
In contrast to HFS+, the modern Apple’s APFS file system (employed in macOS 10.13 High Sierra and later) has native support for encryption. This makes it capable of protecting critical user data at the file system level, without the need for an extra layer of abstraction provided by Core Storage. Meanwhile, each volume within an APFS container is treated as an independent entity by the encryption engine, which allows it to have its own encryption settings.
Users can enable APFS encryption for their Mac’s startup drive during the initial system setup or later through the FileVault feature of macOS. Non-system volumes can be formatted as APFS (Encrypted) from the beginning or encrypted afterward via Finder. APFS encryption is also available for any external digital media, including external drives and USB sticks.
Ciphering is based on the AES (Advanced Encryption Standard) algorithm with a 128-bit or 256-bit key length. While the underlying standard remains the same across devices, the way it is applied can differ significantly depending on the Mac’s hardware capabilities. On some Macs, it is managed purely by software, whereas on others, the encryption of internal drives is backed by the hardware support. In this sense, APFS encryption can be categorized as software-managed encryption and hardware-assisted encryption.
Hardware-assisted APFS encryption
Newer Apple devices equipped with Apple’s T2 security chip or Apple Silicon processors employ hardware-assisted encryption. In this scenario, the encryption and decryption processes for the internal drive are handled by the chip itself. Encryption keys are stored within an isolated part of the chip called the Secure Enclave. Advanced security techniques allow macOS to interact with the component for decryption operations, but direct access to the raw encryption keys is entirely blocked. At present, there are no known methods to extract or transfer these hardware-specific keys. They remain inaccessible outside the Secure Enclave, including to any data recovery applications. And since the encryption keys are bound directly to the particular hardware, an encrypted internal drive cannot be moved and accessed on another computer.
Software-managed encryption
This method works across all external Apple devices, as well as on older Macs that do not have dedicated support for hardware encryption. APFS encryption then relies completely on the credentials provided by the user and may be based on:
-
User password – the primary method used to unlock the encrypted volume. The user sets this password when enabling encryption and provides it each time when logging into the Mac user account or accessing an encrypted external device.
-
Recovery key – a string of 24 alphanumeric characters generated automatically by macOS as a backup to access the encrypted startup drive if the user password is unavailable.
-
iCloud account – the user’s account that is linked to the given Mac and securely stores the recovery key information, whereas the actual key is never displayed to the user. This option can be selected when encrypting the Mac’s system drive. Logging into the iCloud account then unlocks the encrypted storage, similar to a recovery key.
-
Institutional recovery key – a specialized recovery key used only in organizational environments. It is created before encryption is activated on the device and allows the administrator to access it without possessing the user’s personal password or recovery key.
Hence, an APFS volume can be deciphered using a valid user’s password or one of the recovery keys, without requiring any additional hardware. However, the details necessary for decryption are stored as ciphertext within the APFS metadata. If critical areas of the storage become damaged due to corruption or physical defects, it may no longer be possible to verify input credentials and make the data readable again, even if the password or recovery key is correct.
The simplest way to decrypt storage is to type in the user’s password when prompted by UFS Explorer. If the password is missing, the only alternative is to find the recovery key, in case it has been created during the initial setup of encryption on the Mac’s internal startup drive. Depending on their preferences, users may choose to:
-
Copy the key and save it in a secure document, password manager, cloud or any other storage.
-
Print the key and keep it as a physical document.
If the both the password and the recovery key have been lost and no backups exist, it becomes impossible to decrypt the data. As a result, the encrypted APFS volume gets permanently inaccessible.
Encrypted APFS Recovery using a password or recovery key
UFS Explorer serves as a dependable solution for recovering data from APFS volumes protected by software-managed encryption. The product is available in four distinct editions – Standard, RAID, Network RAID and Professional – all of which support APFS encryption technology. The programs are flexible in that they allow decrypting the storage using either of the two methods supported by APFS: a password or a recovery key.
While the principal process of decryption and data recovery remains consistent across all editions and decryption methods, specific steps may vary slightly depending on the software edition you are going to use.
In UFS Explorer of the Standard, RAID or Network RAID editions
- Attach your device locked by Apple APFS to the computer.
Connect the encrypted portable hard drive to your Mac. In case of an internal storage, you will need to remove it from the computer and use with another PC as a secondary drive or launch your Mac in a safe environment with the help of UFS Explorer Backup and Emergency Recovery CD. One may also work on the same Mac, but this approach requires disabling System Integrity Protection, as described in Unblocking access to macOS drives. Yet, the latter option is inadvisable due to a high possibility to overwrite the data.
Hint: Please rely on the instructions to plug the disk into the motherboard or сonnect the drive externally using a USB to SATA adapter.
- Install and run UFS Explorer Standard Recovery, UFS Explorer RAID Recovery or UFS Explorer Network RAID.
Open the software with elevated privileges by entering the correct username and password. The program will list all the connected drives in the left pane. The logical volumes of each physical device will show up under it.
Hint: If you have any difficulties with the installation of the utility, please refer to the installation manual for the employed edition of UFS Explorer.
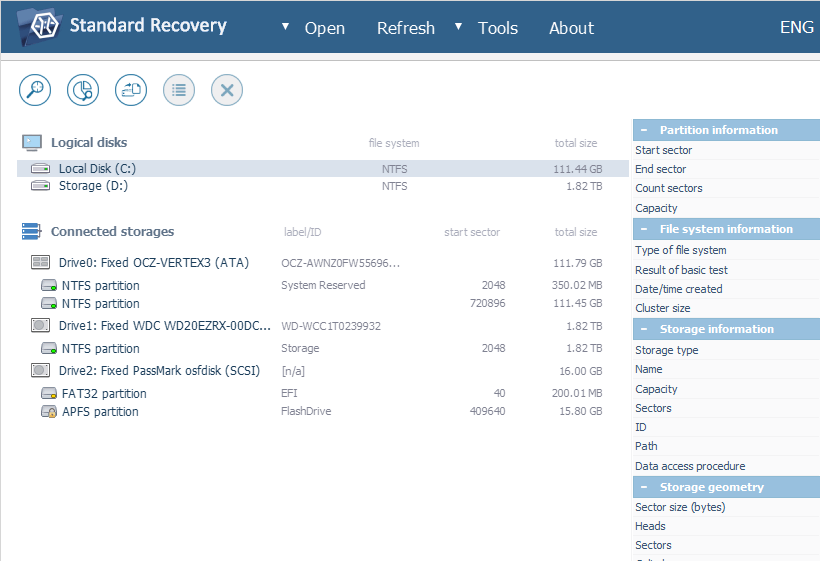
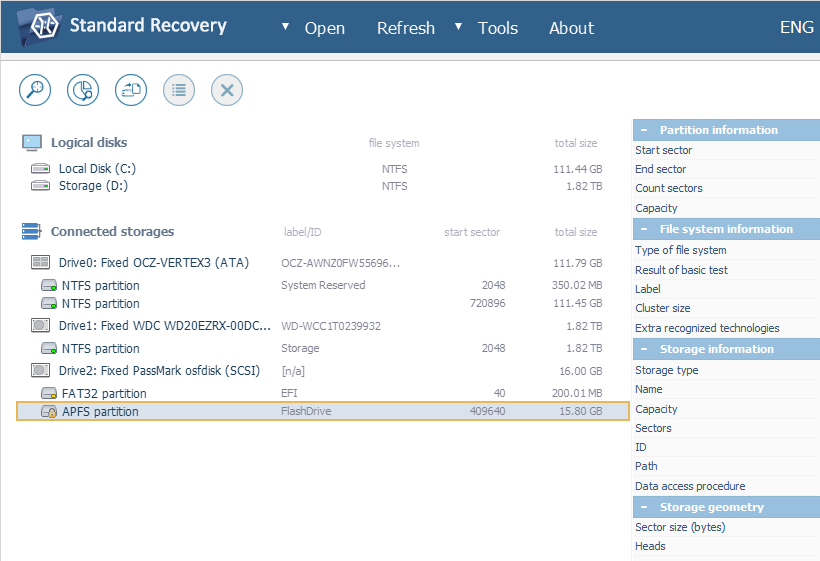
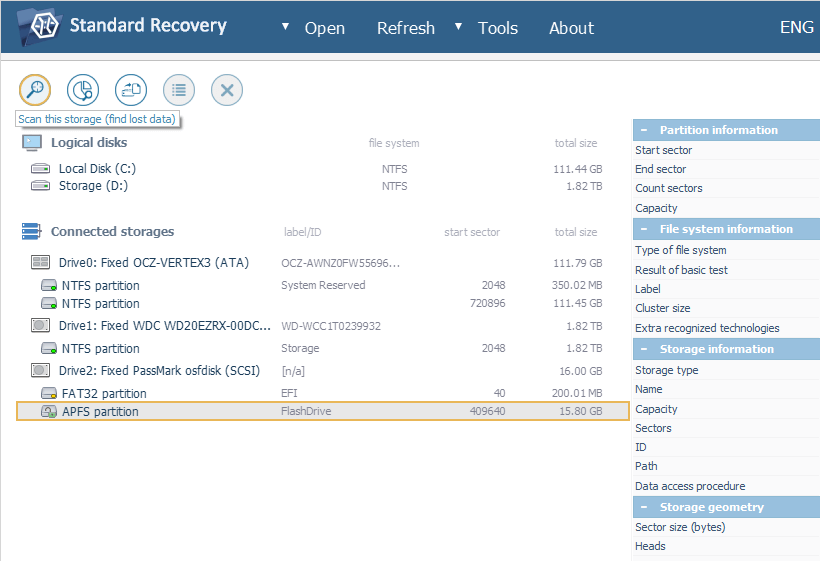
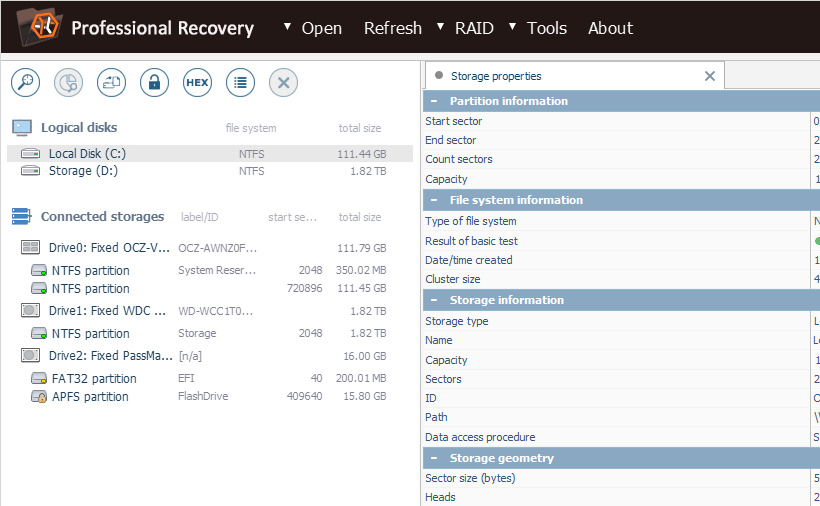
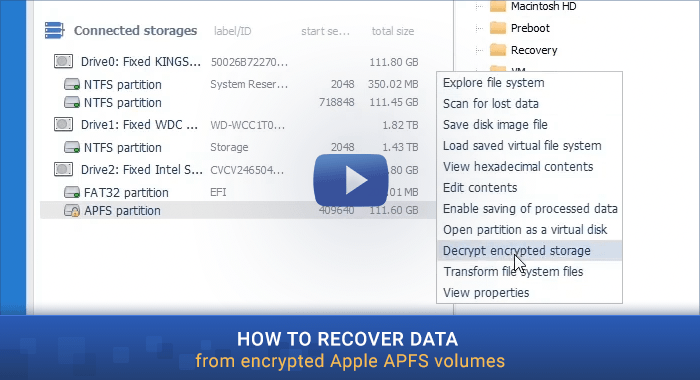
- Find the required encrypted APFS volume among the displayed
Examine the list for the presence of an APFS partition indicated with a yellow padlock icon.
Hint: If you want to learn more about how different drives and volumes are labeled in the interface of UFS Explorer, please refer to Identification of different storages and technologies.
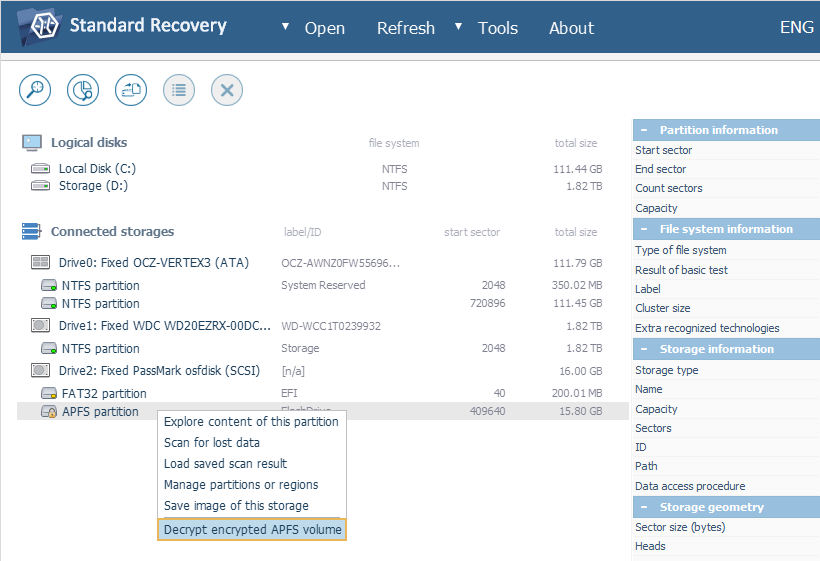
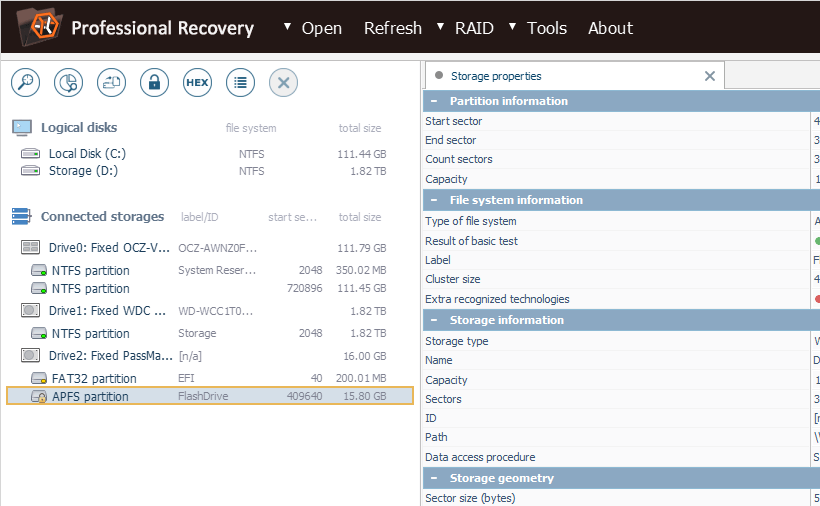
- Decrypt the storage in the application to unlock its content.
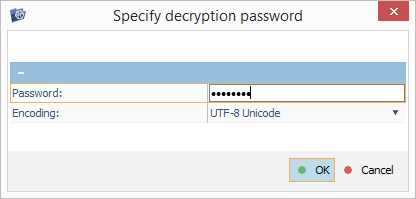
Although the file system may be labeled as accessible, no valid data can be retrieved from it until it gets deciphered. For this, open the volume’s context menu and choose the "Decrypt encrypted APFS volume" option from it. In the opened dialog, type in the correct user password or paste the recovery key into the respective field.
- Run a scan on the decrypted volume to get back deleted or lost files.
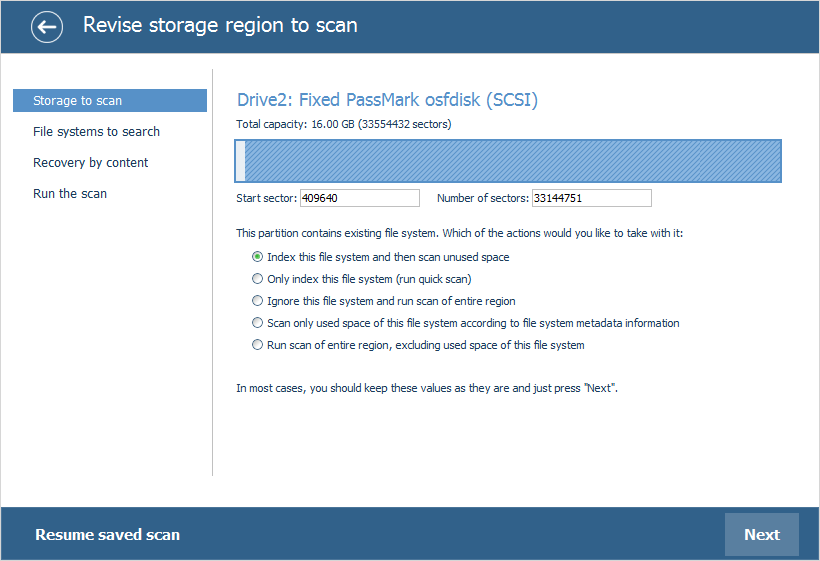
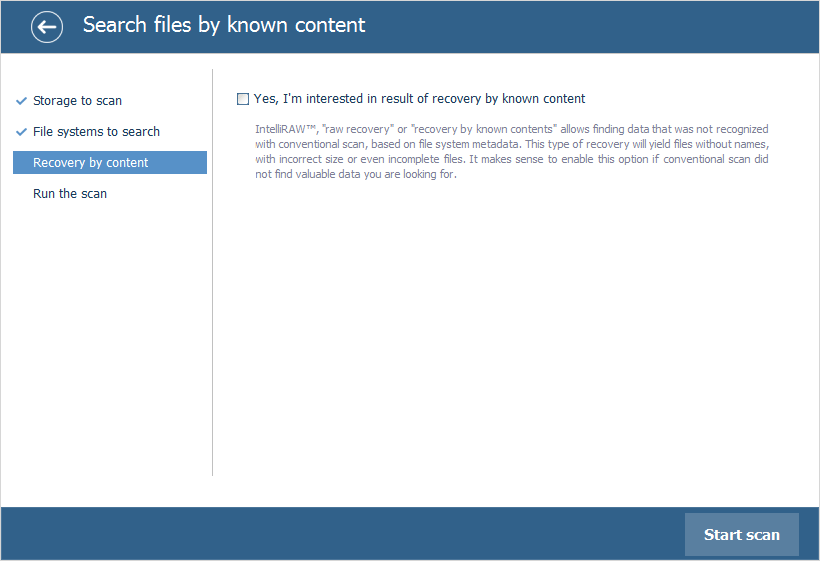
After successful decryption, the volume will become unlocked and its content will be accessible in the program. You can also look for deleted or lost files by scanning the storage. Get the "Scan this storage" tool from the toolbar, deselect all file systems, except APFS, and hit the "Start scan" button.

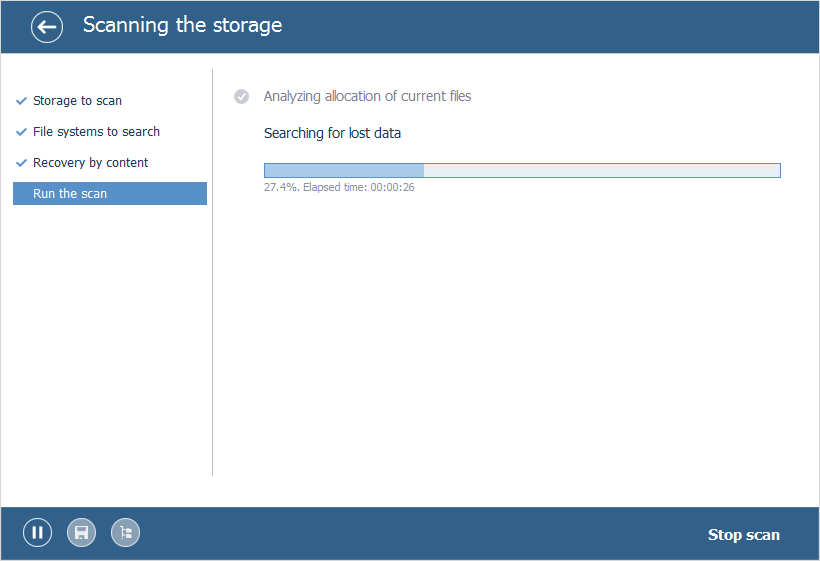
Hint: More information about configuring the scan can be found in the instruction on scanning a drive with UFS Explorer.
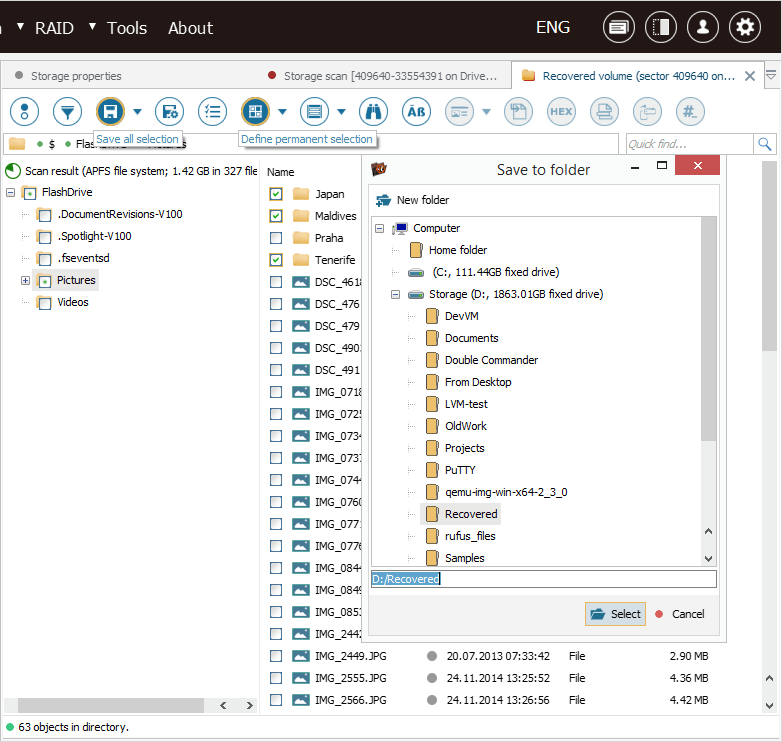
- Check off the necessary recovered elements and save them to another location.
After the scanning is accomplished, navigate through the file system reconstructed by the application and find the folders and files you need. Then, click "Define selection", enable the checkboxes next to them and hit "Save selection". After that, specify a safe destination storage for copying.
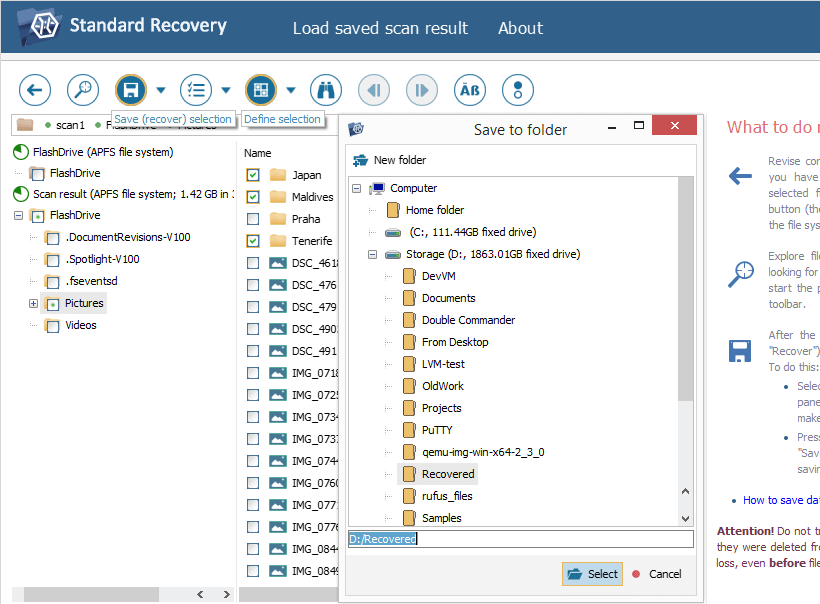
Hint: The information provided in Evaluation and saving the results of data recovery may facilitate your work with the obtained folders and files.
Hint: If you are going to save the recovered data to a network storage, please check the provided guide.
In UFS Explorer Professional Recovery
- Connect your encrypted Apple APFS device to the computer.
Plug the encrypted external drive into the Mac. If you need to work with the system disk, in order to get access to it, you will have to extract it from the machine and attach it to another computer as a secondary storage or boot your Mac in a safe environment using UFS Explorer Backup and Emergency Recovery CD. It is also possible to work on the same Mac if you disable System Integrity Protection as described in Unblocking access to macOS drives, but this option is not recommended in view of a high risk of data overwriting.
Hint: Please rely on the instructions to plug the disk into the motherboard or сonnect the drive externally using a USB to SATA adapter.
- Install and launch UFS Explorer Professional Recovery.
Start the program with administrative privileges by entering the correct user/password in the pop-up window. The application will display all the attached drives in the list of connected storages in the left pane. Each physical device will have its logical volumes placed under it.
Hint: If you have any difficulties with the installation of the utility, please refer to the installation manual for UFS Explorer Professional Recovery.
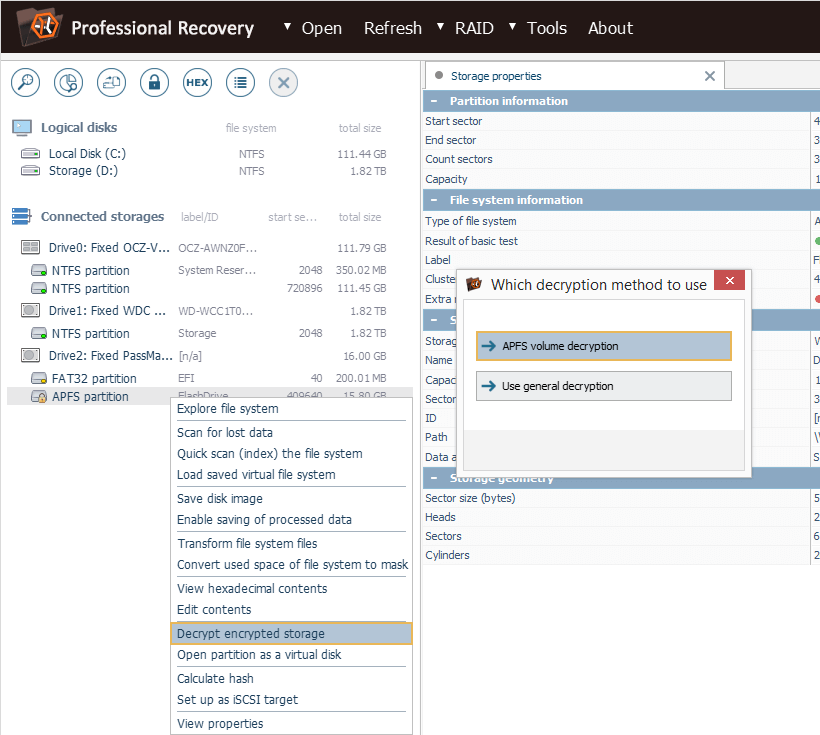
- Choose the necessary encrypted APFS volume from the list of storages.
Explore the list to find the needed encrypted APFS partition labeled with a yellow padlock icon.
Hint: If you want to learn more about how different drives and volumes are labeled in the interface of UFS Explorer, please refer to Identification of different storages and technologies.
- Use the decryption tool provided by the software to open the data.
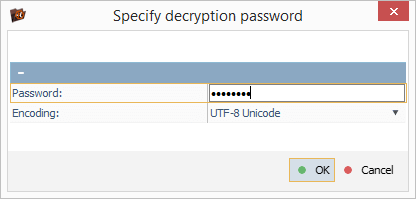
Even though the partition is marked as accessible, the data within it cannot be read until deciphered. Open the volume context menu, select the "Decrypt encrypted storage" option and then choose the "APFS volume decryption" method. Enter the correct user password or copy the recovery key into the field, including all the dashes.
- Scan the decrypted storage to regain deleted or lost files.
After decryption is completed, the available files will become accessible in the software interface. You can also find the deleted or lost ones by scanning the storage. To run the scan, choose the respective tool from the toolbar, unselect all extra file systems excepts APFS and click "Start scan".

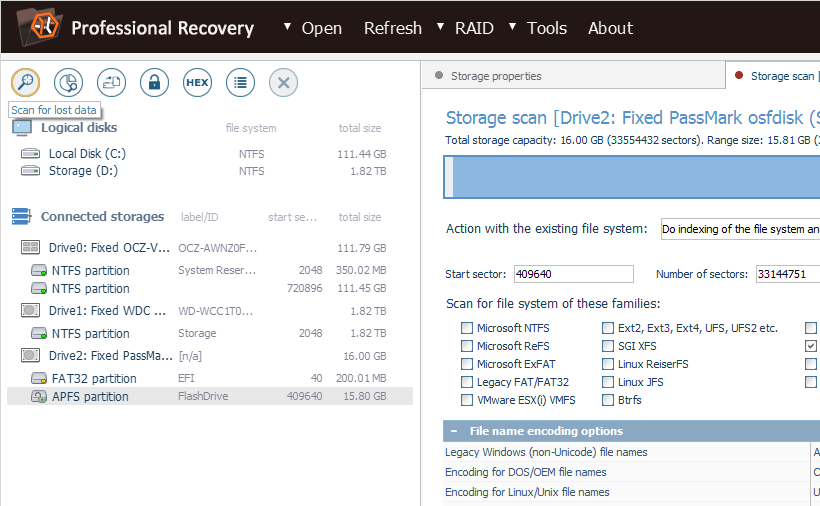
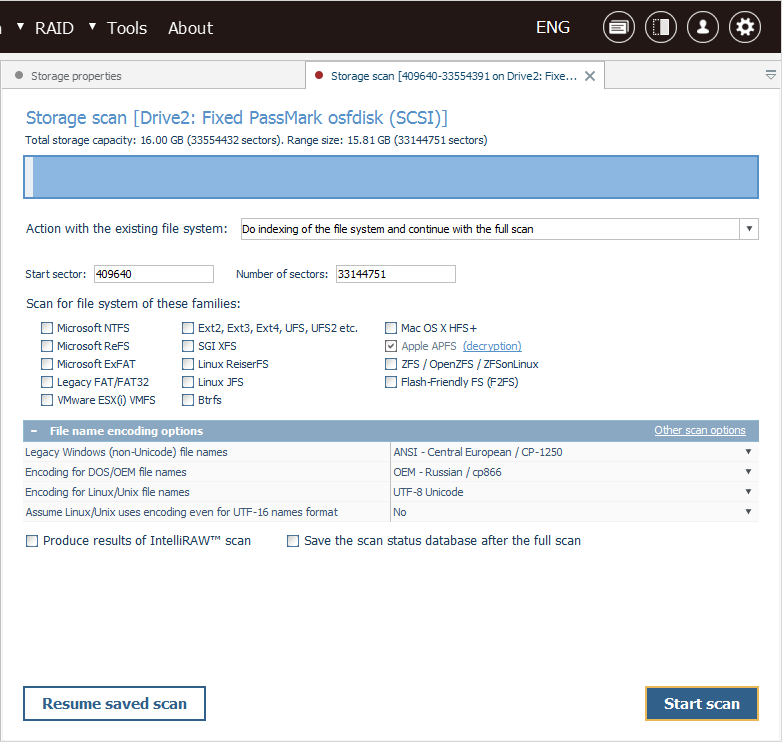
Hint: More information about configuring the scan can be found in the instruction on scanning a drive with UFS Explorer.
- Select the needed recovered items and copy them to another disk.
When the operation is finished off, you can run through the file system restored by the program to find the needed folders and files. To define the ones to be saved, click "Define selection", mark them with ticks and click "Save selection". After that, choose a safe destination folder for the rescued items.
Hint: The information provided in Evaluation and saving the results of data recovery may facilitate your work with the obtained folders and files.
Hint: If you are going to save the recovered data to a network storage, please check the provided guide.
Encrypted APFS recovery in a video-guide
The whole procedure is also demonstrated in the following video:
Last update: December 17, 2024