How to create an image of a drive in UFS Explorer
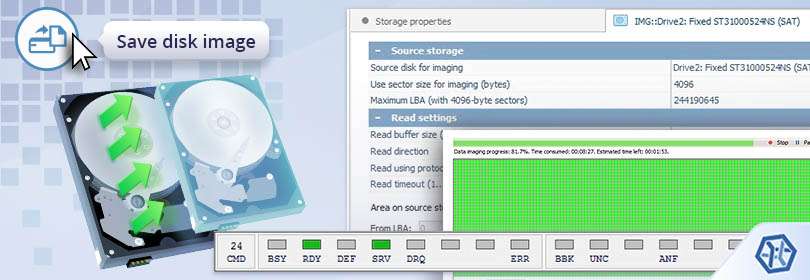
Disk images are commonly used for data recovery and backup purposes. Not only they accelerate the process of data retrieval, but also help to minimize the risk that the original device will break down before it is completed. Supplemented with an advanced disk imager, UFS Explorer makes it possible to create such an image directly in the program, without the need for a third-party utility, and then employ it instead of conducting operations on the physical digital medium.
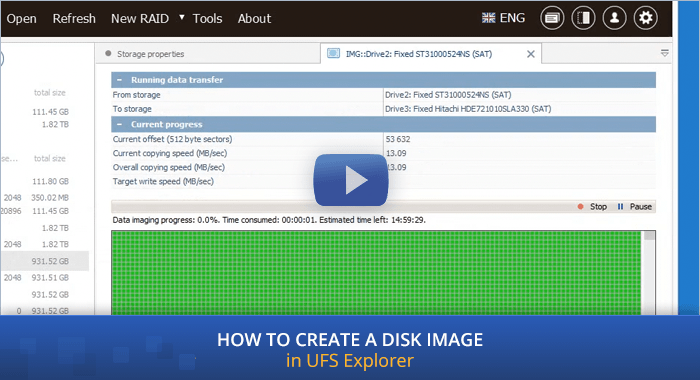
When a storage does not function normally due to hardware defects or other issues, the process of disk imaging may require additional configurations in order to reduce the potential for the total failure of the unstable device before the valuable data is extracted. The disk imager integrated into UFS Explorer provides an extensive set of parameters aimed at maximally efficient data reading and control over I/0 errors. To adjust the procedure in accordance with your particular case, you can modify the available settings as per the instructions given below. In addition, a brief overview of the course of action can be found in the following video guide:
Other peculiarities of work with damaged digital media are described in detail in How to recover data from a defective disk and are recommended to be taken into consideration before the start of the imaging process.
General disk-imaging procedure
-
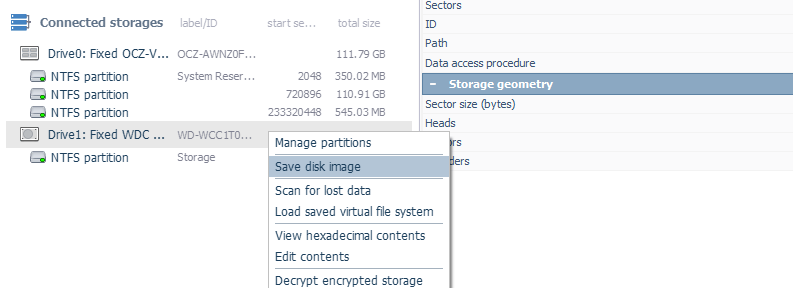
Launch UFS Explorer and get the disk imaging tool embedded into the software.
Find the problem disk/partition in the list of attached storages and select the "Save disk image" option in its context menu if you are using UFS Explorer Professional Recovery, or the "Save image of this storage" option in UFS Explorer of the Standard, RAID or Network RAID editions.
Hint: If you need to attach an internal hard drive from another computer, you can plug the disk into the motherboard of your PC or сonnect the drive externally using a USB to SATA adapter using the given instructions.
-
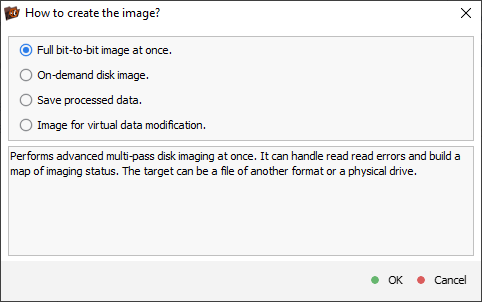
UFS Explorer of the Professional Edition will prompt you to choose between the available disk imaging methods. In case you are using any other edition of the software, simply read the warning note and move on to the next step.
-
Full bit-to-bit image at once
This option is the primary choice when initiating the imaging process, suitable for the majority of scenarios. It allows capturing as much data as possible in multiple sequential passes over the source storage. In situations that involve damaged sectors or other reading instabilities, subsequent passes attempt to retrieve the data that have been missed, resulting in a more complete disk image. Meanwhile, the error-handling mechanism enables efficient bypassing of problematic areas, with the status of each sector being transferred onto a map that can be helpful in diagnostics.
-
On-demand disk image
This option allows performing real-time disk imaging rather than processing the entire storage "in one go". The information is transferred from the source to the target upon access to the respective sectors (including metadata, files, etc.). Its further reading occurs from the target location only, eliminating any additional requests to the source storage during subsequent operations. With the help of this method, you can also configure imaging of any specific data ranges, occupied/free file system space or even individual files. Please refer to How to recover data from a defective drive for more details.
-
Save processed data
This option is designed to quickly capture a snapshot of the data accessed by the application during the current session (including metadata, files, etc.), instead of comprehensive imaging of the source storage. The resulting snapshot is saved as a sparse disk image file in the SDLSP format.
-
Image for virtual data modification
This option makes it possible to establish a connection between the original storage and a "delta" file, for any alterations made to the data to be written to the associated "delta" file rather than modifying the source directly.
You may proceed with the default method or select the one that better aligns with your requirements.
-
-
In the interface of disk imager, specify the parameters related to the source storage.
-
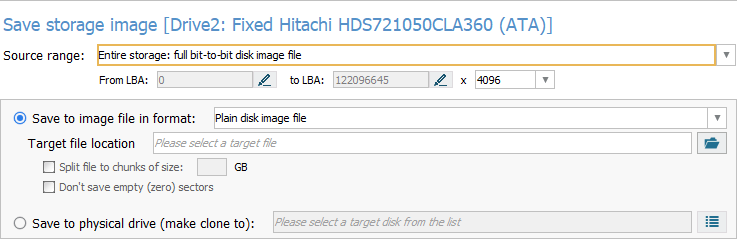
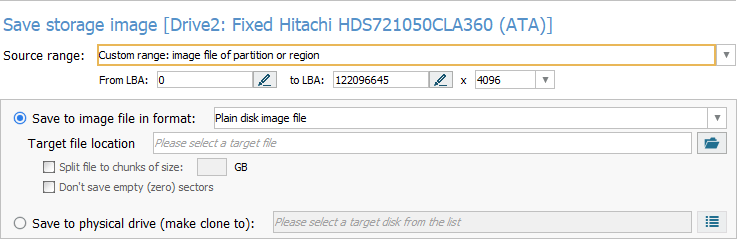
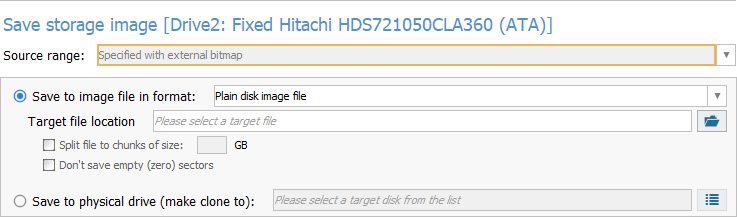
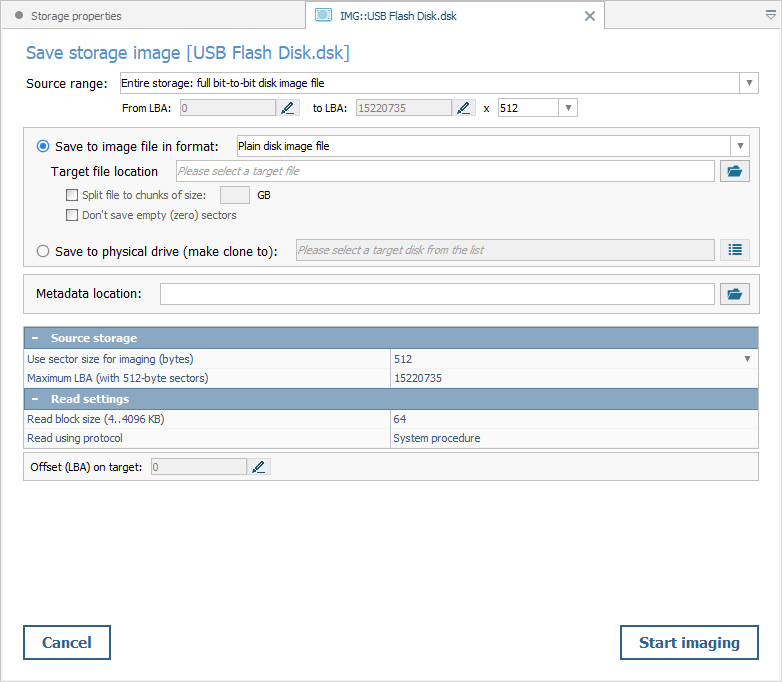
Source range
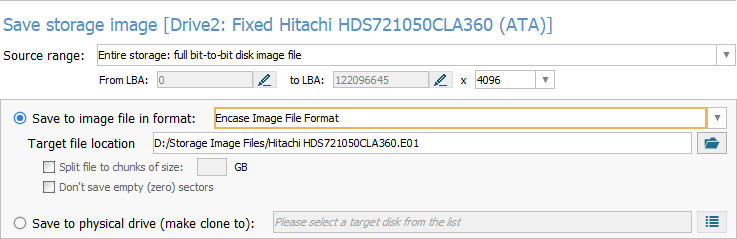
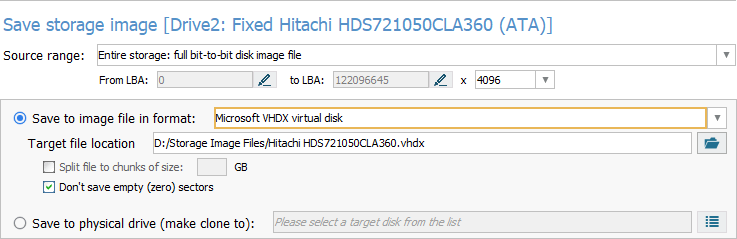
This parameter defines which part of the source storage will be imaged. "Entire storage: full bit-to-bit disk image file" is the default choice for creating an image of the entire disk – it allows saving everything’s possible from the first to the last block of the physical storage.
The "Custom range: image file of partition or region" option is enabled automatically when an image of a disk partition is created. In this case, the values for the start and the end sectors are filled in by the software itself. Alternatively, a range of blocks for imaging and can be specified manually.
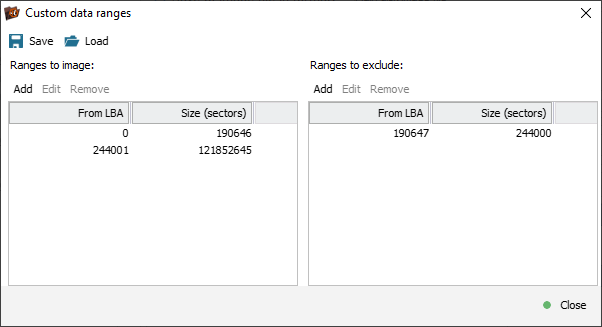
The "Specific sets of sector ranges to include/exclude from the image" option makes it possible to specify a set of ranges for creating a disk image.
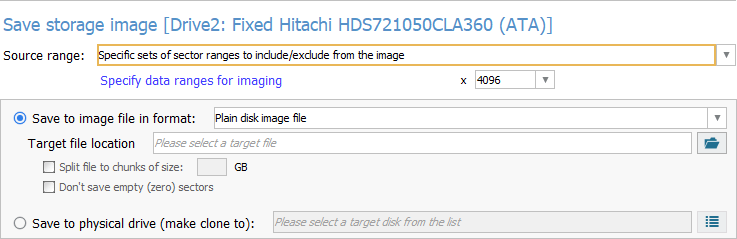
It allows defining which ranges will be saved and which of them will be excluded from the image. The option is useful for reading several known ranges one more time, or when a certain partition or some other data should not be present in the image.
The "Specified with external bitmap" option cannot be selected manually but is activated automatically when an image on the basis of a block map is created, which includes an instruction for each block as to whether it needs to be read.
-
-
Provide settings related to the target storage.
-
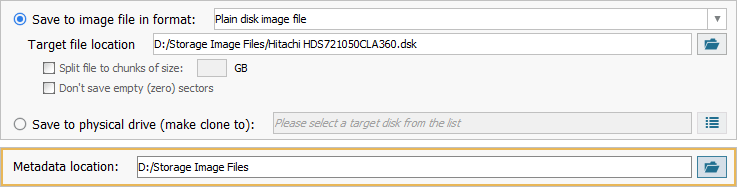
Save to image file in format
This parameter offers several storage options for saving the image file.
"Plain disk image file" is the default option for disk imaging.
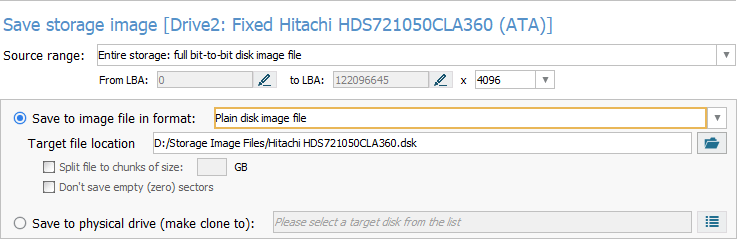
In this case, a plain image file is created, without metadata, with a size that exactly matches the size of the area from which the image is created. Data about defects gets stored in the mandatory block states map file within the disk image.
The "Custom sparse disk image file" option allows performing on-demand disk imaging.
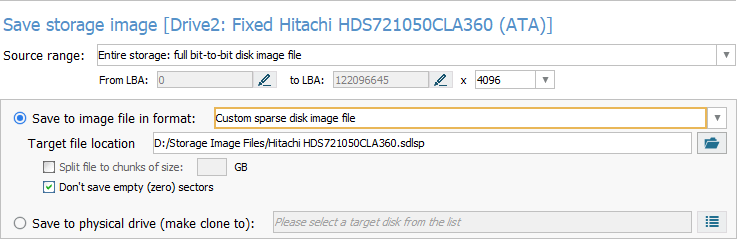
This type should be chosen when one needs an image of just a part of the data, especially if it is scattered across the source storage (an image of the file system metadata/data, an image on the basis of a map, and so on). The state of reading is a part of a sparse file and does not require a separate map.
The "Available (connected) sparse file" option enables on-demand disk imaging to a connected sparse image file and is activated automatically when an image is created for a disk that is already being read in the "on-demand imaging"/"one-time read" mode and has a connected active sparse file.
The "Encase Image File Format" option allows saving a disk image file in the *.E01 format used by the Encase professional forensic software.
The "Microsoft VHDX virtual disk" option makes it possible to create a *.vhdx virtual drive that can be mounted in Windows.
-
Save to physical drive (make clone to)
When this option is chosen, data is simply copied from the source disk to another storage, while the information about reading errors is saved to a defects map file.
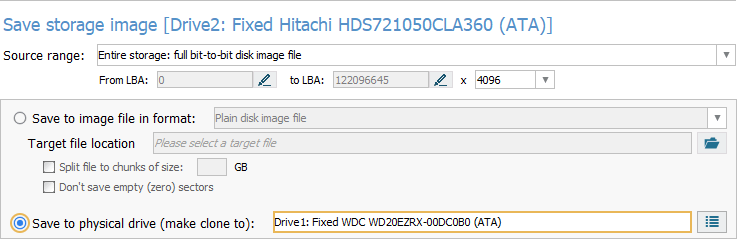
However, the target disk must be no smaller than the selected area to be imaged on the source disk. For instance, if the source disk is 3 TB in size, the target storage for saving its full image must be at least 3 TB. If a 1 TB partition from a 3 TB storage is being imaged, the minimum size of the storage should be 1 TB.
-
Use sector size for imaging
This parameter defines the size of the minimum block for reading.
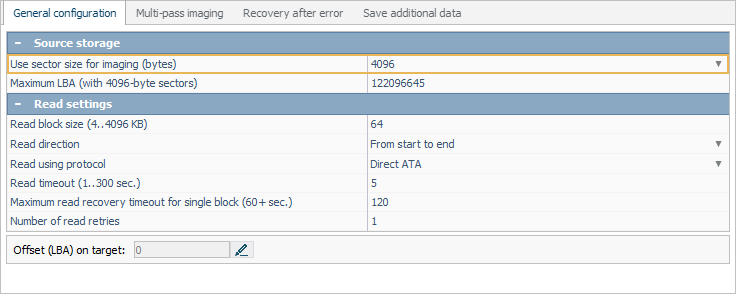
As modern drives usually have a physical sector size of 4 KB, the software chooses this size by default. The value cannot be changed for drives that have a physical sector size of 4 KB according to the disk identification data. For other drives the values of 4 KB or 512 bytes can be selected.

When it comes to a defective sector, using the 512 bytes value for a drive with the 4 KB sector size will lead to repeated attempts to read the same bad block. Selecting 4 KB for a drive with the 512 bytes sector size may result in skipping extra sectors adjacent to the defective one.
For drives whose sector size is not a multiple of 512 bytes (for example, 520 bytes), the software doesn’t allow changing this value whereas the disk image will be created with a rounded block size (for example, 512 bytes on the image for 520 bytes on the source).

-
-
Define the principal settings for data reading.
-
Read block size
This parameter sets the size of the data block that will be read "in one go".
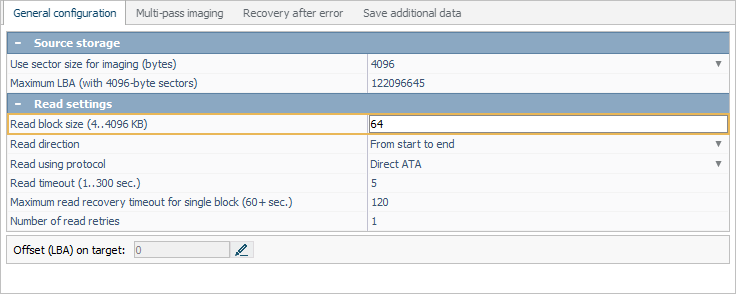
The block size from 64 to 128 KB makes it possible to achieve maximum performance as it is large enough for efficient linear data reading but is not too large so that it should not "catch" defects. Besides, a very large size may not be supported on some connections in ATA/SCSI modes.
-
Read direction
This option allows choosing the direction in which the storage reading will be performed.
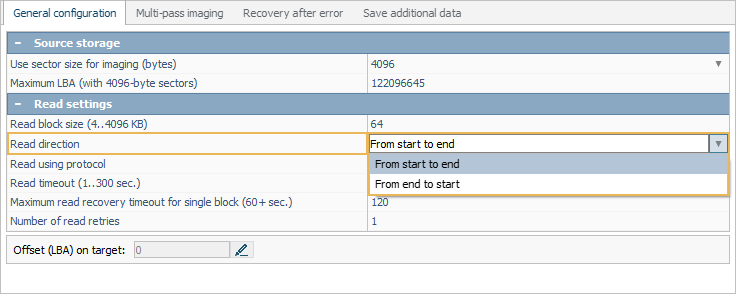
The "From start to end" option is chosen by default and provides the maximum speed. The second option is recommended only when the defect is observed closer to the beginning of the disk to prevent its rotational damage. In this case, the program will still read the data in the "forward" direction but will do that in blocks of several megabytes, starting from the end of the disk.
-
Read using protocol
This parameter sets the procedure which will be employed for access to the storage. The "System procedure" is available for all operating systems. The main disadvantage of the standard system procedure for reading data is the absence of control over reading errors that may result in "hanging" of the software and/or USB adapter in case of defective blocks or series of defects. Using this approach may lead to further degradation of the failing storage device.
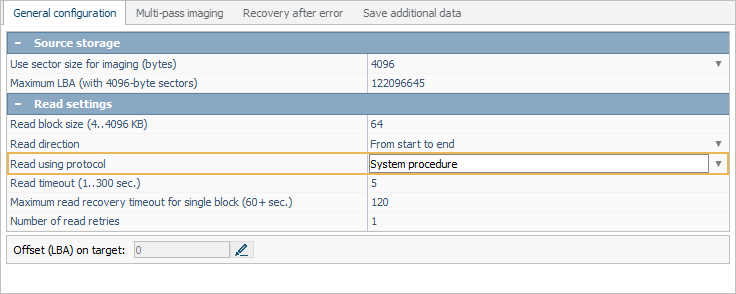
The "Direct SCSI" procedure is available in the Windows and Linux editions for all Linux-based storage media and Windows-based storage devices, except PATA/SATA with a direct connection. The procedure of this type allows performing a controlled disk readout with the diagnostics of reading errors, though such a diagnostics may not be available on many USB adapters.
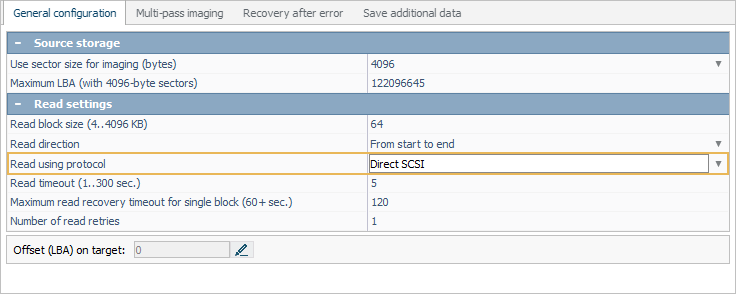
The "Direct ATA" procedure is available in the Windows edition of the software for PATA/SATA disks. Like the previous option, it allows performing controlled disk reading with advanced diagnostics.

-
Read timeout
This parameter allows setting time in seconds to wait for the data from the disk until the attempt to read the sector will not be interrupted.
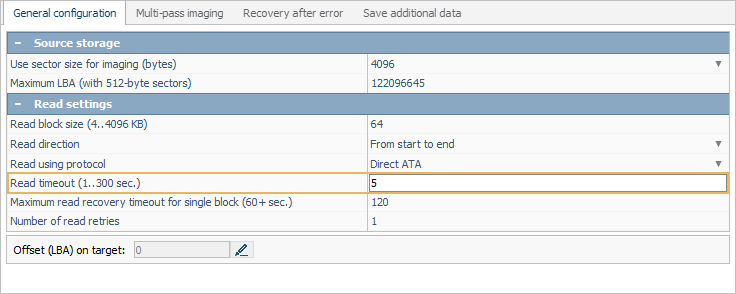
This value is critical for disks that have defective or poorly readable sectors. One should consider that a small timeout accelerates the process but may lead to the omission of poorly readable sectors while a large timeout may cause the rotational scoring of defects.
-
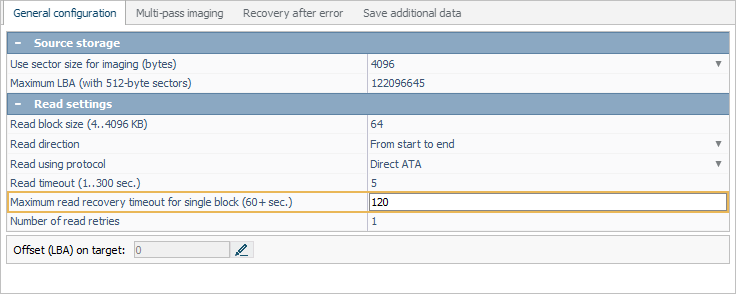
Maximum read recovery timeout for single block
This parameter specifies the maximum time the software can spend on trying to read each individual block before moving forward.
-
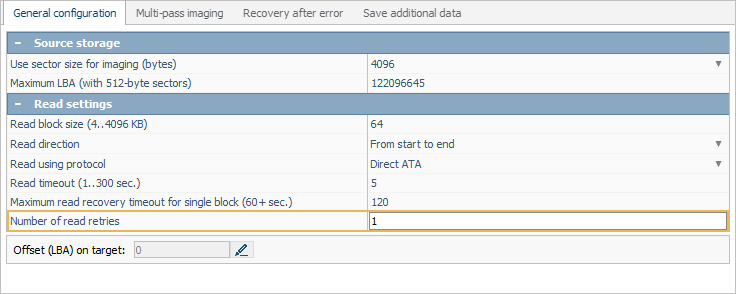
Number of read retries
This is the number of repeated reading attempts that will be performed on a single block that causes a read error until it is considered to be "defective". A value of 1-2 can lead to skipping of extra blocks that are poorly readable, whereas large values can lead to the rotational scoring of defects.
-
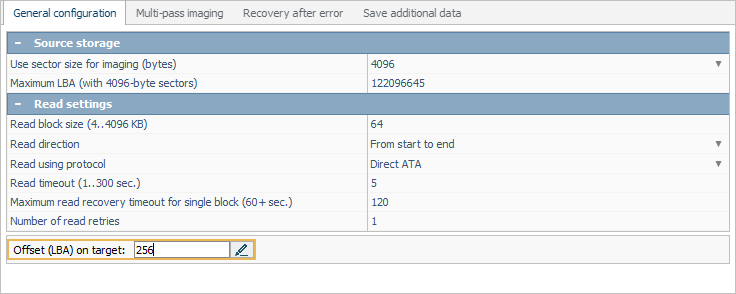
Offset (LBA) on target
If the target storage is larger than the source one (a larger disk, a larger existing image, and so on), it is possible to define an offset on the target storage in the range from zero to the difference of the storage sizes, for instance, to overwrite a certain partition on the target storage.
-
Metadata location
This parameter defines the path for all metadata files saved automatically along with the disk image:
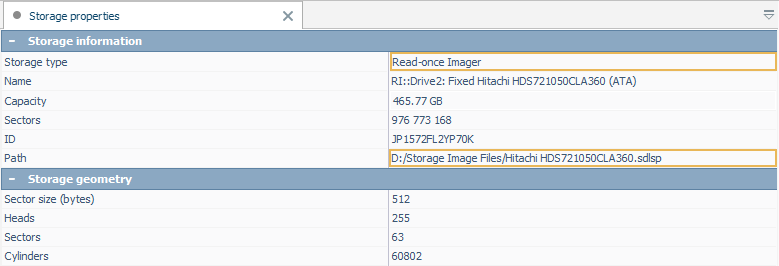
- a map of block states in the SDMF format that provides a color representation of the imaging status for blocks within the storage device: whether they have been copied successfully (imaged), skipped due to a reading failure (defective), modified by the user or haven’t been processed (pending). In addition to the header, the file contains a simple map, where each byte defines the status of 4 blocks (512 Bytes or 4 KB, depending on the settings for the size of the block for reading);
- an optional entropy map in the SDEF format that indicates the areas of high/low entropy within the disk image and aids in determining the peculiarities of data distribution. It is exclusive to the Professional Edition of the software and can be used along with a map of block states for enhanced diagnostics;
- a log file that includes the information about the source and target storages as well as a detailed record of events and actions taken during imaging, like reading errors, jumps, etc.
-
-
Configure the multi-pass imaging algorithm for the processing of reading errors.
-
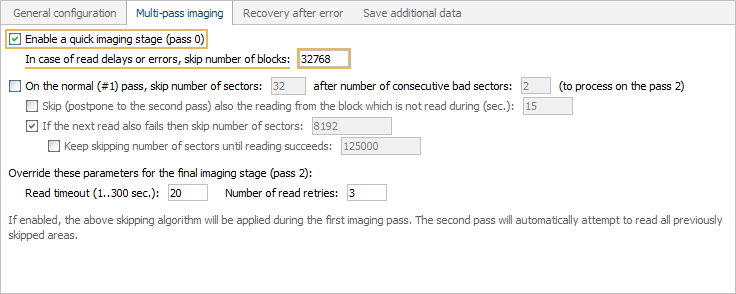
Enable a quick imaging stage (pass 0)
This option sets the software to run a pre-imaging pass focused on fast copying from "healthy" regions of the storage device before addressing the problematic sectors with slower reading speeds. Such an approach helps to accelerate the imaging process and reduce the impact of read issues on the overall operation, since the data can be captured swiftly from the stable areas before dedicating time and resources to more challenging ones.
-
In case of read delays or errors, skip number of blocks
During pass 0, the software attempts to read the data block by block, and if encountered a poorly readable or faulty one, performs a jump by skipping the specified number of blocks in order to proceed with reading from the new presumably intact location.
-
On the normal (#1) pass, skip number of sectors … after number of consecutive bad sectors … (to process on the pass 2)
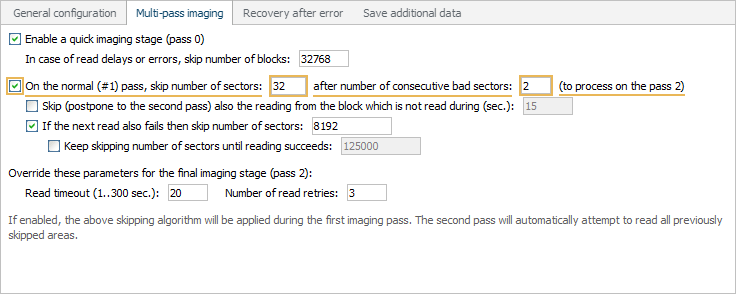
The following set of options allows adjusting the parameters applicable to the main imaging stage. Having encountered a defective block during the first pass, the software checks the number of consecutive defects. If this number is greater than or equals to the specified number, a jump is performed over the given number of blocks and the reading is performed from that location. If the readout is successful, the status gets reset and the normal mode gets resumed.
-
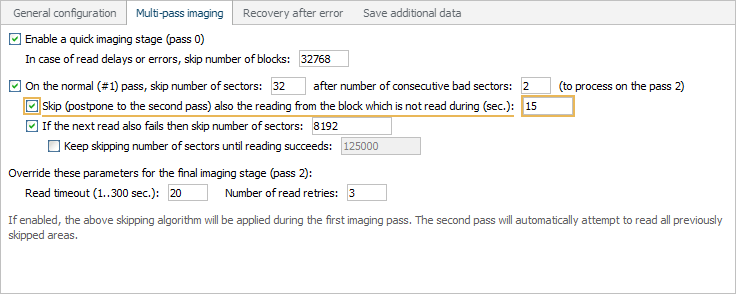
Skip (postpone to the second pass) also the reading of the block which is not read during ... (sec.)
This option can be used to set the maximum time devoted to reading of a block during the main imaging stage. If this timeout gets exceeded, such a block is skipped and deferred to the second final imaging pass that will attempt to read all the previously omitted areas.
-
If the next read also fails then skip number of sectors
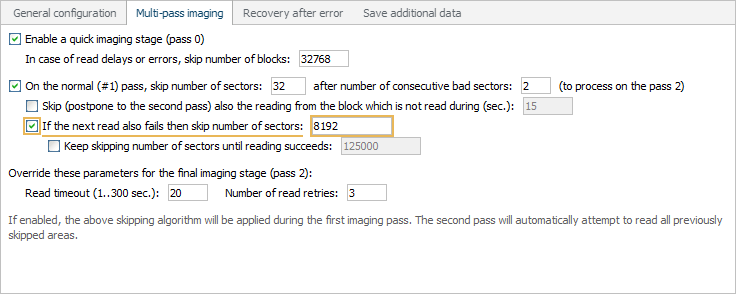
If the readout from the new location failed, the jump is performed again. When this option is enabled, the size of the second jump will equal to the specified number of blocks. Otherwise, its size will be the same as that of the first jump.
-
Keep skipping number of sectors until reading succeeds
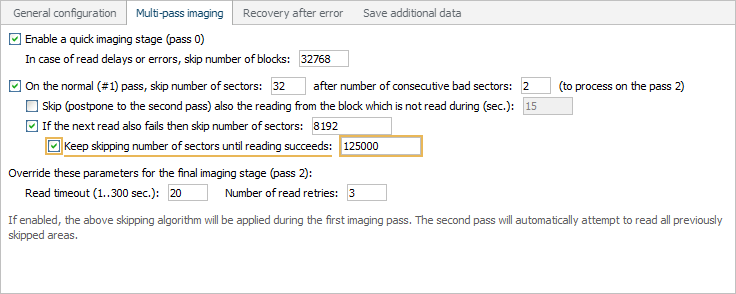
If the reading is not normal after the second jump, the third jump is performed again on the size which equals to the specified number of blocks if this option is active, or coincides with the size of the second jump. The jumps of the given size are performed until normal reading resumes.
-
Override these parameters for the final imaging stage (pass 2):
This option provides the possibility to override the read timeout and number of retries for the second final imaging stage, intended to try reading the areas left out during the main imaging stage.
-
-
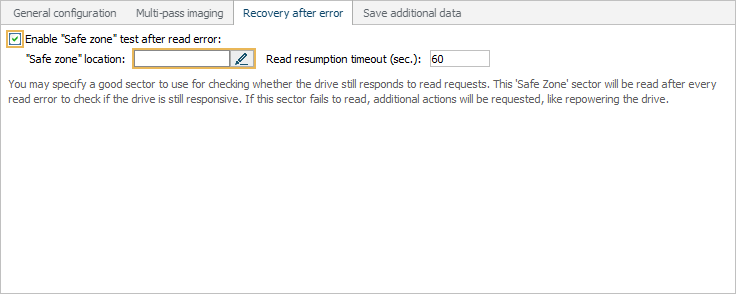
If necessary, establish a check of the storage’s ability to respond to commands after a read error.
-
Enable "safe zone" test after read error
When this feature is enabled, the software will check whether the disk is readable by performing test read requests to the specified block, which the user believes is guaranteed to be readable. This can be block 0, if the rotational scoring occurred somewhere in the file system metadata area, or a sector near the end of the disk, if the defect occurred near its starting blocks.
-
-
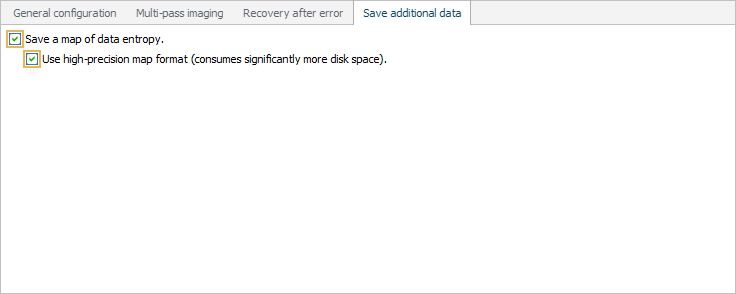
If desired, you may incorporate entropy mapping into the imaging process. However, such a possibility is available only in the Professional Edition of UFS Explorer.
-
Save a map of data entropy
When this option is activated, the software calculates the entropy of the data from each requested block and presents the resulting entropy values as a map file.
-
Use high-precision map format
If you enable this parameter, an entropy map will be saved in a high-resolution format, enabling a detailed and accurate representation of the entropy levels.
-
Creating disk images from other disk images
The software offers a special mode for creating disk images from other disk images and files of various formats. This mode has a simplified procedure without defect handling. This mode can be used to save a sub-image, convert formats or write data from the disk image to a physical disk.
Disk images from special sources
When imaging is run on a supported special storage from which the image is created (for example, when a disk is connected via DeepSpar DDI), a special dialog opens for managing the imaging process on an "external" tool instead of the standard procedure for creating images.
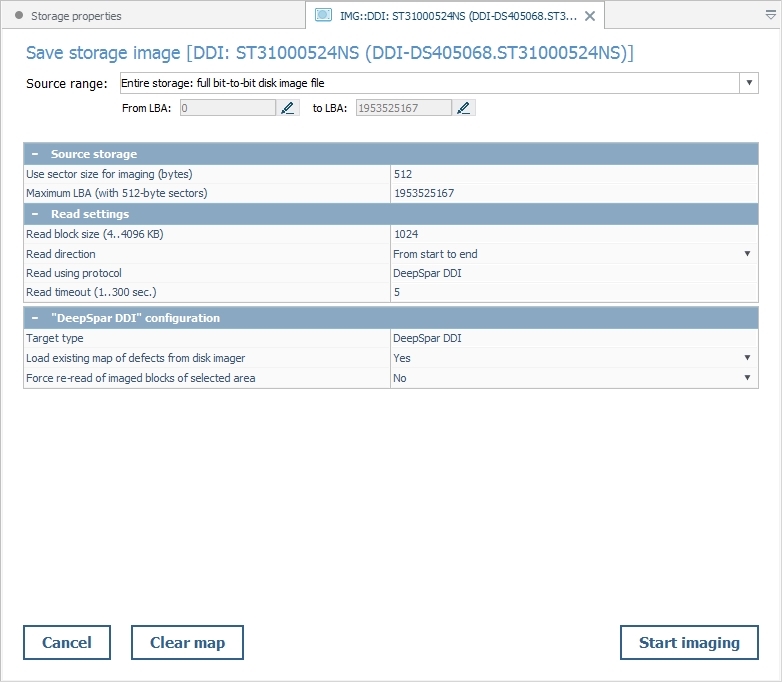
This procedure allows configuring and launching the process of imaging performed by an external tool while the process and its result will be displayed in the software.
Last update: February 14, 2024