How can one recover data from a distributed SAN system?
The necessity to store and effectively process terabytes of mission-critical information prompts businesses and organizations to create in-house networks referred to as SANs. Such complex systems incorporate a number of storage devices into a huge pool of shared resources, which can be smoothly accessed by different servers as though it was a single local disk. Multiple drives utilized by SANs are logically merged with the help of the RAID technology, and various RAID schemes allow making a SAN speedy and highly robust. Yet, none of them renders it totally foolproof. Controller failures, faulty configurations, power surges, software crashes and human errors may result in a variety of data loss situations, from deletion or inaccessibility of certain LUNs to the corruption of the whole storage pool.
Below you can learn about different data recovery approaches applicable in SAN environments. This overview will help you to determine and adopt an optimal strategy for your particular scenario, enabling you to reach your SAN recovery goals in the most efficient manner.
The specifics of SAN storage to take into account
The size and complicacy of SANs often make them non-transportable. Thus, it may be quite problematic to ship such a storage to a data recovery center. Fortunately, if all of the member drives are intact or the number of failed ones doesn’t exceed the system’s fault tolerance capabilities (according to the employed RAID level), the missing data can usually be restored on-site with little physical intervention.
That being said, please mind that the possibility of successful data recovery from a SAN is also highly dependent on the timely actions of the administrator. To increase the chances, please take the following measures as soon as you notice a sign of data loss:
- immediately switch the system to the read-only mode to prevent any potential data overwriting and, as a result, permanent deletion of the missing files;
- copy the metadata and the journal of the SAN (as a rule, 1-10% of the whole amount of the file system) to a secure external location;
- if possible, create sector-by-sector copies of all drives comprising the SAN in order to work with disk images rather than with the original digital media.
Operating under the management of SAN controllers, SAN systems usually obstruct direct reading from their drives. Therefore, all digital media must be removed from the initial storage enclosures. Such drives commonly use enterprise-grade interfaces like SAS (Serial Attached SCSI) or FC (Fibre Channel), and very seldom rely on SATA (Serial ATA) or other consumer interfaces. So, once taken out, the drives should be connected to a computer or server that is equipped with the corresponding adapters and other additional hardware to support the drives’ interface type.
Hint: Please rely on the article on the identification of a hard drive's interface type to aid you in determining the type of connector featured by the SAN drives.
Although further steps may vary depending on the circumstances of the data loss case and the peculiarities of the SAN storage in question, the process of data recovery typically consists of several stages. In most cases, it includes the recreation of the RAID configuration, virtual translation of address space for correct reading of data from RAID, reconstruction of the lost file system and copying of its content to a safe location. These stages are principal to the data recovery procedure, but can be executed using different approaches, depending on the level of the administrator’s expertise, the complexity and urgency of the task:
- Automated data recovery using UFS Explorer Technician. When combined with a dedicated plugin, the software identifies and attempts to reconstruct the SAN pool configuration, providing straightforward access to SAN volumes, without the need for extensive manual manipulations.
- Semi-automated data recovery using UFS Explorer Professional Recovery or UFS Explorer Technician. Both programs allow assembling SAN logical volumes on the basis of external maps that can be created through SAN metadata analysis and uploaded into the interface.
- Professional remote data recovery by specialists from SysDev Laboratories, who distantly access the SAN system and use their own expertise and techniques to devise a tailored recovery strategy for your specific data loss incident.
Automated data recovery from a SAN using UFS Explorer Technician
Data recovery from a SAN can be rather daunting due to the sophisticated nature of these systems. Even seasoned experts may spend a lot of time and effort on parsing all virtualization layers and reproducing accurate relationships across the storage pool structure. Considering this fact, SysDev Laboratories has developed UFS Explorer Technician as the most versatile solution for technical professionals dealing with challenging data recovery tasks, including ones related to complex SAN systems from major manufacturers. The software is well-suited for SAN data recovery thanks to its automated RAID reconstruction mechanisms, wide support for various configurations, file systems and other technologies the SAN storage may be based on.
However, most modern SANs are proprietary products. Vendors may use their own combinations of hardware, software and storage layouts. In view of the unique characteristics of each vendor's solution, customized methods may be required to address them accordingly. That is why the functionality of the program can be extended with the help of special plugins that automate the process of volumes assembly for particular SAN implementations, including Dell EqualLogic, HP StorageWorks EVA, HPE MSA and HPE 3PAR StoreServ:
- Data recovery plugin for Dell EqualLogic is designed for Dell EqualLogic arrays with Type 11 to Type 15 controllers, firmware versions from 7.1 to 10.0, including models from the EqualLogic PS6110 Series, PS6210 Series, PS6500 Series and PS6610 Series.
- Data recovery plugin for HP StorageWorks EVA provides access to the virtual volume content on different generations of the EVA product line, including the Initial Compaq EVA systems of the 3000 and 5000 Series; HP StorageWorks EVA of the 4100, 6100 and 8100 Series; the products of the 4400, 6400 and 8400 Series and the latest models of the P6300/P6500 Series.
- Data recovery plugin for HPE MSA allows opening linear volumes created on HPE MSA models from the MSA 2000 Series up to the MSA 2040 Series, and virtual volumes on HPE MSA 2040 and later models.
- Data recovery plugin for HPE 3PAR StoreServ enables volume reconstruction on HPE 3PAR StoreServ models running HPE 3PAR OS 3.2 through 3.3.1, including the HPE 3PAR StoreServ 7000 Series, 8000 Series and 10000 Series.
In order to get started, you need to download the required plugin from the product webpage and follow on-screen instructions to install this component. Once installed, it will automatically integrate into the plugins section of UFS Explorer Technician and can also be managed through the Plugin Manager. To be able to exploit the full functionality of the plugin and save the recovered data, you will have to activate the product’s license as well.
The standard procedure for using such a plugin typically involves the following steps:
-
Connect the drives belonging to your SAN or open the previously created disk images in the interface of UFS Explorer Technician.
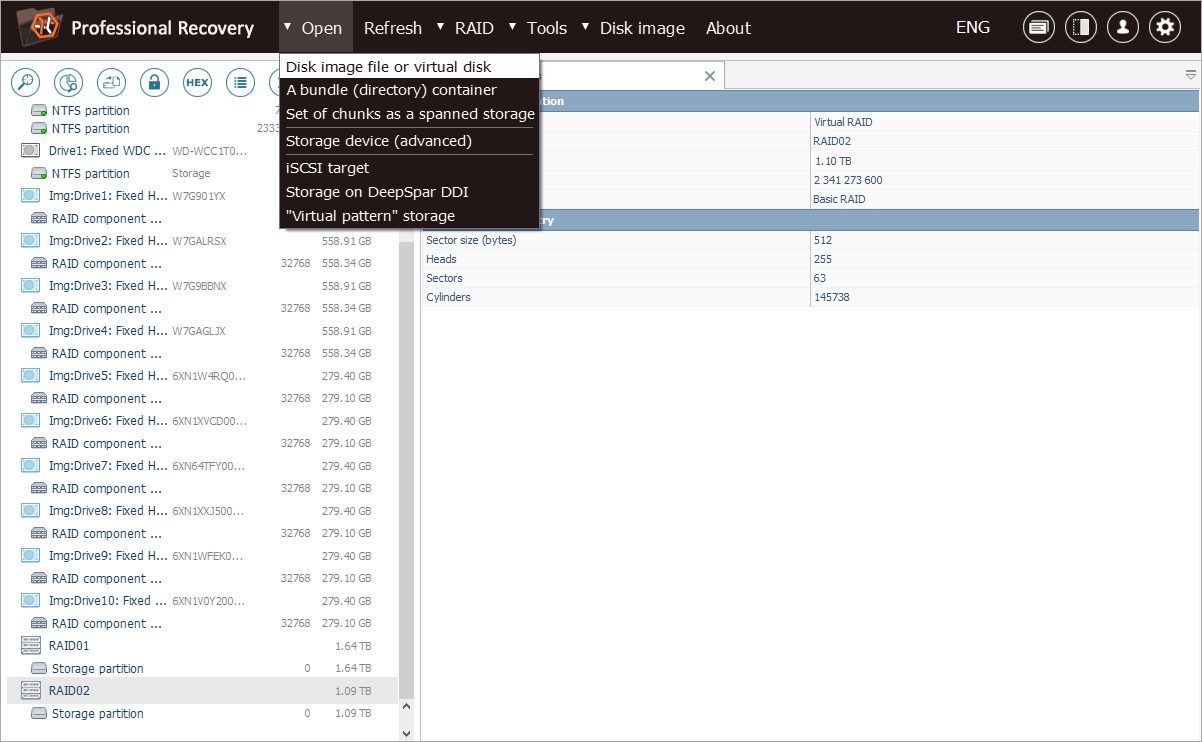
If using disk images, employ the "Disk image file or virtual disk" option from the "Open" menu to load each disk image file.
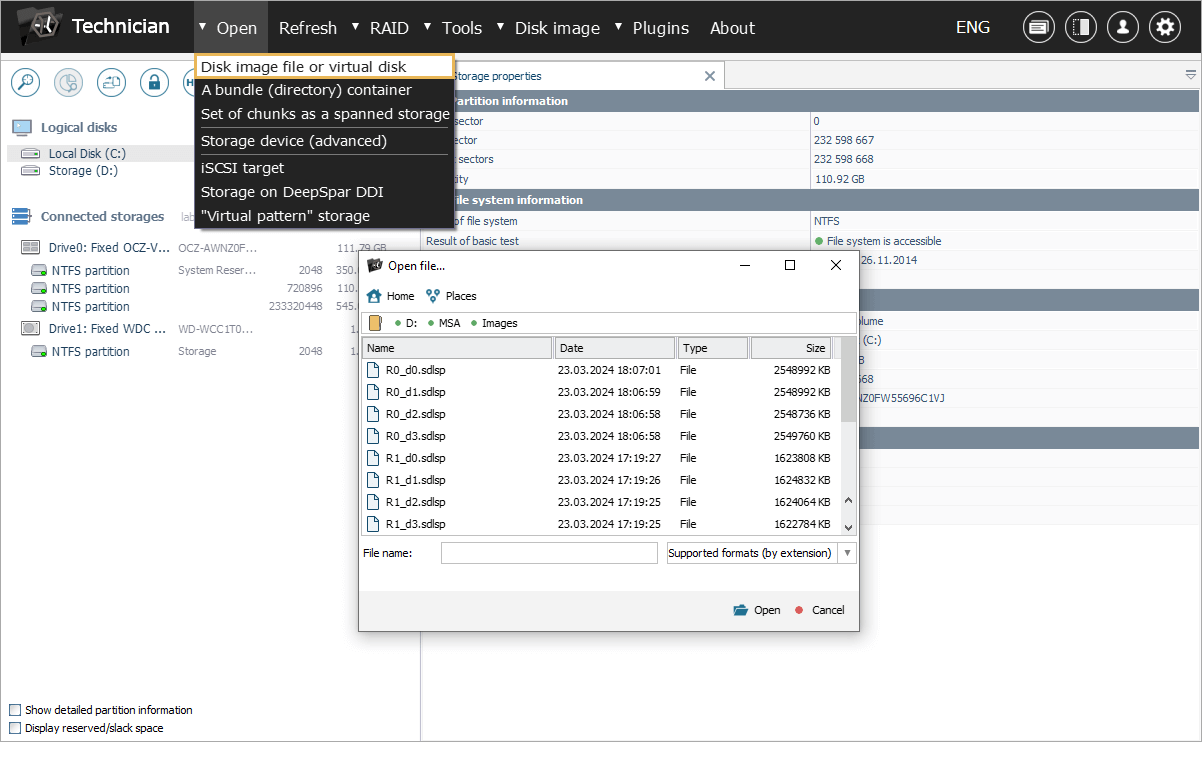
The drives/disk images will appear in the left pane of the main window. The program detects the SAN pool components automatically and marks them with a distinctive icon. As an illustrative example, we took an HPE MSA storage array.
-
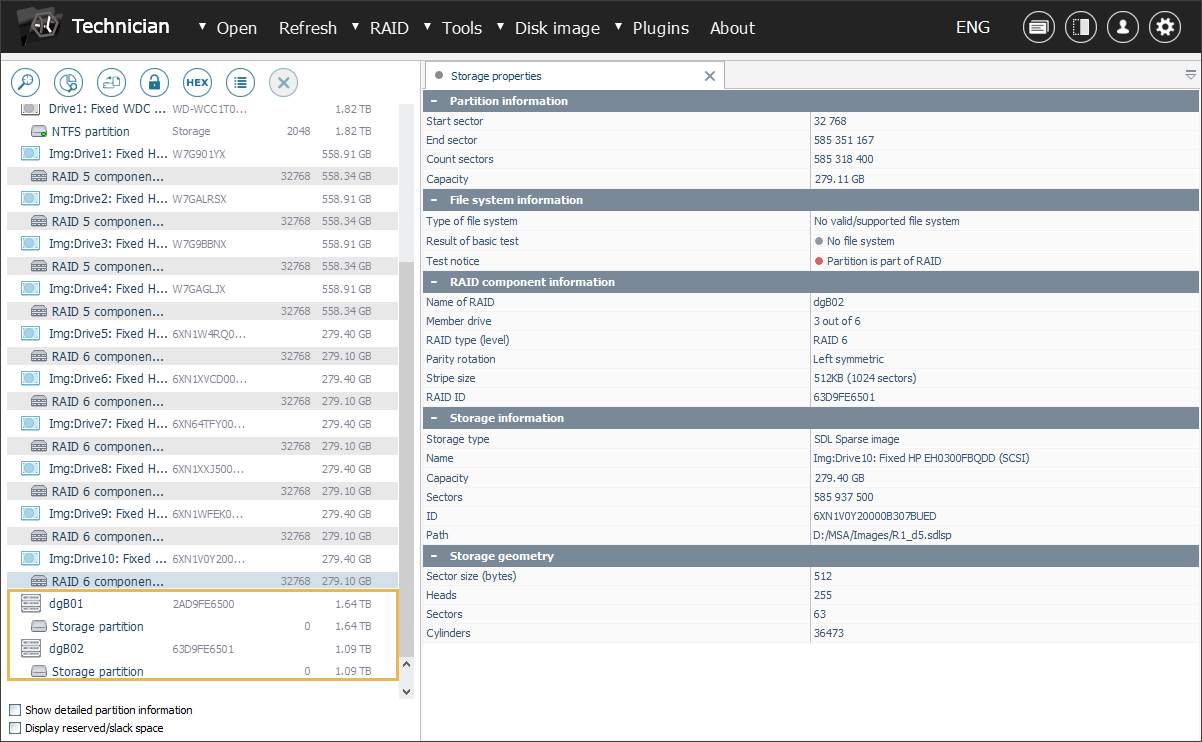
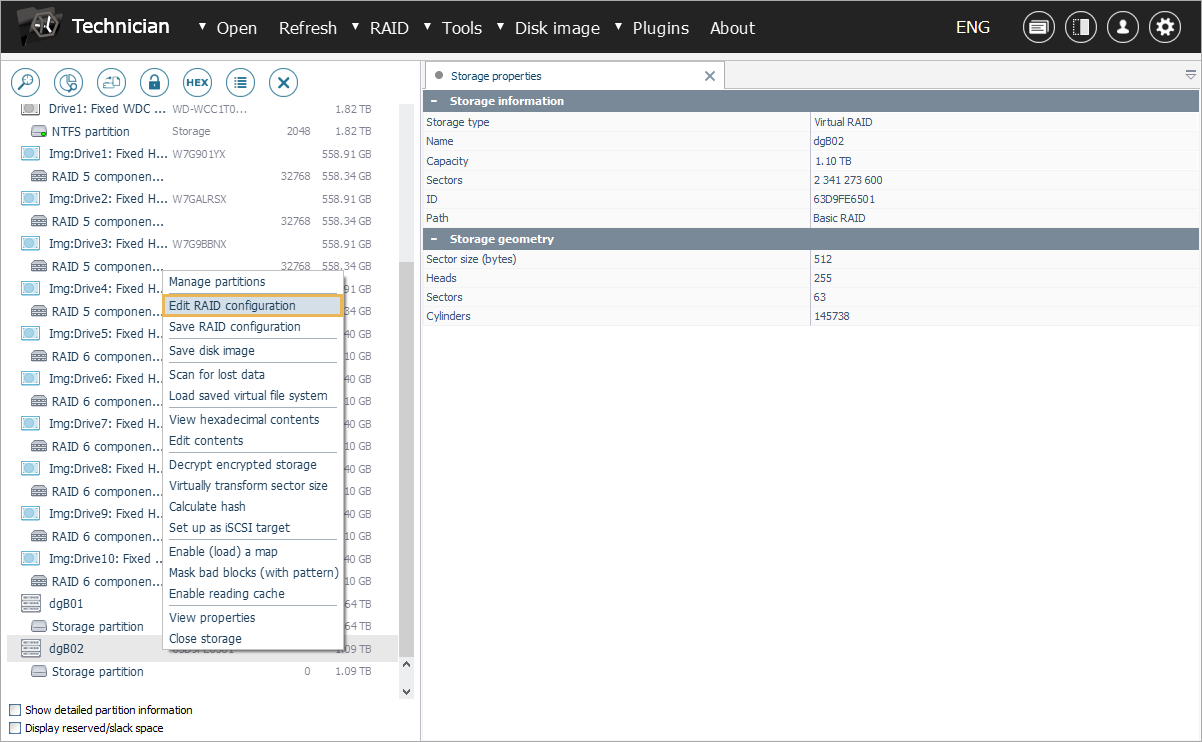
Check if the RAID configuration of your SAN has been reconstructed by the software and has the correct parameters. The latter can be reviewed with the help of the "Edit RAID configuration" option from the storage context menu.
If RAID metadata has been damaged and automatic reconstruction is not possible, you will have to build each array manually before using the plugin. The detailed instructions on RAID assembly are provided in Data recovery from RAID.
-
Launch the respective plugin from the "Plugins" menu to start searching for the available SAN pool configurations.
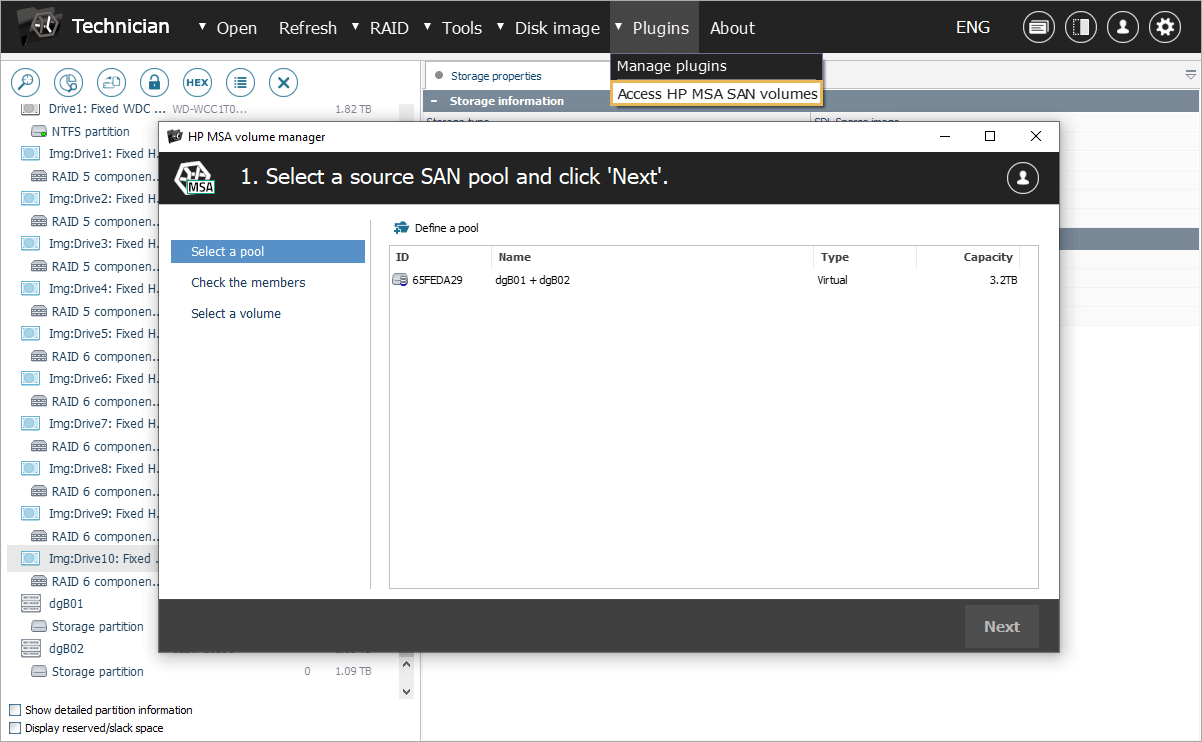
-
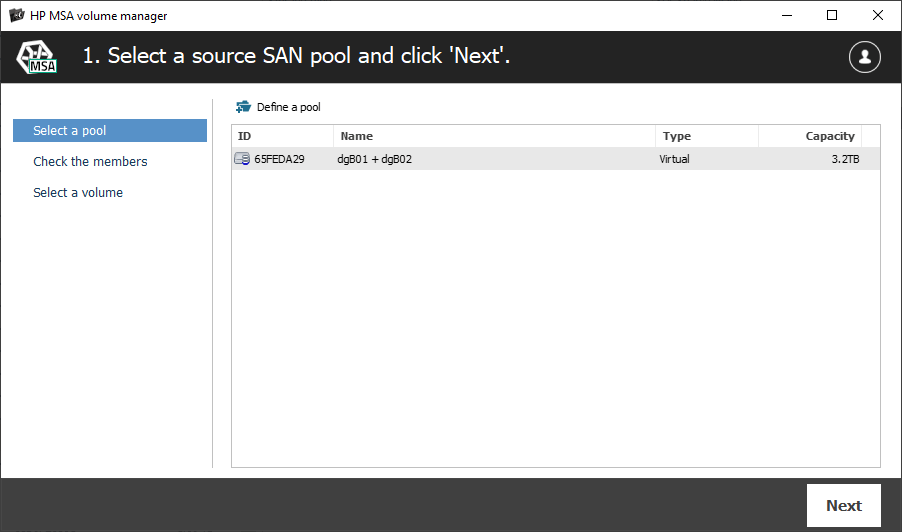
The set of configuration metadata versions found on the source drives will be presented in the plugin’s interface. Choose the appropriate version to proceed.
-
Once the selected metadata is loaded, the software will list the drives identified as components of the SAN pool. Verify these and click "Next" to continue.
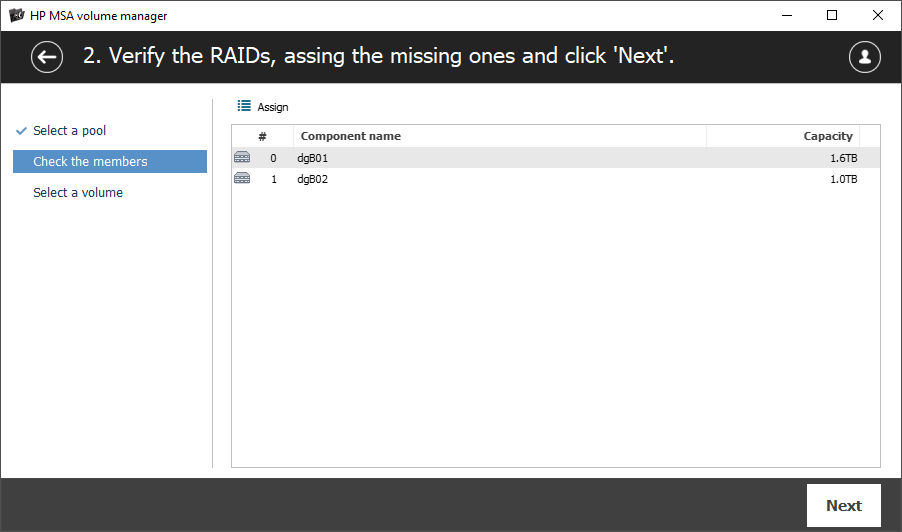
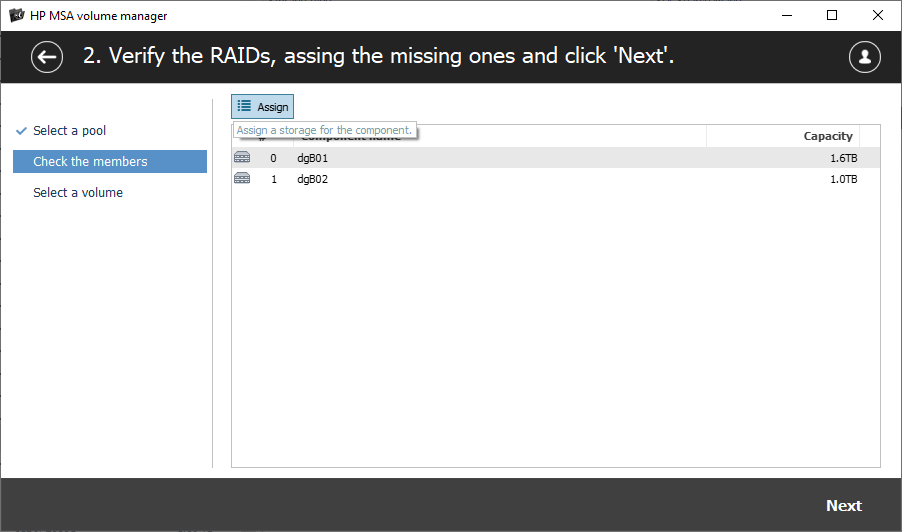
If certain drives were not recognized automatically, for example, because of metadata damage, you may add them manually using the "Assign" button.
-
Select volumes that look relevant and click "Open" to mount them in the program for subsequent operations.

Given that the plugin’s license has been activated, these volumes will become visible in the storages list, ready for access or data recovery operations, such as scanning or copying.
Semi-automated SAN recovery using the Professional or Technician edition of UFS Explorer
As already pointed out, RAID is a basic component of a SAN. The system may consist of one or multiple RAID sets. However, the host server does not access and use this storage directly. Vendor-specific software supplied with the corresponding platform first translates the raw physical space of the array into virtual address space. And this virtual address space is then provisioned to one or more logical volumes comprised of fixed-size blocks. The mapping of such a volume to the underlying RAID is expressed via the SAN metadata that is stored in a separate location. Therefore, in order to be able to recover data from SAN, you will need to deal with three different stages:
- Reconstruction of each member RAID set;
- Analysis and interpretation of SAN metadata that allows reading out data chunks of logical volumes in the right order and from the correct physical addresses on RAID;
- Enabling proper address translation in data recovery software.
While the RAID reconstruction stage is a relatively standard practice described in Data recovery from RAID, SAN metadata analysis is a complicated process that requires profound technical knowledge. The professional team of SysDev Laboratories is competent in parsing the metadata of various SAN products and offers this kind of procedure as a remote service.
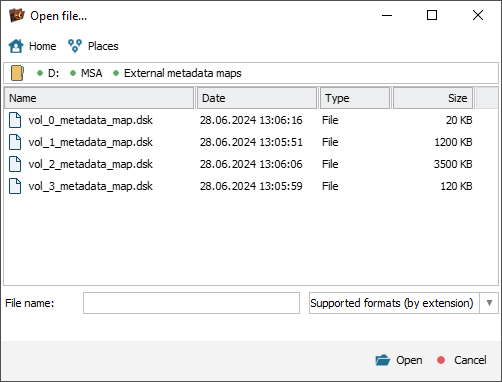
Yet, in case you are a data recovery expert conducting your own research on SAN systems, you may use UFS Explorer Professional Recovery or UFS Explorer Technician to effectively implement the results of your studies. These in-depth software solutions allow assembling SAN logical volumes on the basis of "external data mapping" files in the *.dsk format that are created through the conversion of SAN metadata.
Also, both programs support RAID of standard, nested and custom configurations employed in SANs. Thus, they can greatly facilitate work with the majority of SAN systems from different vendors.
Once you’ve processed the SAN metadata or obtained the data mapping file from our engineer, you can use it to build the SAN logical volume for further operations in UFS Explorer, similarly as in the following example.
The *.dsk file should be opened in UFS Explorer with the help of the "Disk image file or virtual disk" option from the "Open" item in the main menu of the software.
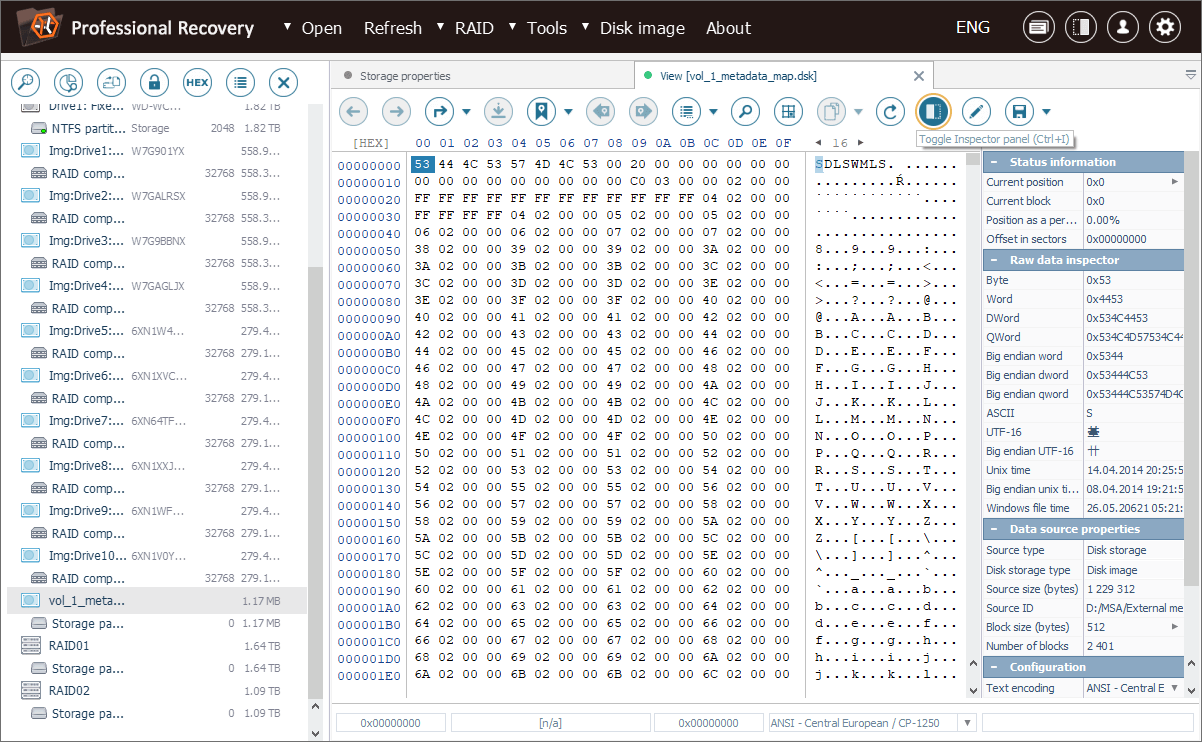
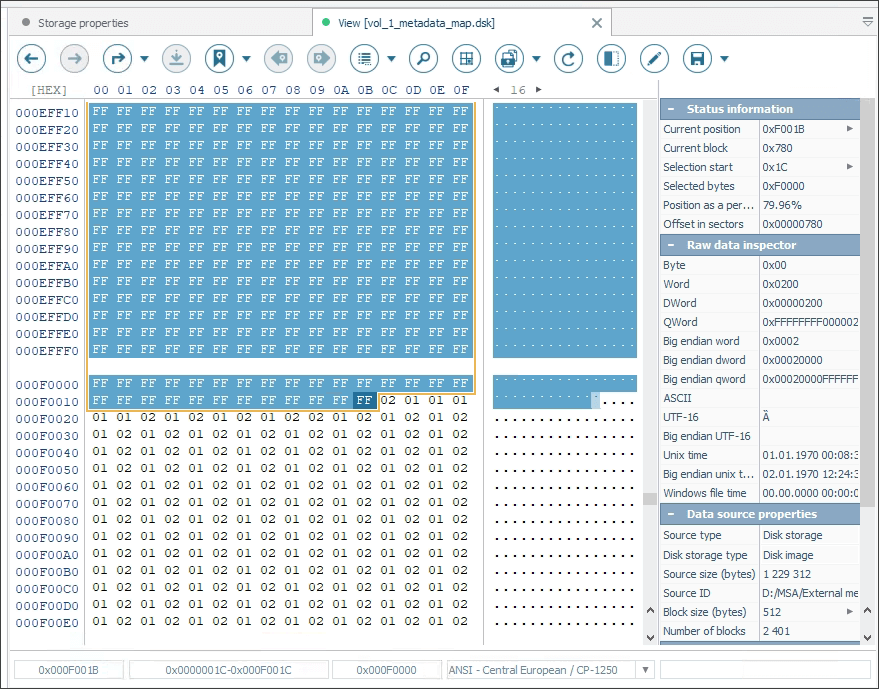
The map file itself is characterized by a specific format. It is possible to examine its structure using the Hexadecimal Viewer component, launched with the "View hexadecimal contents" option.
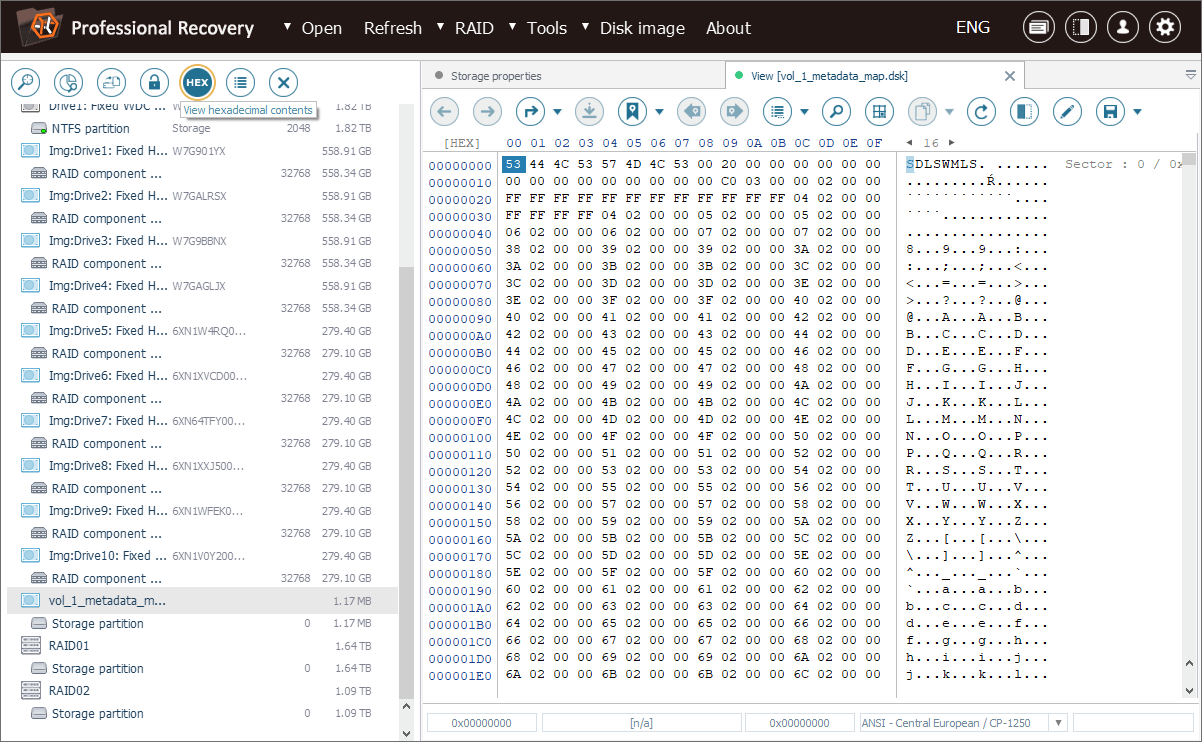
The "Toggle Inspector panel" tool will expand the informational pane if it is currently hidden.
Map file signature
The file should begin with the fixed 'SDLSWMLS' magic sequence (8 bytes), signaling that it conforms to the expected map file format.
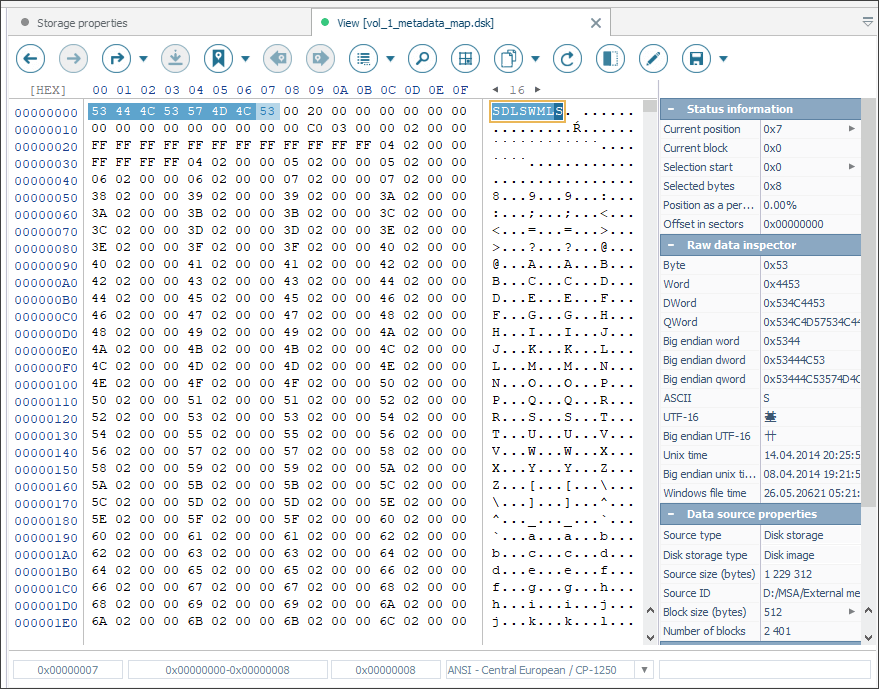
Minimal SAN data chunk size
Next comes a value for the size of a minimal block (in 512-byte sectors) that defines the smallest addressable unit of data.
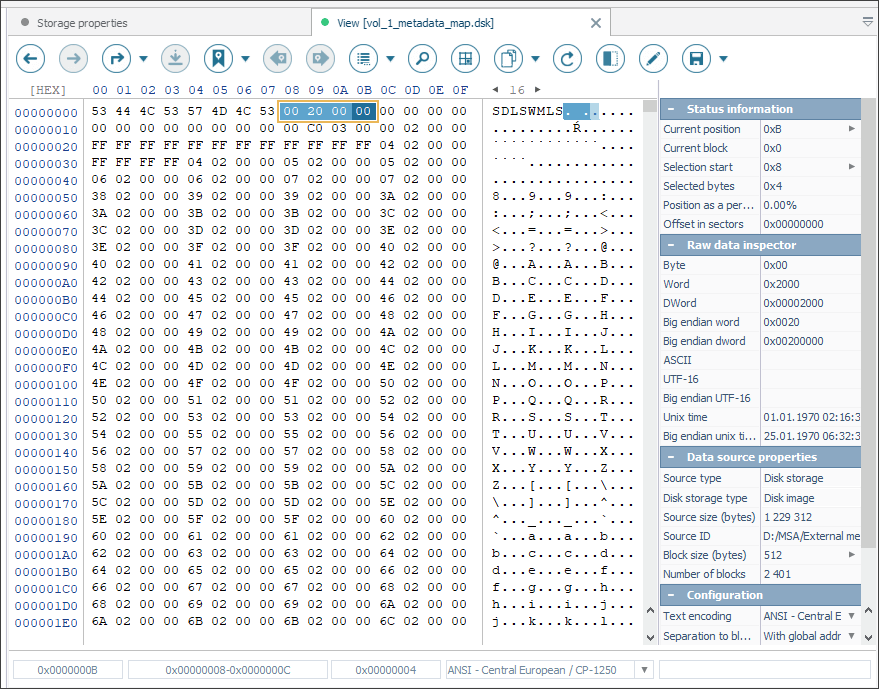
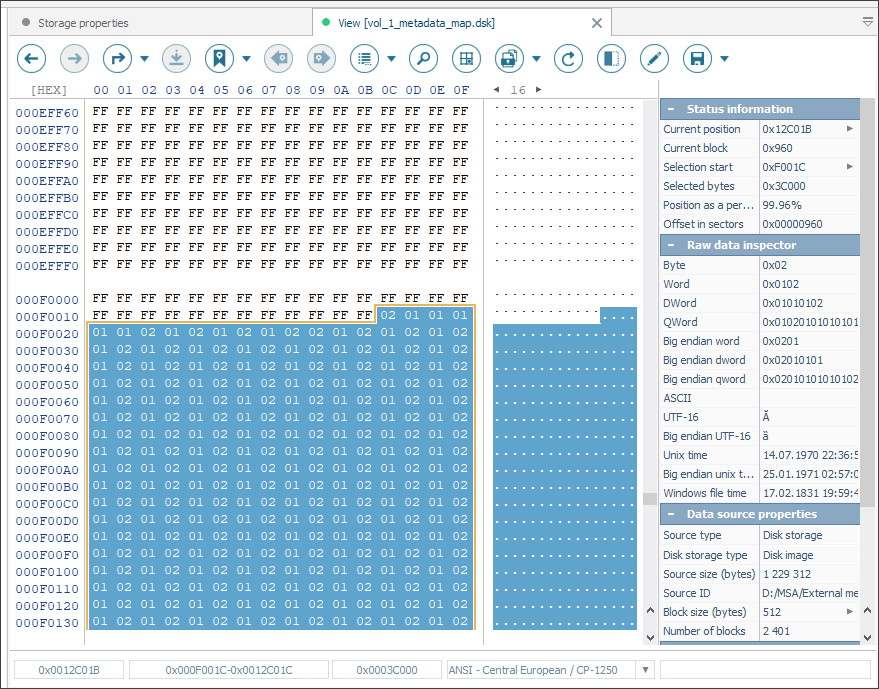
Logical volume size
Then, after zeros, you can find a value that corresponds to the number of blocks – the total size of the logical volume.
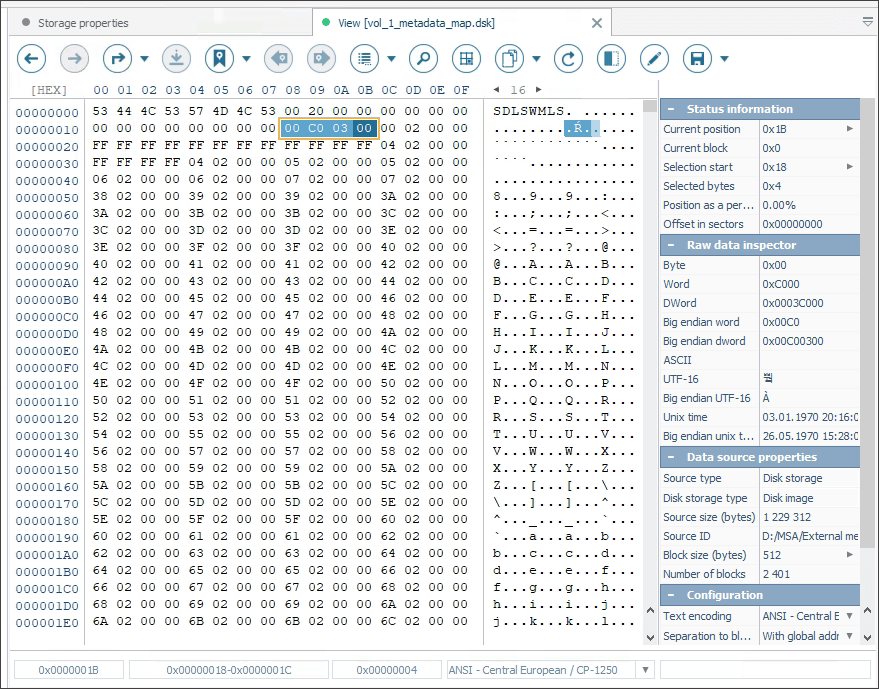
Block pointers table
After that, you can see the "block pointers table" containing an offset for each block on RAID. The offset is expressed by an absolute value from the start of RAID, measured in "blocks". This table is crucial for mapping each logical block within the array to its corresponding physical location.
In our illustrative example, the range of selected bytes is 0x1C - 0xF001B.
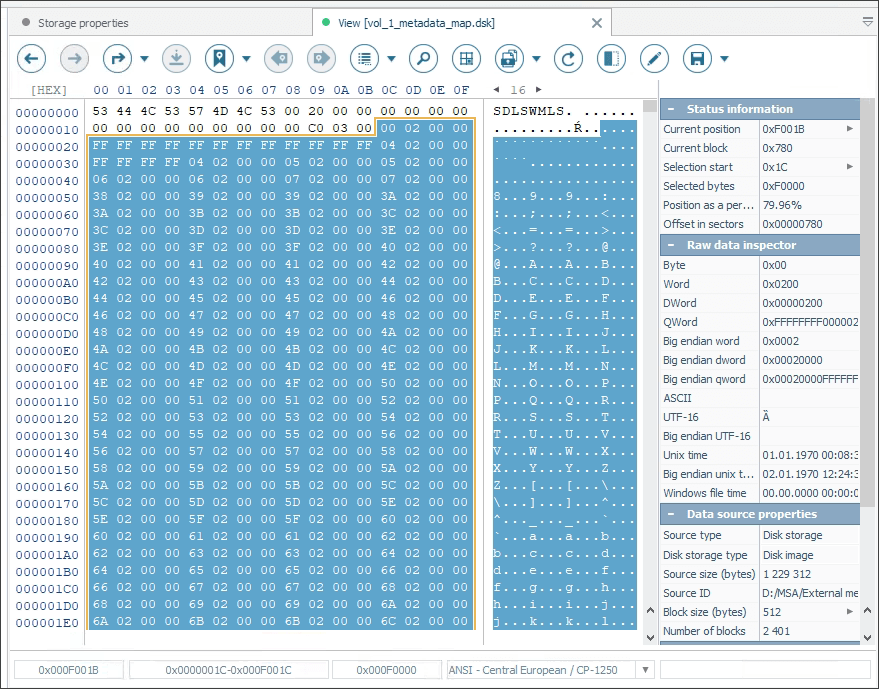
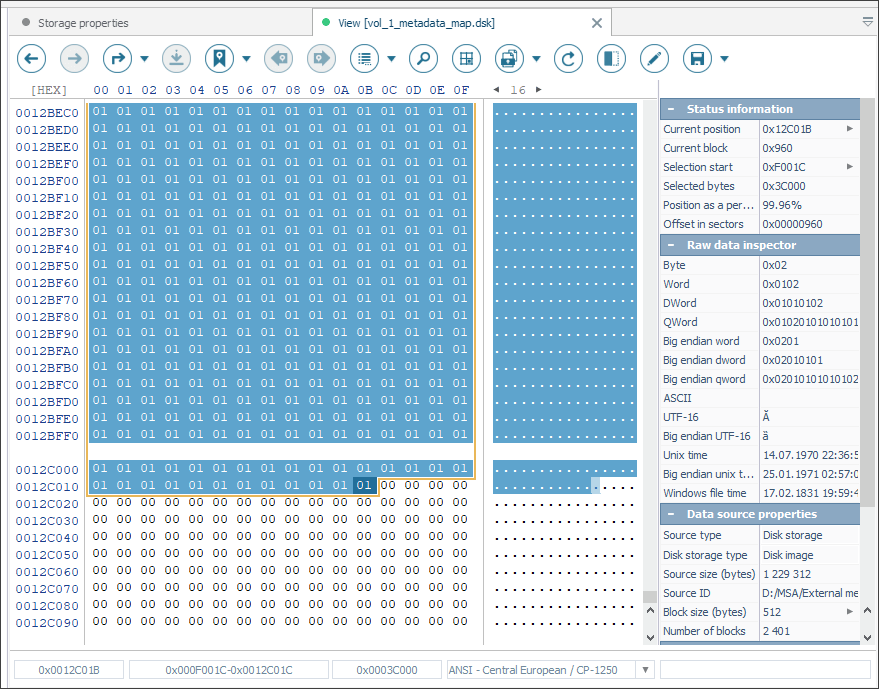
Component ID table
Alongside block pointers, there should also be a table listing the "component ID" for each pointer. This ID represents the particular RAID member drive where the block resides.
In our case, the range of selected bytes is 0xF001C - 0x12C01B.
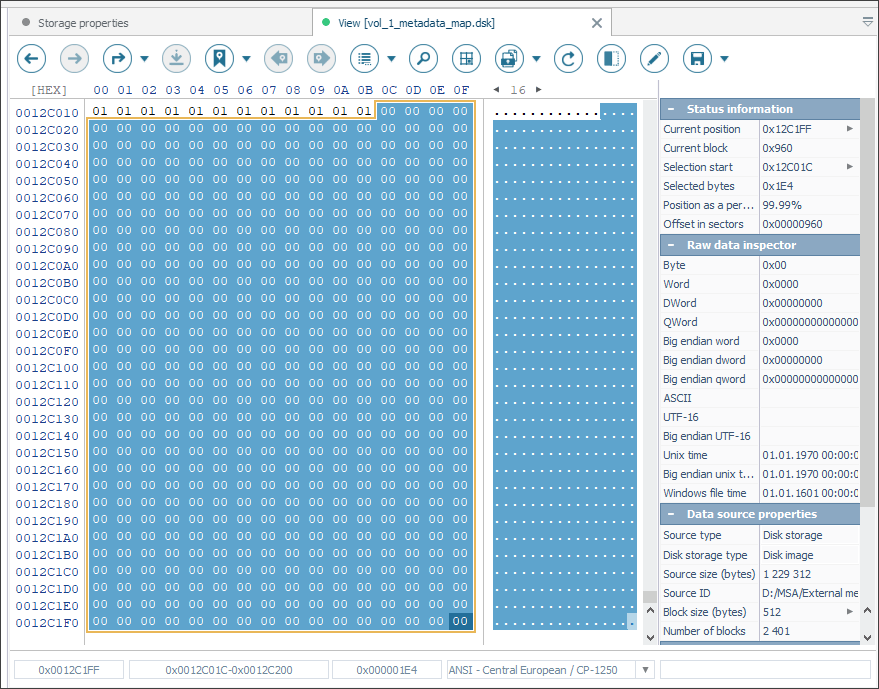
Padding to the last sector end
The file must also be filled with zeros up to the end of the last 512-byte sector.
Now you can apply this mapping file to the reconstructed member RAID sets and hence build the SAN logical volume.
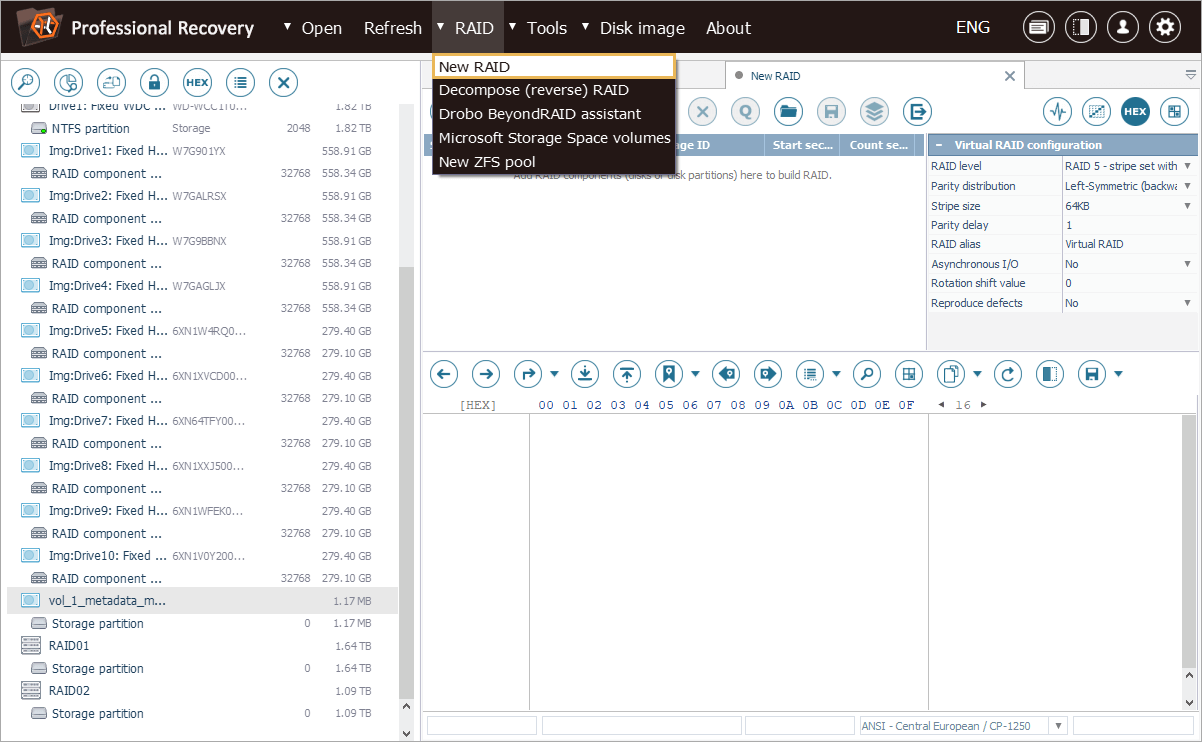
-
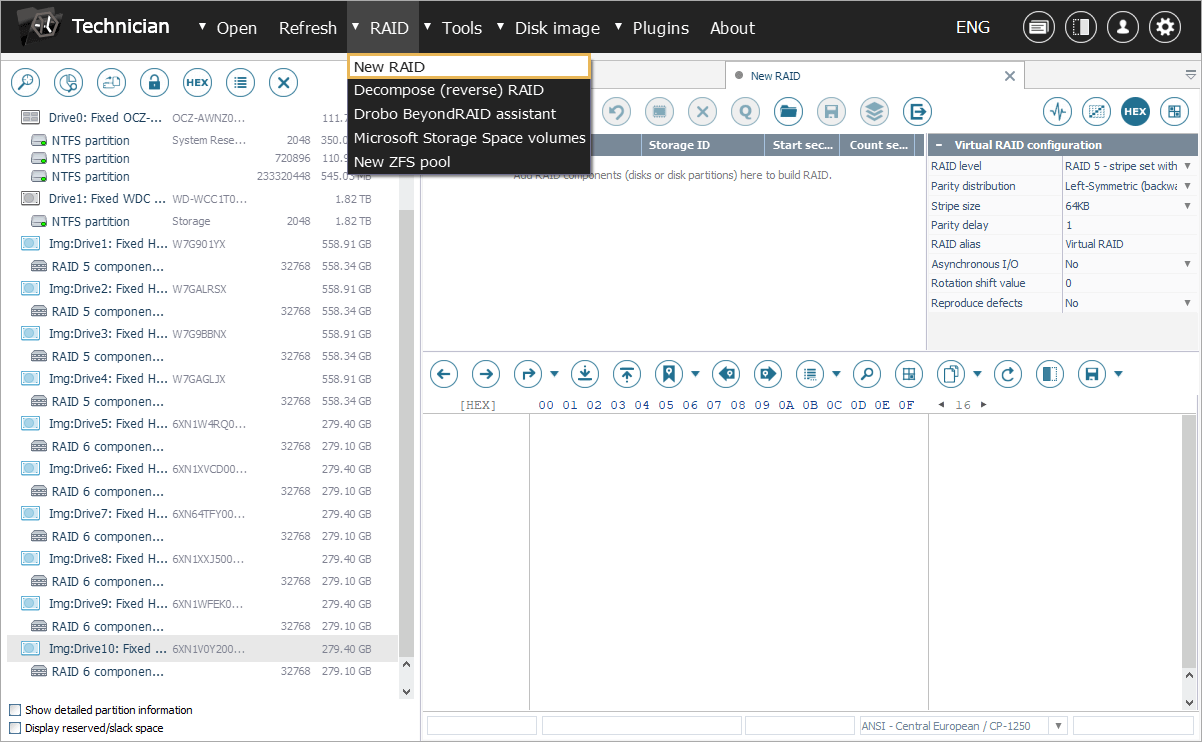
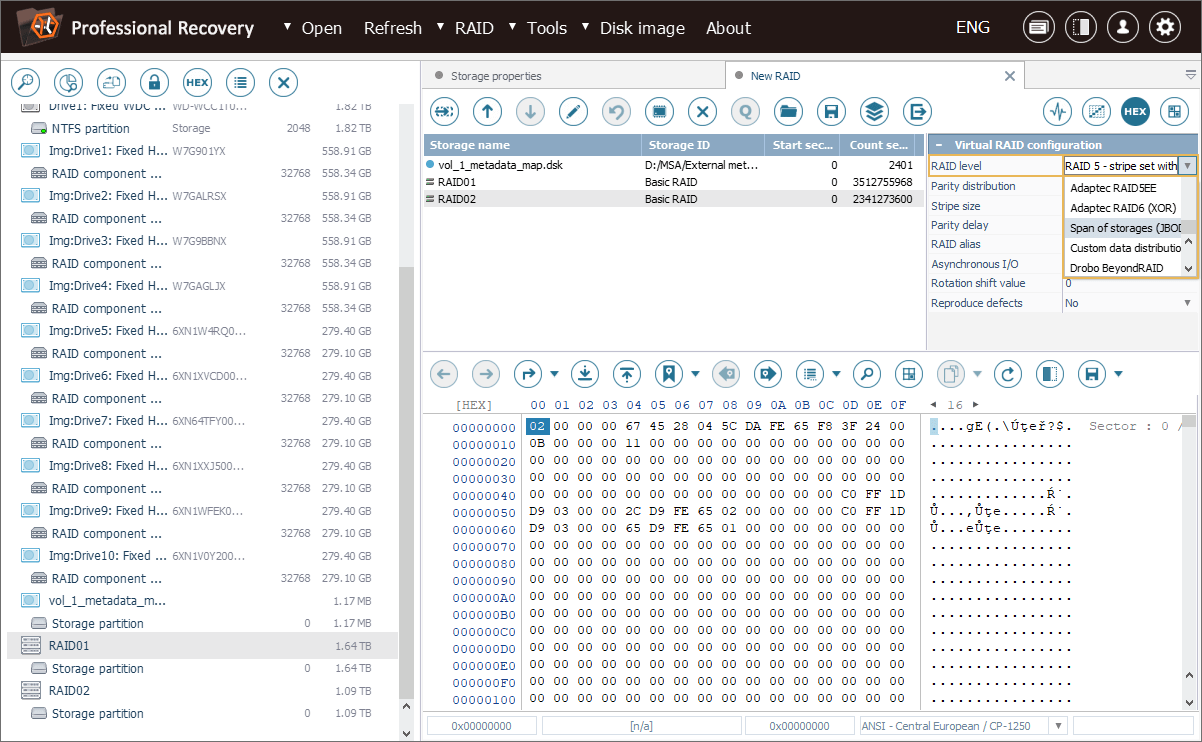
To start with, open the RAID Builder element using the "New RAID" option from the "RAID" menu.
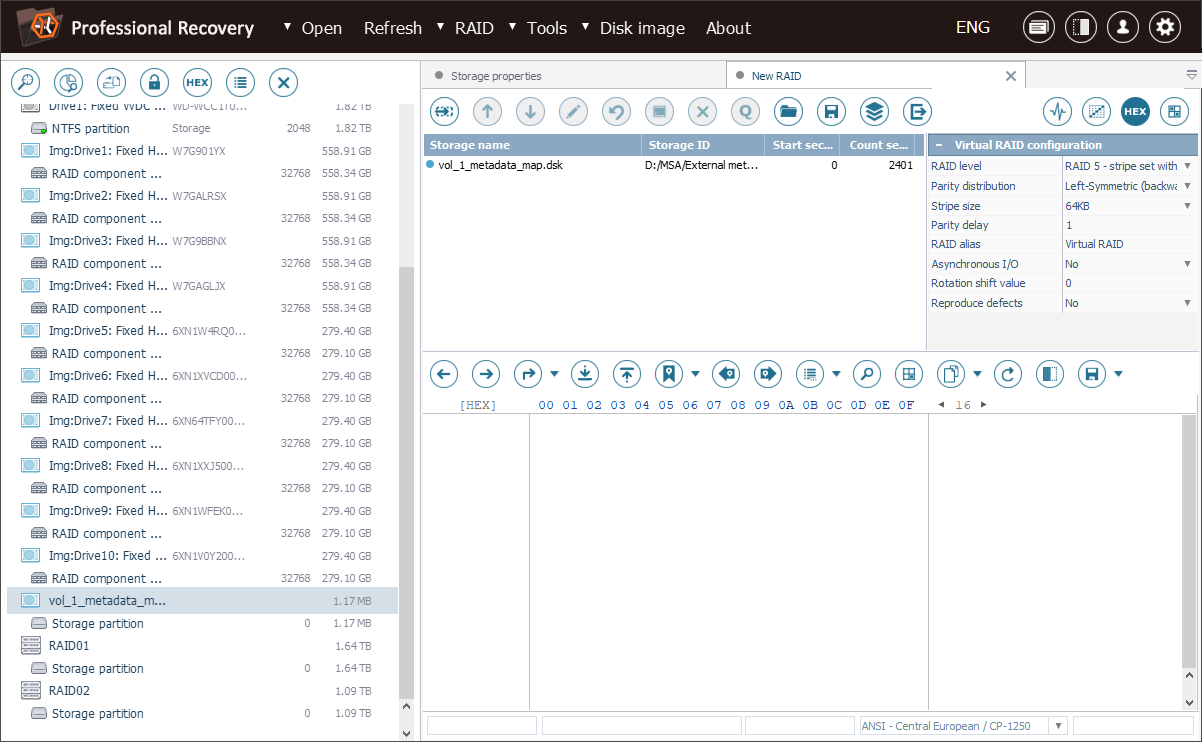
-
Then add the mapping file as the first component of the array.
-
The map should be followed by the member RAID sets.
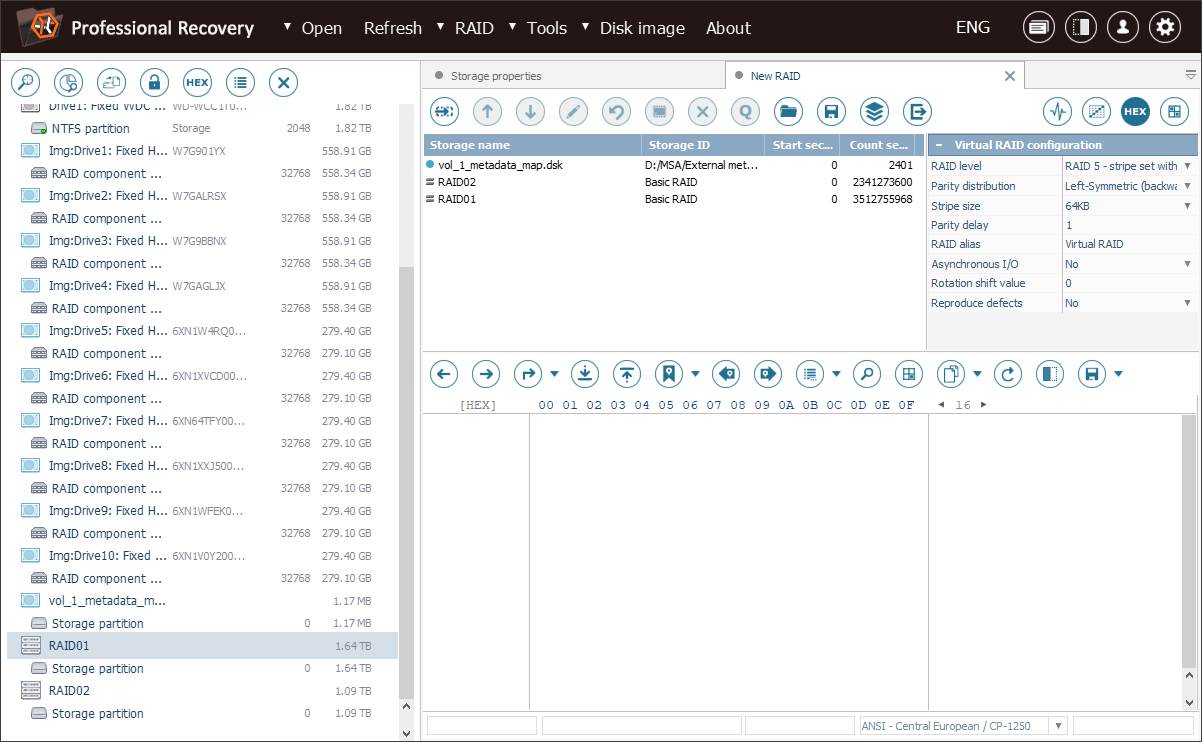
-
Adjust their order in accordance with the order of "component IDs".
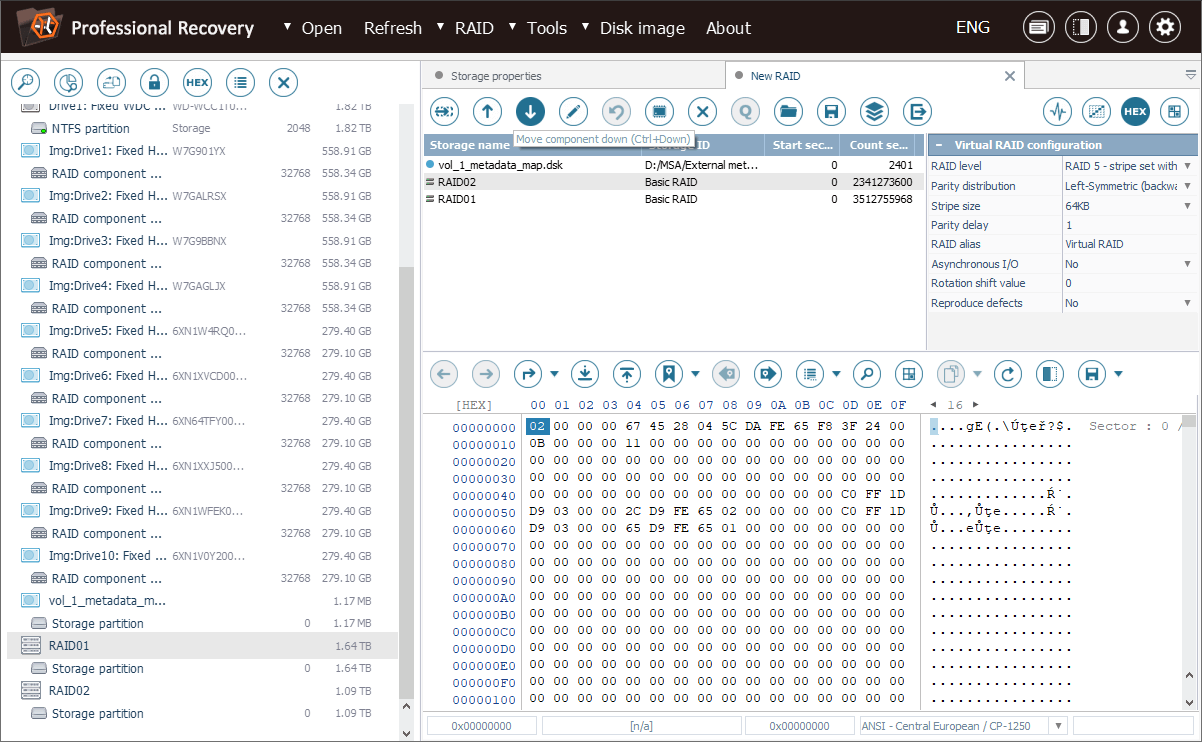
-
Finally, set "RAID level" as "Span of storages" in the configuration section and hit "Build this RAID".
-
The "Unknown" partition available on the assembled complex storage should be opened as a virtual disk using the respective option in its context menu.
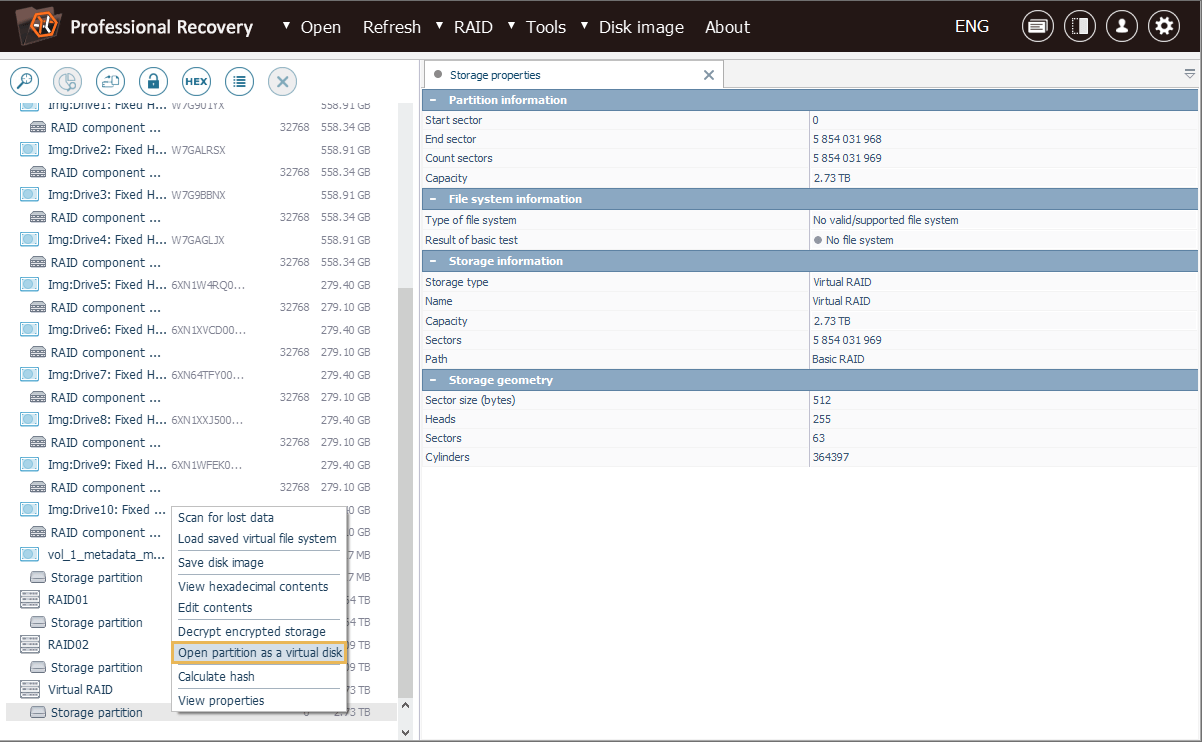
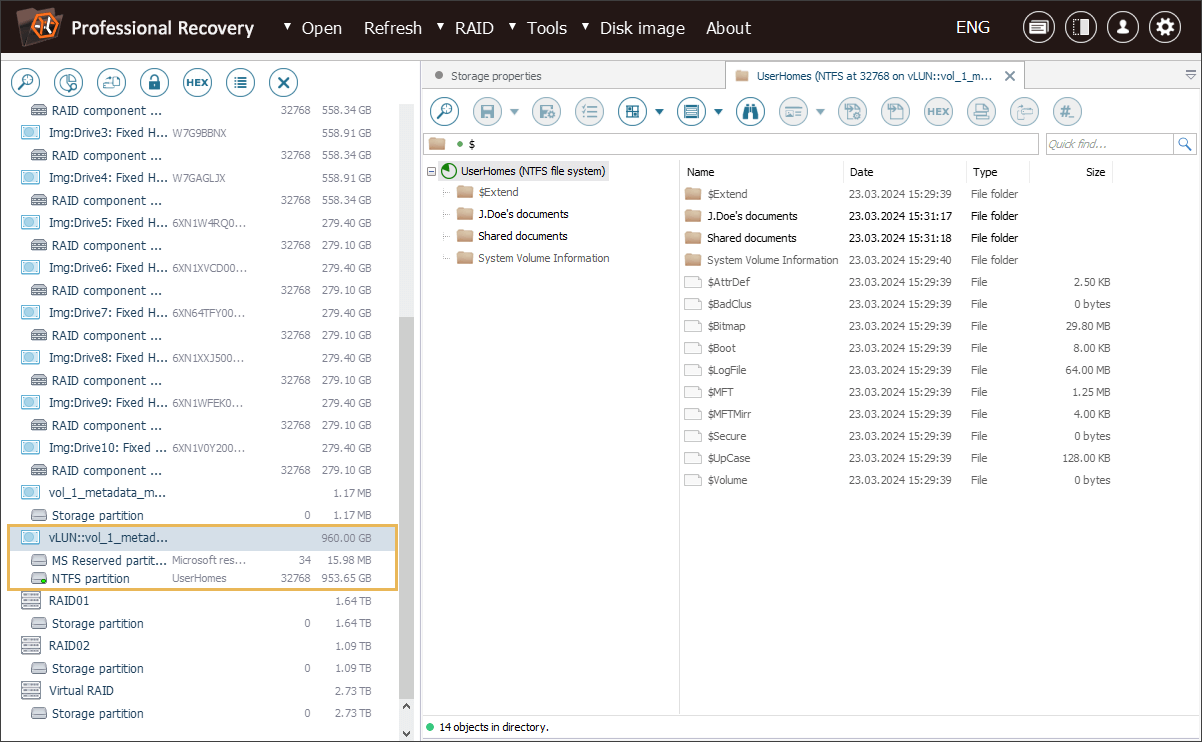
As a result, a new virtual storage will be mounted in the interface of UFS Explorer. It serves as a valid virtual representation of the SAN volume, ready for access or subsequent data recovery.
The reference SAN recovery procedure is also demonstrated in the following video tutorial:
Remote SAN recovery performed by professionals
The combination of technical expertise and extensive experience in software development lets SysDev Laboratories deliver qualified remote services for professional data recovery from distributed SAN systems.
By utilizing advanced software tools of our own production, our team can efficiently handle complex data loss scenarios that may take place in SAN environments. Whether dealing with software failures, corruption or accidental deletion, the company’s services are aimed to meet the highest standards of effectiveness, ensuring that critical data is recovered with maximum accuracy and with minimal downtime, regardless of the underlying infrastructure.
For estimation of the chances for successful data extraction, you will need to inform us about the type of the file system applied on the problem SAN and send us the image of its metadata. This metadata is used to analyze the peculiarities of data distribution and file names within the SAN system and does not contain any corporate or personal information.
The stages involved in professional SAN data recovery by specialists from SysDev Laboratories include:
- Case assessment. Our engineer connects to the client's system remotely via TeamViewer and performs free preliminary evaluation of the data loss incident. This includes assessing the extent of data loss, the chances of successful recovery and the approximate timeframes. Based on this initial assessment, the client is informed about the possible scope and cost of the recovery service.
- Data recovery. Once the client agrees to proceed, the engineer executes the necessary operations to recover the lost data. This may entail the reconstruction of RAID sets, data retrieval from damaged or corrupted volumes, search for lost file systems, etc. The client is kept abreast of the progress and quality of the recovery process. A portion of the restored data is then shown to the client in order to demonstrate the effectiveness of recovery efforts. If the customer accepts the provided quality, they should pay a half of the agreed service fee as a non-returnable payment.
- Finalization and data delivery. The recovery process is completed, and the data is transferred to a safe location specified by the client. The client pays the remaining part of the service fee. If the obtained quality is lower than initially expected, the fee may be discussed and reduced accordingly.
Should you require further details or wish to discuss your specific data recovery case, please feel free to contact us.
Last update: August 22, 2024