Data recovery from Buffalo's LinkStation and TeraStation Duo NAS
Buffalo Technology provides a wide range of NAS solutions for personal, home and small office use. These devices offer space-efficient shared data storage with access over a local network. Unfortunately, despite enhanced reliability of modern Network Attached Storages, they still remain exposed to failures and data loss.
This article describes the procedure of data recovery from popular two-disk LinkStation and TeraStation NAS solutions of Bufallo Technology using UFS Explorer RAID Recovery.
Warning! The instructions below assume that you have basic skills of manipulating hard drives. Any physical damage to the storage media may cause permanent data loss. If you are not completely sure about your competence in working with the internal components of the hardware, please, contact a provider of professional data recovery services.
Attention! This article contains details about the state of NAS after its resetting to factory defaults. Please read the article carefully for the information about data recovery from a failed device after its resetting.
Getting started
The most common causes of data loss from NAS include:
- The failure of one or several hard drives;
- Electrical damage or overheating of the appliance;
- Software issues or faulty firmware updates;
- Accidental deletion of important information due to user mistakes.
The chances for data recovery from NAS are closely linked to the factors that lead to the loss of its data. In case of any physical damage to the device, for example, due to electrical issues or overheating, as a rule, hard drives fail and data recovery is possible only after their physical repair in a specialized laboratory. If the loss of data occurred as a result of a logical failure, such as NAS re-initialization or just mistaken file deletion, hard drives are likely to remain intact and can be processed with the help of data recovery software.
Hint: More detailed information as to the prospects for successful data recovery can be found in the articles on data recovery specifities of different OS and chances for data recovery.
SysDev Laboratories offers the UFS Explorer software products for smooth do-it-yourself recovery of data from NAS units of Buffalo Technology. UFS Explorer RAID Recovery is specially geared for work with RAID systems of various configurations and is an optimal solution to the problem of data loss from NAS devices of different manufacturers. UFS Explorer Professional Recovery deploys professional approach to data recovery and features an embedded toolset for efficient RAID reconstruction and recovery, along with numerous other instruments and possibilities. Each of the utilities applies powerful mechanisms, allowing you to achieve maximum recovery result and is 100% reliable, guaranteeing complete safety of the lost NAS data.
It should be noted that as NAS devices don't provide low-level access to the data on their disks, in order to perform data recovery you will have to disassemble the storage and connect its hard drives to a computer as detailed below.
Preparing hardware
Software-based data recovery from LinkStation and TeraStation can be carried out when:
- At least one of the drives is operable in the RAID 1 (Mirror) configuration;
- Both hard drives are in the working order in RAID 0 or JBOD.
Hint: All the basic RAID concepts are described in the peculiarities of data organization on RAID.
To to make the hard drives ready for the actual data recovery, you will need to complete the following steps:
- Shut down your NAS.
- Extract the drives through the front panel: open the door and eject the enclosures.
Hint: If you are not sure how to remove the NAS drives correctly, please, refer to the video tutorial.
- Mark the drives (Left/Right for Linkstation and Top/Bottom for Terastation) to be able to re-assemble the device in the same order.
- Connect the intact drives to the computer.
Hint: You can plug the disk into the motherboard of the computer or сonnect the drive externally using a USB to SATA/IDE adapter as described in the instructions.
Hint: Please familiarize yourself with the article to choose the right OS for NAS recovery.
When the NAS drives are successfully connected to a PC, you can run the software and start data recovery.
Data layout
LinkStation and TeraStation have equal data layout:
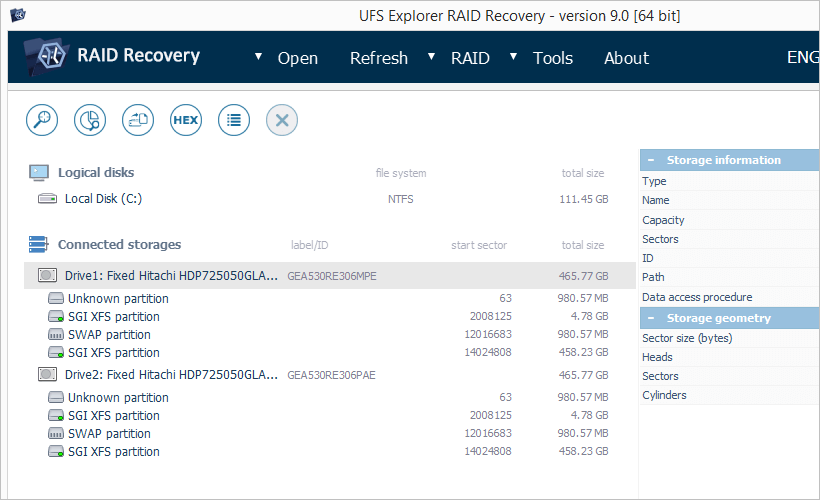
Figure 1. NAS drives in UFS Explorer RAID Recovery.
- The actual view depends on the software version and edition;
- The actual sizes of the drives depend on the NAS model;
- The identified partitions depend on the NAS model and the software version and edition;
- The extended partition (a partition with sub-partitions) is a container and will not be mentioned further on.
Each NAS drive has the same partition structure:
- Boot firmware partition. This partition contains files necessary to boot embedded custom Linux OS (no user data is stored here);
- Firmware partition. This partition contains system files of the embedded Linux operating system such as executables, configurations, etc. (there is no user data here);
- Swap partition. This partition is used by embedded Linux OS to extend RAM (memory swapping);
- Data (storage) partition.This partition contains user files. For RAID configurations data partitions of each drive are combined into a software RAID virtual device.
Note: Depending on the retailer and the model, NAS can contain from two and up to four partitions on each drive. The Data partition is the largest one (takes up 95-99% of the entire disk space) and has no sub-partitions.
For RAID 1 a valid XFS file system appears on the data partition of each NAS drive. For SPAN or RAID 0 the first drive contains 'SGI XFS' on the data partition and the second one contains a 'Raw partition'.
Diagnostics and data recovery
To diagnose and virtually rebuild your NAS configuration follow these steps:
Step 1. Check the file system on data partitions.
As has been mentioned, for the mirror RAID 1 configuration data recovery is possible when at least one of the drives is connected. Yet, you may need to attach the second one for further diagnostics in cases when:
- the drive doesn't show the SGI XFS file system on the data partition;
- the SGI XFS file system is unreadable (reports read error);
- you can't find some of the files available on the device after data loss.
You will get one of the following results:
- Both drives contain the SGI XFS file system on the data partitions (see Fig.1)
NAS is configured to RAID 1 (mirror). The file system is readable on both drives. Data recovery is possible from any of the drives. - Both drives contain RAW partitions indicated with a gray icon (see Fig.1)
The file system seems to be destroyed or NAS worked as an iSCSI target. In this case, your NAS requires professional data analysis and data recovery services. - One of the drives contains SGI XFS and the other one – a RAW partition (see Fig.1)
NAS was configured to RAID 0 (the default configuration) or SPAN. The drive with the SGI XFS file system will be referred to as 'first' and the one with a RAW partition – as 'second'. Explanations as to further analysis you will find in Step 2.
After the analysis you can start data recovery from any of the RAID 1 drives. If you fail to recover your data, please, use professional data recovery services.
Step 2. Open the SGI XFS file system on the data partition of the first drive.
One of the following results may occur:
- The file system is opened and you can see the "share" folder:
NAS must have been configured to SPAN. In rare cases this result appears for RAID 0 with the stripe size over 64 KB; - The file system is unreadable:
NAS was configured to RAID 0.
If you run a scan for at least partial file system reconstruction, you'll get a more precise result. If the recovered files have valid content, it is a JBOD or RAID 1 configuration, if file contents are invalid, this is RAID 0.
Step 3. Verify the RAID configuration.
For SPAN (JBOD):
- Check the content of the "share" folder on the first drive;
- If the folder contains files, all of them can be opened using the hexadecimal preview tool of UFS Explorer;
- If all files can be opened, the second drive can be an unused or a failed component of RAID 1. Try to recover the data from the first drive;
- If the files or folders are missing or some files cannot be opened, this is a SPAN.
The SPAN configuration on TeraStation and LinkStation products doesn't fit to the data partition and cannot be aligned without the knowledge of the XFS file system or professional analysis.
For RAID 0:
Assemble RAID 0 in UFS Explorer:
Click the 'Build RAID' button to invoke RAID Builder:

Figure 2. RAID Builder tool button in UFS Explorer.
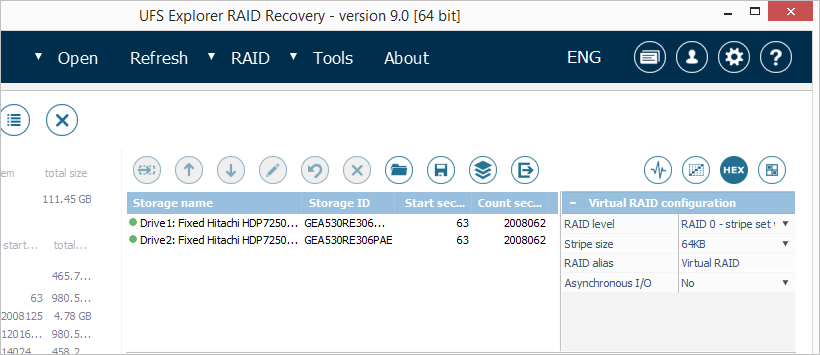
Figure 3. RAID Builder tool in UFS Explorer.
After this:
- Switch the 'RAID mode' to 'RAID 0 (Stripe set without redundancy)';
- Add data partitions of each drive to the list of the components following the drives order;
- Adjust the stripe size if required (Buffalo products use the 64 KB stripe size by default);
- Press 'Build this RAID'.
When you assemble virtual RAID 0, it will appear as a new storage with the SGI XFS file system in the tree of storages. If you open this file system, you will get one of the following results:
- The file system is unreadable:
The stripe size is invalid. Open the RAID configuration and adjust the stripe size. - The file system is readable and the "share" folder contains at least some of your data:
the RAID configuration was successfully assembled and you can proceed to data recovery. - The file system is readable but the "share" folder is empty:
your NAS storage seems to be reset to the default configuration state.
RAID 0 emergence: possible reasons and chances for recovery
If the RAID configuration was assembled correctly, the file system is readable but the "share" folder appears to be empty, RAID 0 is likely to have been created on your NAS. To assess the chances for data recovery in this case and choose the right course of action, you need to analyze the reason for RAID 0 emergence.
The most probable cases for the emergence of RAID 0 on your NAS are:
- You have configured your NAS device to maximum speed/capacity;
- The device was reset to the factory defaults.
NAS re-configuration. After re-configuration of the NAS box the lost data remains recoverable. You should assemble the storage as described in Step 3. All good files will appear in the 'share' folder of the Virtual RAID. If you don't find the files, scan the Virtual RAID for lost information.
NAS resetting. After virtual re-assembling of NAS as described in Step 3 Virtual RAID will display a new default file system and contain an empty 'share' folder. The chances for recovery depend on the original NAS configuration:
- Original RAID 0 (stripe set)
- If the previous configuration was set as "maximum speed and capacity" and the drives weren't swapped before the reset, the file system of NAS was formatted. To recover the missing information scan the storage for lost data.
- If the drives were swapped before NAS reset, rebuild RAID as described in Step 3 but with the reverse order of the drives. As a result, you will get Virtual RAID with a RAW partition. To recover the missing information scan the storage for lost data.
- Original RAID 1 (mirror) If the previous configuration was with half of full capacity and the redundant data sustained more serious damage as a new XFS file system was written with different parameters. Ordinary file system reconstruction cannot give the expected results.
Scan the second drive of your NAS, the one with a RAW data partition. If this doesn't provide any positive result, it's recommended to use professional data recovery services. - Original SPAN The file systems remain almost equal. To recover the data destroy invalid XFS superblocks produced with the RAID 0 format. After this re-assemble RAID as SPAN and run file system reconstruction. Note that modification of the disk structures and SPAN aligning require the knowledge of the XFS file system or professional data recovery assistance.
NAS resetting destroys some of on-disk structures possibly resulting in the permanent loss of some files, folders or file names. It's recommended to analyze the entire tree of the "reconstructed file system" for files you are looking for. Some files and folders can appear under the "[Parent unknown]" virtual folder with numbers in file/folder names.
Final notes
In case of any sign of physical damage, it's strongly recommended to bring your NAS to a specialized data recovery laboratory in order to avoid data loss. Yet, if you have the appropriate skills to perform the procedure, please first familiarize yourself with the peculiarities of work with defective disks in UFS Explorer.
If you feel unsure about conducting data recovery operations from your NAS by yourself or not confident about RAID configuration in your NAS, feel free to use professional services provided by SysDev Laboratories.
For data recovery professionals SysDev Laboratories offer expert NAS storage analysis on a commercial basis.
Last update: August 22, 2022